
Excertos do catálogo

QUICK GUIDE
Abrir o catálogo na página 1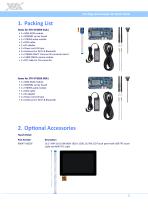
VIA Edge AI Developer Kit Quick Guide 1. Packing List Items for STK-VT6093-01A1 • 1 x SOM-9X20 module • 1 x SOMDB2 carrier board • 1 x VT6093 audio module • 1 x COM cable • 1 x AC adapter • 1 x Power cord US type • 2 x Antennas for Wi-Fi & Bluetooth • 1 x VT6093-CAM-T Camera-CSI converter board • 1 x 13MP CMOS camera module • 1 x FPC cable for CSI connector Items for STK-VT6093-00A1 • 1 x SOM-9X20 module • 1 x SOMDB2 carrier board • 1 x VT6093 audio module • 1 x COM cable • 1 x AC adapter • 1 x Power cord US type • 2 x Antennas for Wi-Fi & Bluetooth 2. Optional Accessories Touch Panel Part...
Abrir o catálogo na página 2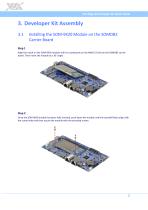
VIA Edge AI Developer Kit Quick Guide 3. Developer Kit Assembly 3.1 Installing the SOM-9X20 Module on the SOMDB2 Carrier Board Step 1 Align the notch on the SOM-9X20 module with its counterpart on the MXM 3.0 slot on the SOMDB2 carrier board. Then insert the module at a 30° angle. Step 2 Once the SOM-9X20 module has been fully inserted, push down the module until the standoff holes align with the screw holes and then secure the module with the provided screws.
Abrir o catálogo na página 3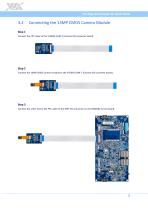
VIA Edge AI Developer Kit Quick Guide 3.2 Connecting the 13MP CMOS Camera Module Step 1 Connect the FPC cable to the VT6093-CAM-T (Camera-CSI converter board). Step 2 Connect the 13MP CMOS camera module to the VT6093-CAM-T (Camera-CSI converter board). Step 3 Connect the other end of the FPC cable to the MIPI CSI connector on the SOMDB2 carrier board.
Abrir o catálogo na página 4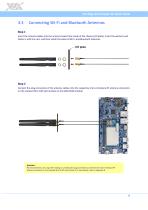
VIA Edge AI Developer Kit Quick Guide 3.3 Connecting Wi-Fi and Bluetooth Antennas Step 1 Insert the antenna cables into the antenna holes from inside of the chassis (I/O plate). Insert the washers and fasten it with the nuts, and then install the external Wi-Fi and Bluetooth antennas. Step 2 Connect the plug connectors of the antenna cables onto the respective micro-miniature RF antenna connectors on the onboard Wi-Fi+BT LGA module on the SOM-9X20 module. Reminder: We recommend to use a Jig when mating or unmating the plug connector to and from the micro-miniature RF antenna connector on...
Abrir o catálogo na página 5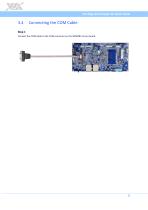
VIA Edge AI Developer Kit Quick Guide 3.4 Connecting the COM Cable Step 1 Connect the COM cable to the COM connector on the SOMDB2 carrier board.
Abrir o catálogo na página 6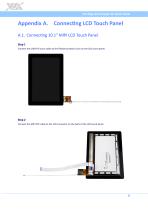
VIA Edge AI Developer Kit Quick Guide Appendix A. Connecting LCD Touch Panel A.1. Connecting 10.1" MIPI LCD Touch Panel Step 1 Connect the USB FPC touch cable to the flexible printed circuit on the LCD touch panel. Step 2 Connect the MIPI FPC cable to the LCD connector on the back of the LCD touch panel.
Abrir o catálogo na página 7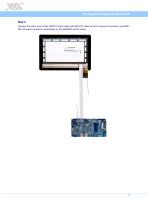
VIA Edge AI Developer Kit Quick Guide Step 3 Connect the other ends of the USB FPC touch cable and MIPI FPC cable to the P-Cap touch connector and MIPI DSI LCD panel connector respectively on the SOMDB2 carrier board.
Abrir o catálogo na página 8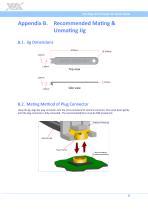
VIA Edge AI Developer Kit Quick Guide Appendix B. Recommended Mating & Unmating Jig B.1. Jig Dimensions B.2. Mating Method of Plug Connector Using the jig, align the plug connector onto the micro-miniature RF antenna connector. Then push down gently until the plug connector is fully connected. The recommended force must be 30N (maximum).
Abrir o catálogo na página 9
Taiwan Headquarters 1F, 531 Zhong-zheng Road, Xindian Dist., New Taipei City 231 Taiwan 940 Mission Court Fremont, CA 94539, USA 3-15-7 Ebisu MT Bldg. 6F, Higashi, Shibuya-ku Tokyo 150-0011 Japan Tsinghua Science Park Bldg. 7 No. 1 Zongguancun East Road, Haidian Dist., Beijing, 100084 China Europe Email: embedded@via-tech.eu
Abrir o catálogo na página 10Todos os catálogos e folhetos técnicos VIA Technologies
-
 VIA Mobile360 D700 AI Dash Cam
2 Páginas
-
 PROGRAMMING GUIDE VIA Smart ETK SDK
36 Páginas
-
 VIA ARTiGO A820-Android EVK v5.0.6
28 Páginas
-
 AMOS-825-Android EVK v5.0.3
22 Páginas
-
 VIA Mobile360 ADAS
2 Páginas
-
 VIA Mobile360
2 Páginas
-
 COMe-9X90
3 Páginas
-
 EMIO-2550
2 Páginas
-
 AMOS-3005
3 Páginas
-
 AMOS-820
3 Páginas
-
 VIA_EPIA-E900
2 Páginas
-
 VIA_VTS-8589
2 Páginas
-
 VIA_SOM-6X50
3 Páginas
-
 VIA_QSM-8Q60
3 Páginas
-
 ALTA DS 4K
2 Páginas
-
 ARTiGO_A820
2 Páginas
-
 VIA_ARTiGO_A600
2 Páginas
-
 VIA_AMOS-825
2 Páginas
-
 ETX-8X90-10GR
3 Páginas
-
 EPIA-M920
2 Páginas
-
 ARTiGO A1300
3 Páginas
-
 CX700M (Single-Chip)
2 Páginas
-
 VX900/H
2 Páginas
-
 VX11H
VX11H2 Páginas
-
 VIA C7®
2 Páginas
-
 Eden® ULV Fanless
2 Páginas
-
 Eden® X2 (Dual Core)
2 Páginas
-
 QuadCore E-Series
2 Páginas
-
 VAB-600 (Pico-ITX)
2 Páginas
-
 VIA AMOS 800
2 Páginas
-
 VAB-1000
2 Páginas
-
 ARTiGO A900
2 Páginas
-
 VAB-820
2 Páginas
-
 VIPRO VP7910
3 Páginas
-
 VAB-800
2 Páginas
-
 VIA EPIA-M840
2 Páginas
-
 VIA EPIA-M850
2 Páginas
-
 VIA EPIA-M860
2 Páginas
-
 VIA VX900
2 Páginas
-
 VIA Nano X2
2 Páginas
-
 VIA EPIA-P720
2 Páginas
-
 VIA EPIA-P900
2 Páginas
-
 VIA EITX-3000
4 Páginas
-
 VIA EITX-3001
4 Páginas
-
 VIA EITX-3002
5 Páginas
-
 VIA EPIA EN
2 Páginas
-
 VIA EPIA-M830
2 Páginas
-
 VIA VB7001
2 Páginas
-
 VIA VB8001
2 Páginas
-
 VIA VB8004
2 Páginas
-
 VIA CN700
2 Páginas
-
 VIA CN896
2 Páginas
-
 VIA VX800
2 Páginas
-
 VX855
VX8552 Páginas
-
 VIA EPIA-M900
2 Páginas
-
 VIA QuadCore Flyer
2 Páginas
