
Excertos do catálogo

PORTABLE RAIL PROFILOMETER PRP Series User's manual www.riftek.com info@riftek.com
Abrir o catálogo na página 1
Portable Rail Profilometer. PRP Series
Abrir o catálogo na página 2
Portable Rail Profilometer. PRP Series
Abrir o catálogo na página 3
Portable Rail Profilometer. PRP Series Safety precautions and measurement conditions · Prior to mounting the profilometer onto the rail, areas of contact and laser scanning of the rail surface should be thoroughly cleaned from dirt. · When mounting the module on the rail, do not allow heavy shocks of its support against the rail. · The output windows of the laser sensor must be carefully inspected and cleaned. · Do not use laser module in locations close to powerful light sources. The profilometer has been developed for use in industry and meets the requirements of the following Directives:...
Abrir o catálogo na página 4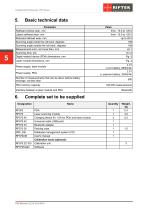
Portable Rail Profilometer. PRP Series Basic technical data Parameter Railhead vertical wear, mm Lateral railhead wear, mm Redused railhead wear, mm Scanning angle inside the rail track, degrees Scanning angle outside the rail track, degrees Measurement error, not more than, mm Scanning time, sec Digital readout device (PDA) dimensions, mm Laser module dimensions, mm Fig. 3 3.7V Li-ion battery, 6800mАh 3.7V Li-polymer battery, 3300mАh Power supply, laser module Power supply, PDA Number of measurements that can be taken before battery recharge, not less than PDA memory capacity Interface...
Abrir o catálogo na página 5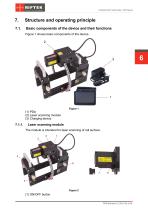
Portable Rail Profilometer. PRP Series Structure and operating principle Basic components of the device and their functions Figure 1 shows basic components of the device. (1) PDA (2) Laser scanning module (3) Charging device Laser scanning module The module is intended for laser scanning of rail surface. (1) ON/OFF button PRP [Revision 2.0.0] 15.03.2018
Abrir o catálogo na página 6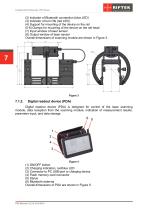
Portable Rail Profilometer. PRP Series (2) Indicator of Bluetooth connection (blue LED) (3) Indicator of turn ON (red LED) (4) Support for mounting of the device on the rail (5-6) Clamps for mounting of the device on the rail head (7) Input window of laser sensor (8) Output window of laser sensor Overall dimensions of scanning module are shown in Figure 3. Digital readout device (PDA) Digital readout device (PDA) is designed for control of the laser scanning module, data reception from the scanning module, indication of measurement results, parameter input, and data storage. (1) ON/OFF...
Abrir o catálogo na página 7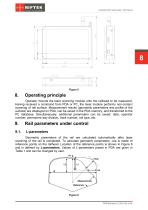
Portable Rail Profilometer. PRP Series Operating principle Operator mounts the laser scanning module onto the railhead to be measured. Having received a command from PDA or PC, the laser module performs non-contact scanning of rail surface. Measurement results (geometric parameters and profile of the surface) are displayed on PDA, can be saved in the PDA memory, and transferred to the PC database. Simultaneously, additional parameters can be saved: date, operator number, permanent way division, track number, rail type, etc. Rail parameters under control L-parameters Geometric parameters of...
Abrir o catálogo na página 8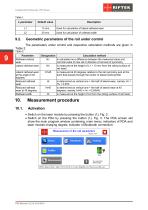
Portable Rail Profilometer. PRP Series Default value Used for calculation of lateral railhead wear Used for calculation of railhead width Geometric parameters of the rail under control The parameters under control and respective calculation methods are given in Table 2. Table 2. Parameter Designation Calculation method Railhead vertical Hv is calculated as a difference between the measured value and wear nominal value of new rail in direction of rail axis of symmetry Lateral railhead wear Hh is measured at the height of L1 = 13 mm from the rolling surface of rail head Lateral railhead wear...
Abrir o catálogo na página 9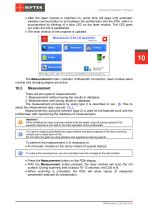
Portable Rail Profilometer. PRP Series · After the laser module is switched on, some time will pass until automatic wireless communication is set between the profilometer and the PDA, which is accompanied by blinking of a blue LED on the laser module. The LED goes out when the link is established. · The main window of the program is updated: 10 The Measurement button, indicator of Bluetooth connection, laser module serial number and charging degree are active. There are two types of measurements: 1. Measurements without saving the results to database. 2. Measurements with saving results to...
Abrir o catálogo na página 10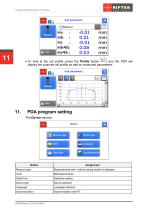
Portable Rail Profilometer. PRP Series · To look at the rail profile, press the Profile button , and the PDA will display the scanned rail profile as well as measured parameters: PDA program setting The Device window: Measure type Measurements with / without saving results to database Date/time setting Device type Device selection Language selection
Abrir o catálogo na página 11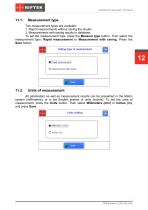
Portable Rail Profilometer. PRP Series Measurement type Two measurement types are available: 1. Rapid measurements without saving the results. 2. Measurements with saving results to database. To set the measurement type, press the Measure type button. Then select the measurement type: Rapid measurement or Measurement with saving. Press the Save button. All parameters as well as measurement results can be presented in the Metric system (millimeters), or in the English system of units (inches). To set the units of measurement, press the Units button. Then select Millimeters (mm) or Inches...
Abrir o catálogo na página 12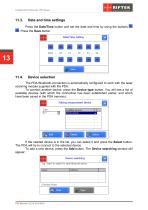
Portable Rail Profilometer. PRP Series Date and time settings Press the Date/Time button and set the date and time by using the buttons . Press the Save button. Device selection The PDA Bluetooth-connection is automatically configured to work with the laser scanning module supplied with the PDA. To connect another device, press the Device type button. You will see a list of available devices (with which the connection has been established earlier, and which have been saved in the PDA memory): If the needed device is in the list, you can select it and press the Select button. The PDA will...
Abrir o catálogo na página 13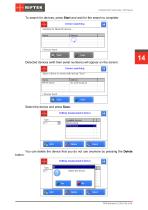
Portable Rail Profilometer. PRP Series To search for devices, press Start and wait for the search to complete: Detected devices (with their serial numbers) will appear on the screen: Select the device and press Save. You can delete the device that you do not use anymore by pressing the Delete button.
Abrir o catálogo na página 14Todos os catálogos e folhetos técnicos RIFTEK EUROPE
-
 PRODUCT CATALOG 2025
44 Páginas
-
 RF603 Series Manual
49 Páginas
-
 RF602 Series Manual
33 Páginas
-
 RF603HS Series Manual
36 Páginas
-
 RF609 (RF609Rt) Series Manual
33 Páginas
-
 RF600 Series Manual
46 Páginas
-
 RF605 Series Manual
29 Páginas
-
 RF60i Series Manual
46 Páginas
-
 RF62x Manual
174 Páginas
-
 RF25x Series Manual
34 Páginas
-
 RF651 Series Manual
32 Páginas
-
 RF656 Series Manual
32 Páginas
-
 RF656XY Series Manual
33 Páginas
-
 RF656.2D, RF657.2D, RF657R.2D Series Manual
104 Páginas
-
 Laser probes Manual
14 Páginas
-
 Pipe ID Control System Manual
18 Páginas
-
 Width Measurement System RF590 Manual
21 Páginas
-
 Edge Sensor RF659 Series Manual
25 Páginas
-
 RF627Smart-Weld manual
103 Páginas
-
 PRODUCT CATALOG 2024
40 Páginas


