Excertos do catálogo
DINGS’ Servo Studio Manual DINGS’ Servo Studio Manual DS-BVS/BVM-Series
Abrir o catálogo na página 1
Table of Contents 1. Environment….………………………………………………………….….3 2.1.Screen Layout…..…………………………………………………………4 Environment (DINGS’ Servo Studio) runs on Microsoft Windows. The following operating systems are 3.1 DINGS’ Connecting CAN Communication……….……………………………………………………5 supported: 4. Drive Setup..…….………..……………………………………………………13 Windows 8 (32/64Bit) 4.1 Motor Setting………….…………….……………………………………………………….14 Windows 10 (32/64Bit) 4.2 Feedback Setting (Encoder)..…..……………………………………………………………17 supported in DINGS’ Servo Studio is listed below. As the supported 4.3 The Unitcommunication...
Abrir o catálogo na página 2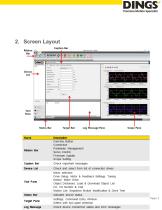
Screen Layout
Abrir o catálogo na página 3
Device Connection 3. Device Connection 3.1 Connecting CAN Communication 3.1.1 Connecting method for CAN communication (1) Execute DINGS’ Servo Studio and click [Connect] in the Ribbon Bar (2) Select Connection Type in the Connection Window Select Type corresponding to Kvaser CAN, Peak-System CAN, or Zhcxgd CAN (3) Select CAN bitrate (Default: 1M bps) Set ID Scan Range. (Drive default ID = 1) If the Device ID is known, set the range according to the ID. To connect multiple drives, the ID must be set differently for each drive before connecting the drive.
Abrir o catálogo na página 4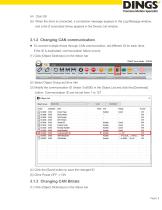
(5) When the drive is connected, a connection message appears in the Log Message window, and a list of connected drives appears in the Device List window. 3.1.2 Changing CAN communication To connect multiple drives through CAN communication, set different ID for each drive. If the ID is duplicated, communication failure occurs. (1) Click [Object Dictionary] on the ribbon bar (2) Select Object Group as Drive Info (3) Modify the communication ID (Index: 0x5000) in the Object List and click the [Download] button. Communication ID can be set from 1 to 127 (4) Click the [Save] button to save...
Abrir o catálogo na página 5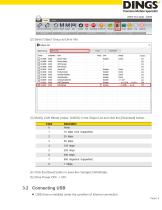
Device Connection (2) Select Object Group as Drive Info (3) Modify CAN Bitrate (Index: 0x5002) in the Object List and click the [Download] button.. (4) Click the [Save] button to save the changed CAN Bitrate. (5) Drive Power OFF -> ON 3.2 Connecting USB USB drive is installed under the condition of Internet connection. Page | 6
Abrir o catálogo na página 6
USB drives are installed differently depending on the servo drive model. Device Connection When connecting the servo drive to the PC for the first time, check the USB drive installed in the Device Manager and connect it using the appropriate connection method for the installed USB drive as shown in the figure below. (2) (3) (4) (5) (1) Connect PC and servo drive with USB cable (2) After executing DINGS Servo Studio, click the [Connect] button on the Ribbon Bar. Pag
Abrir o catálogo na página 7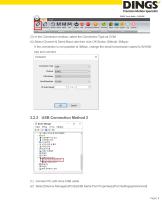
Device Connection (3) In the Connection window, select the Connection Type as COM (4) Select Channel & Serial Baud rate then click OK Button (Default: 3Mbps) If the connection is not possible at 3Mbps, change the serial transmission speed to 921600 bps and connect (1) Connect PC with drive USB cable (2) Select [Device Manager]-[Port]-[USB Serial Port Properties]-[Port Settings]-[Advanced]
Abrir o catálogo na página 8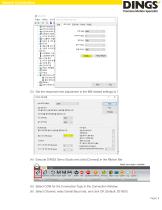
Device Connection (3) Set the response time adjustment in the BM-related settings to 1 (4) Execute DINGS Servo Studio and click [Connect] in the Ribbon Bar (5) Select COM for the Connection Type in the Connection Window (6) Select Channel, select Serial Baud rate, and click OK (Default: 921600) Page | 9
Abrir o catálogo na página 9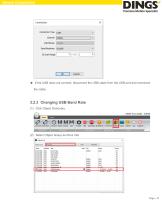
Device Connection ◈ If the USB does not connect, disconnect the USB cable from the USB port and reconnect the cable. 3.2.3 Changing USB Band Rate (1) Click Object Dictionary (2) Select Object Group as Drive Info
Abrir o catálogo na página 10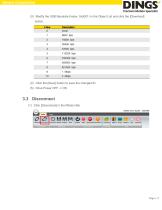
Device Connection (3) Modify the USB Baudrate (Index: 0x5001) in the Object List and click the [Download] button. Device Connection (4) Click the [Save] button to save the changed ID (5) Drive Power OFF -> ON 3.3 Disconnect (1) Click [Disconnect] in the Ribbon Bar
Abrir o catálogo na página 11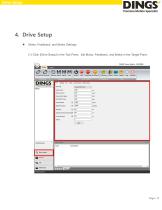
Drive Setup Motor, Feedback, and Brake Settings (1) Click [Drive Setup] in the Tool Pane. Set Motor, Feedback, and Brake in the Target Pane.
Abrir o catálogo na página 12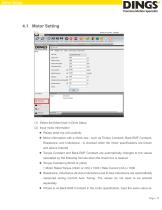
Drive Setup (1) Select the [Motor] tab in Drive Setup (2) Input motor information Please enter the unit carefully Motor information with a check box - such as Torque Constant, Back-EMF Constant, Resistance, and Inductance - is checked when the motor specifications are known and data is entered Torque Constant and Back-EMF Constant are automatically changed to the values calculated by the following formula when the check box is cleared. Torque Constant (μNm/A or μN/A) = Motor Rated Torque (mNm or mN) x 1000 / Rate Current (mA) x 1000 Resistance, Inductance (Q-Axis Inductance) and...
Abrir o catálogo na página 13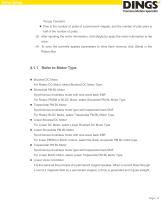
Drive Setup Torque Constant. Pole is the number of poles of a permanent magnet, and the number of pole pairs is half of the number of poles. (3) After inputting the motor information, click [Apply] to apply the motor information to the drive. (4) To save the currently applied parameters to drive flash memory, click [Save] in the Ribbon Bar. 4.1.1 Refer to Motor Type Brushed DC Motor For Rotary DC Motor, select Brushed DC Motor Type. Sinusoidal PM BL Motor Synchronous brushless motor with sine wave back EMF. For Rotary PMSM or BLDC Motor, select Sinusoidal PM BL Motor Type ...
Abrir o catálogo na página 14Todos os catálogos e folhetos técnicos Jiangsu DINGS' Intelligent Control Technology Co.
-
 General Catalog
295 Páginas
-
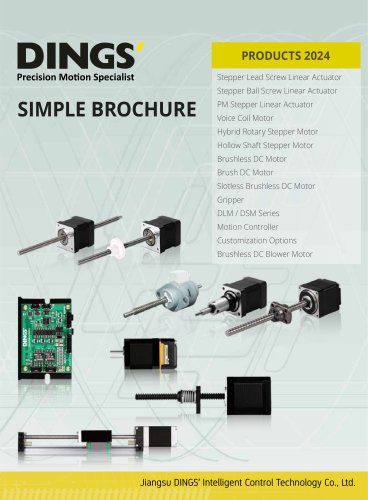 Simple Brochure
36 Páginas
-
 DS-BVS-FETC-FCAO_Hardware Manual
18 Páginas
-
 DS-BVS-BVM-Series_Reference Manual
181 Páginas
-
 DS-BVM-FETC-FCAO_Hardware Manual
15 Páginas
-
 DS-CL28_42-SA_Text_Technical Manual
49 Páginas
-
 DS-OL42-ICAO_Technical Manual
53 Páginas
-
 DS-OL42-IPD(IRS4)_Technical Manual
26 Páginas
-
 DS-CLS9-FETC-2I_Technical Manual
43 Páginas
-
 DS-CLS9-FETC-2A_Technical Manual
43 Páginas
-
 DS-CLS9-FETC_Technical Manual
17 Páginas
-
 DS-CLS9-FCAO_Technical Manual
59 Páginas
-
 Simple Tuner Pro Quick User Guide
22 Páginas
-
 DS-OLS10-FSC_Technical Manual
12 Páginas
-
 DS-OLS8-FRS4_Technical Manual
30 Páginas
-
 DS-OLS7-FRS4_Technical Manual
29 Páginas
-
 DS-OLS8-FPD_Technical Manual
16 Páginas
-
 DS-OLS4-FPD_Technical Manual
17 Páginas
-
 DS-OLS22_FPD_Technical Manual
16 Páginas
-
 DS-OLS2-FPD_Technical Manual
16 Páginas
-
 DS-CLS9-FRS4_Technical Manual
21 Páginas
-
 DS-CLS9-FRS4-01_Technical Manual
29 Páginas