
Catalog excerpts
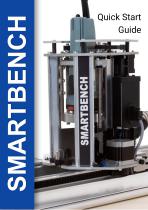
Quick Start Guide
Open the catalog to page 1
SMARTBENCH V1.2 – STANDARD, PRECISION AND PRECISIONPRO Yeti Tool Limited Unit 1 Westfield Court, Barnes Ground, Clevedon, Bristol. BS21 6FQ UK declare under our sole responsibility that the product(s): Product Name Model Number(s) Part Number(s) to which this declaration relates is(are) in conformity with the essential requirements and other relevant requirements of EU Directive 2006/42/EC (MD), EU Directive 2014/53/EU (RED) and EU Directive 2011/65/EU (RoHS2). Essential Requirements Health & Safety (RED article 3.1a) EN 62368-1:2014 EN 60950-1:2006+A1:2010+A12:2011+A2:2013 EN 62311:2008 EN...
Open the catalog to page 2
SMARTBENCH V1.2 – STANDARD, PRECISION AND PRECISIONPRO United Kingdom 18th February 2019 Authorised signature for and on behalf of Yeti Tool Limited Ed Sells - Director European Representative: Yeti Tool Limited Unit 1 Westfield Court Barnes Ground Clevedon Bristol BS21 6FQ United Kingdom Tel: +44 1275 217060 IMPORTANT This is a class 1 machine: The power supply MUST be earthed. Only use the power cable supplied. If you require a replacement, please contact your place of purchase. Unit 1 Westfield Court | Barns Ground | Clevedon | Bristol | BS21 6FQ | UK
Open the catalog to page 3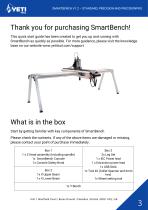
SMARTBENCH V1.2 – STANDARD, PRECISION AND PRECISIONPRO Thank you for purchasing SmartBench! This quick start guide has been created to get you up and running with SmartBench as quickly as possible. For more guidance, please visit the knowledge base on our website www.yetitool.com/support What is in the box Start by getting familiar with key components of SmartBench Please check the contents. If any of the above items are damaged or missing, please contact your point of purchase immediately. Box 1 1 x Z Head assembly (including spindle) 1x SmartBench Console 1x Console Safety Bond Box 2 1x X...
Open the catalog to page 4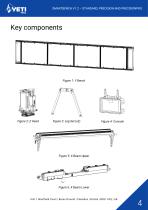
SMARTBENCH V1.2 – STANDARD, PRECISION AND PRECISIONPRO Figure 5: X Beam Upper Figure 6: X Beam Lower Unit 1 Westfield Court | Barns Ground | Clevedon | Bristol | BS21 6FQ | UK
Open the catalog to page 5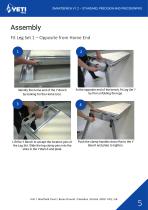
SMARTBENCH V1.2 – STANDARD, PRECISION AND PRECISIONPRO Assembly Fit Leg Set 1 – Opposite from Home End 1 Identify the home end of the Y Bench by looking for the Home Icon. At the opposite end of the bench, fit Leg Set 1 by first unfolding the legs. Lift the Y Bench to accept the location pins of the Leg Set. Slide the leg clamp pins into the slots in the Y Bench end plate. Push the clamp handles down flat to the Y Bench end plate to tighten. Unit 1 Westfield Court | Barns Ground | Clevedon | Bristol | BS21 6FQ | UK
Open the catalog to page 6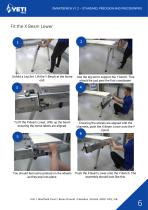
SMARTBENCH V1.2 – STANDARD, PRECISION AND PRECISIONPRO Unfold a Leg Set. Lift the Y Bench at the home end. Use the leg set to support the Y bench. This should be just past the first crossbeam. To fit the X Beam Lower, offer up the beam ensuring the home labels are aligned. Ensuring the wheels are aligned with the channels, push the X Beam Lower onto the Y bench. You should feel some preload on the wheels as they pop into place. Push the X Beam Lower onto the Y Bench. The assembly should look like this. Unit 1 Westfield Court | Barns Ground | Clevedon | Bristol | BS21 6FQ | UK
Open the catalog to page 7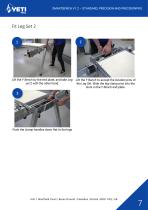
SMARTBENCH V1.2 – STANDARD, PRECISION AND PRECISIONPRO Lift the Y Bench by the end plate, and take Leg set 2 with the other hand. Lift the Y Bench to accept the location pins of the Leg Set. Slide the leg clamp pins into the slots in the Y Bench end plate. Push the clamp handles down flat to the legs Unit 1 Westfield Court | Barns Ground | Clevedon | Bristol | BS21 6FQ | UK
Open the catalog to page 8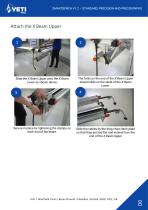
SMARTBENCH V1.2 – STANDARD, PRECISION AND PRECISIONPRO Attach the X Beam Upper 1 Slide the X Beam Upper onto the X Beam Lower as shown above. The forks on the end of the X Beam Upper should slide on the skids of the X Beam Lower. Secure in place by tightening the clamps on each end of the beam. Slide the cables by the drag chain latch plate so that they are laid flat and extend from the end of the X Beam Upper Unit 1 Westfield Court | Barns Ground | Clevedon | Bristol | BS21 6FQ | UK
Open the catalog to page 9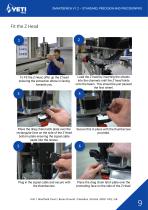
SMARTBENCH V1.2 – STANDARD, PRECISION AND PRECISIONPRO To Fit the Z Head, offer up the Z head ensuring the extraction elbow is facing towards you. Load the Z head by inserting the wheels into the channels until the Z head holds onto the beam. This should be just passed the first wheel. Place the drag chain latch plate over the rectangular face on the side of the Z Head bottom plate ensuring the signal cable seats into the recess. Secure this in place with the thumbscrew provided. Plug in the signal cable and secure with the thumbscrew. Place the drag chain latch plate over the protruding...
Open the catalog to page 10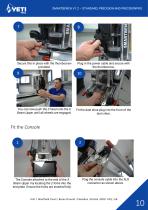
SMARTBENCH V1.2 – STANDARD, PRECISION AND PRECISIONPRO Secure this in place with the thumbscrew provided. Plug in the power cable and secure with the thumbscrew. You can now push the Z head onto the X Beam Upper until all wheels are engaged. Fit the dust shoe plug into the front of the dust shoe. The Console attaches to the end of the X Beam Upper my locating the 2 forks into the end plate. Ensure the forks are inserted fully. Plug the console cable into the XLR connector as shown above. Unit 1 Westfield Court | Barns Ground | Clevedon | Bristol | BS21 6FQ | UK
Open the catalog to page 11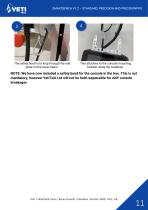
SMARTBENCH V1.2 – STANDARD, PRECISION AND PRECISIONPRO The safety bond is to loop through the end plate on the lower beam. This attaches to the console mounting bracket using the carabiner. NOTE: We have now included a safety bond for the console in the box. This is not mandatory, however YetiTool Ltd will not be held responsible for ANY console breakages Unit 1 Westfield Court | Barns Ground | Clevedon | Bristol | BS21 6FQ | UK
Open the catalog to page 12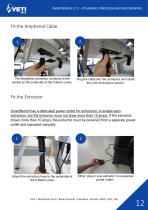
SMARTBENCH V1.2 – STANDARD, PRECISION AND PRECISIONPRO The Amphenol connector connects to the socket on the underside of the X Beam Lower. Plug the cable into the connector and rotate the cuff clockwise to secure. Fit the Extractor SmartBench has a dedicated power outlet for extractors, to enable autoextraction, but the extractor must not draw more than 10 amps. If the extractor draws more than 10 amps, the extractor must be powered from a separate power outlet and operated manually. Attach the extraction hose to the underside of the X Beam Lower Either: plug in your extractor to a separate...
Open the catalog to page 13All YETI Tool catalogs and technical brochures
-
 CONSOLE USER MANUAL
65 Pages
-
 EU Declaration of Conformity
1 Pages