
Catalog excerpts
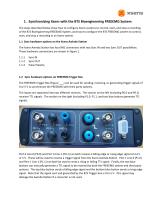
1. Synchronizing Xsens with the BTS Bioengineering FREEEMG System The steps described below show how to configure Xsens systems to control, start, and stop a recording of the BTS Bioengineering FREEEMG System, and how to configure the BTS FREEEMG system to control, start, and stop a recording in an Xsens system. 1.1 Sync hardware options on the Xsens Awinda Station The Xsens Awinda Station has four BNC connectors with two Sync IN and two Sync OUT possibilities. These hardware connections are shown in Figure 1. 1.1.1 1.1.2 1.1.3 Sync IN Sync OUT Pulse Polarity 1.2 Sync hardware options on FREEEMG Trigger Box The FREEEMG Trigger Box (Figure ___) can be used for sending, receiving, or generating trigger signals of 0 or 5 V to synchronize the FREEEMG with third party systems. The inputs are separated into two different sections. The section on the left (including P0.0 and P0.1) receives TTL signals. The section on the right (including P1.0, P1.1, and two blue buttons generate TTL signals. Port 0 Line 0 (P0.0) and Port 0 Line 1 (P0.1) can both receive a falling edge or rising edge signal of 3.3 V or 5 V. These will be used to receive a trigger signal from the Xsens Awinda Station. Port 1 Line 0 (P1.0) and Port 1 Line 1 (P1.1) can both be used to send a rising or falling TTL signal. Finally, the two blue buttons can manually generate a TTL signal to be received by both the FREEEMG system and third party
Open the catalog to page 1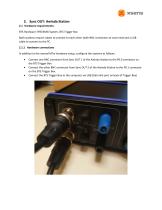
2. Sync OUT: Awinda Station 2.1 Hardware requirements: BTS Hardware: FREEEMG System, BTS Trigger Box Both systems require cables to connect to each other (with BNC connectors at each end) and a USB cable to connect to the PC. 2.1.1 Hardware connections In addition to the normal MTw hardware setup, configure the systems as follows: Connect one BNC connector from Sync OUT 1 of the Awinda Station to the P0.0 connector on the BTS Trigger Box. Connect the other BNC connector from Sync OUT 2 of the Awinda Station to the P0.1 connecto
Open the catalog to page 2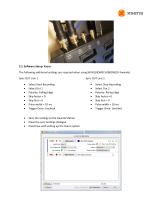
2.2 Software Setup: Xsens The following additional settings are required when using MVN (BIOMECH/BIOMECH Awinda) Sync OUT Line 1 Select Start Recording Select Out 1 Polarity: Falling Edge Skip factor = 0 Skip first = 0 Pulse width = 10 ms Trigger Once: Uncheck Save the settings to the Awinda Station Close the sync Settings dialogue Constinue with setting up the Xsens system Select Stop Reco
Open the catalog to page 3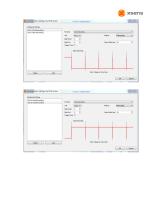
X Synchronization Settings: My MVN System __£ Configued Settings Out 1: Start Recording Out 2: Stop Recording Function Stop Recordng Trigger Once Q Stop Recordng Polarity Rang Edge
Open the catalog to page 4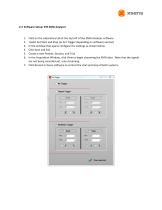
2.3 Software Setup: BTS EMG Analyzer 1. Click on the Laboratory tab at the top left of the EMG Analyzer software 2. Select Set Start and Stop (or Set Trigger depending on software version) 3. In the window that opens configure the settings as shown below 4. Click Save and Exit 5. Create a new Patient, Session, and Trial 6. In the Acquisition Window, click View to begin streaming the EMG data. Note that the signals are not being recorded yet, only streaming. 7. Click Record in Xsens software to control the start and stop of both systems. C No Trigger <~ Output Trigger | Sturt ~
Open the catalog to page 5All XSENS catalogs and technical brochures
-
Mti-600 Leaflet
2 Pages
-
Mti-600 DK Manual
22 Pages
-
MTi-600 Datasheet
33 Pages
-
MTw Awinda
2 Pages
-
MTi-G-710 Leaflet
2 Pages
-
MTi 100-series Leaflet
2 Pages
-
MTi 10-series Leaflet
2 Pages
-
MTi-7 Leaflet
2 Pages
-
MTi 1-series Data Sheet
35 Pages


