
Strain sensors for dynamic applications with integrated amplifier and digital zero adjustment
1 /
7Pages
Catalog excerpts
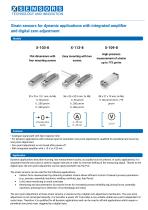
Strain sensors for dynamic applications with integrated amplifier and digital zero adjustment Models Flat dimensions with Easy mounting with two four mounting screws High-precision measurement of strains up to 775 µm/m Features • Analogue signal path with fast response time • For dynamic applications with external input for automatic zero point adjustments, qualified for periodical and recurring zero point adjustment • Zero point adjustment is not stored after power-off • With integrated amplifier with ± 10 V or 4-20 mA Application Dynamic applications describe recurring, fast measurement cycles, as usually found in presses. In cyclic applications, it is important that the zero point is tared in regular intervals in order to minimize drifting of the measuring signal. Thanks to the digital input, the zero point adjustment can be easily teached-in by the PLC. The strain sensors can be used for the following applications: • Indirect force measurement by detecting smallest strains allows efficient control of relevant process parameters (e.g., presses, assembly machines, welding machines, jigs, feed force) • Limit value monitoring to avoid overloads • Monitoring and documentation of process forces for increased process reliability (eg joining forces, assembly machines, pressing force, detection of tool breakage and wear) The zero point adjustment at these strain sensors is carried out by a digital zero adjustment mechanism. The zero point adjustment is not stored permanently, it is lost after a power off. It provides a non-volatile, stable zero point independent of cycle times. Therefore, it is qualified for all dynamic applications and can be used in all kind applications which require a periodical zero point
Open the catalog to page 1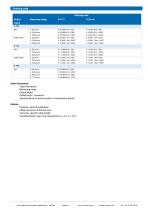
Order information: Type/Description Measuring range Output signal Cable length / connector Signal positive on tension (pull) or compression (push) Options: Customer specific calibration Cable connector at the free end Customer specific cable length Switched Reset-Logic: Zero adjustment at < 3 V or > 10 V Strain sensors for dynamic applications - DigTara
Open the catalog to page 2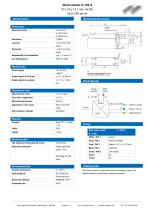
Strain sensor X-103-8 93 x 25 x 19.1 mm, 4x M6, Up to 360 pm/mMechanical dimensions! Performance. Electrical data Block diagram External zero reset Wiring Mechanical data Environmental data Ordering code This strain sensor is delivered without mounting screws. For detailed ordering information, please see page 2. Strain sensors for dynamic applications - DigTara
Open the catalog to page 3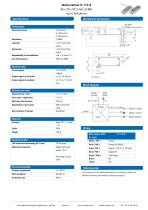
Electrical data External zero reset Wiring Reset (green) Mechanical data Environmental data Ordering code This strain sensor is delivered without mounting screws. For detailed ordering information, please see page 2. Strain sensors for dynamic applications - DigTara
Open the catalog to page 4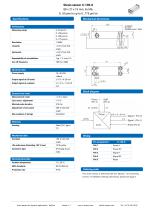
Strain sensor X-109-8 88 x 27 x 19 mm, 4x M6, 0...50 pm/m up to 0...775 pm/m Specifications! Mechanical dimensions External zero reset Block diagram Mechanical data This strain sensor is delivered with four M6x25 / 12.9 mounting screws. For detailed ordering information, please see page 2. Strain sensors for dynamic applications - DigTara
Open the catalog to page 5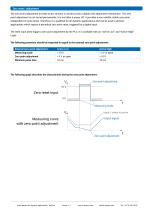
The zero point adjustment at these strain sensors is carried out by a digital zero adjustment mechanism. The zero point adjustment is not stored permanently, it is lost after a power off. It provides a non-volatile, stable zero point independent of cycle times. Therefore, it is qualified for all dynamic applications and can be used in all kind applications which require a periodical zero point reset, triggered by a digital input. The reset input does trigger a zero point adjustment by the PLC. It is available with an "Active Low" and "Active High" Logic. The following paramters should be...
Open the catalog to page 6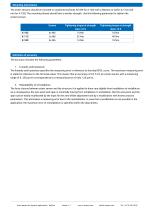
The strain sensors should be mounted on machined surfaces N7 (N9 for X-103) with a flatness to within 0,1 mm (0,5 mm for X-103). The mounting thread should have a similar strength. Use the following parameter for tighten the socket screws: The accuracy includes the following parameters: 1. Linearity and hysteresis The linearity and hysteresis specifies the measuring error in reference to the ideal BFSL curve. The maximum measuring error is stated in reference to the full scale value. This means that an accuracy of 0.5 % FS at a strain sensor with a measuring range of 0...250 pm/m...
Open the catalog to page 7All X-Sensors AG catalogs and technical brochures
-
XCS-131
7 Pages
-
X-134
6 Pages
-
Strain gauge indicator X-317
2 Pages
-
Indicator X-315
6 Pages
-
X-201-KA04 / X-201-IP04
7 Pages
-
DB_X-135_V00
5 Pages


