
- Catalogs
- Wire Belt Company Osterloh GmbH
- Belt joining tubes


Belt joining tubes

Belt joining tubes
- Relax the belt tension adjuster and unzip a single strand from the belt's upper end.
- Make the first cut and weave the short piece through the lower and upper belt spaces, turning clockwise to join the ends.
- Use pliers to loop the edges together and straighten the wire.
- Repeat the process for subsequent spaces, turning anti-clockwise as needed.
- Insert the joining tube over the wire sections, ensuring a minimum 5 mm gap from the Z-form.
- Use bolt cutters to secure the joining tube, avoiding the cut wire position.
Catalog excerpts

Flat-Flex® Tube Join Instructions Make Flat-Flex endless – with joining-tubes Application – To join a new belt or to repair a damaged belt. Please note: Before undertaking any other method of belt joining, including the tube method described here, it is important that a risk assessment is undertaken and that all applicable regulations are complied with. Selection of Tube Length The tube length should be a few millimeters less than 2/3rds of the belt space. If this joining tube length is not available then choose the nearest shorter available tube. Which tools do you need? • Safety Glasses • Needle Nose and /or Flat End pliers • Wire Straightening tool (optional). • Side-cutting pliers – Knippex Compact Bolt Cutters are ideal for both cutting of wire and crimping the tubes. You can order the wire straightener and pliers from our sales department. Where should the space wire be cut? The first cut is made at one third of the length of the space, exclusively in those spaces that are not driven – the odd numbered spaces. CAREFUL: The cut must ALWAYS be set so that the joining-tube can be pulled completely over the longer part of the cut wire section. These spaces are cut through and later put together again with the joining-tubes. To avoid confusion later, only cut off the part you need to use next. Space length The joining-tube must fit completely over 2/3
Open the catalog to page 1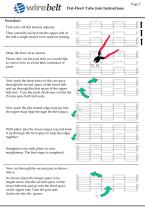
Flat-Flex® Tube Join Instructions Procedure: First relax off belt tension adjuster. Then carefully unzip from the upper end of the belt a single strand to be used for joining. Make the first cut as shown. Please only cut the part that you would like to weave next, to avoid later confusion of parts. Now push the short piece of the cut space through the second space of the lower belt and up through the first space of the upper belt end. Turn the parts clockwise, so that the Z-form joins both belt ends. Now push the join strand edge-loop up into the upper loop edge through the first space. With...
Open the catalog to page 2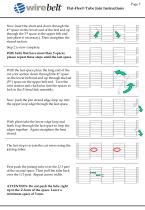
Flat-Flex® Tube Join Instructions Now insert the short end down through the 4th space on the lower end of the belt and up through the 3rd space in the upper belt end (use pliers if necessary). Then straighten the strand section. Step 2 is now complete. With belts that have more than 5 spaces please repeat these steps until the last space. With the last space place the long end of the cut wire section down through the 4th space on the lower belt end and up through the last (5th ) space on the upper belt end. Turn the wire section anti-clockwise into the spaces to lock in the Z-bend link assembly....
Open the catalog to page 3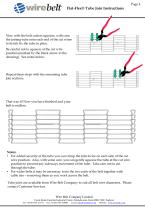
Flat-Flex® Tube Join Instructions Now with the bolt cutters squeeze, with care, the joining-tube onto each end of the cut wires to firmly fix the tube in place. Be careful not to squeeze at the cut wire position (marked by the black arrow in the drawing). See notes below. Repeat these steps with the remaining tube join sections. That was it! Now you have finished and your belt is endless. Notes: • For added security of the tube you can crimp the tube twice on each side of the cut wire position. Also, with some care, you can gently squeeze the tube at the cut wire position to prevent any sideways...
Open the catalog to page 4All Wire Belt Company Osterloh GmbH catalogs and technical brochures
 Wire Belt Corporate brochure
9 Pages
 Balanced Spiral Woven
4 Pages
 WB_Conveyors
2 Pages
 Clean-Sweep™ sprockets
1 Page
 Belt maintenance tool
1 Page
 Honeycomb
3 Pages
 Flex-Turn® Conveyor
2 Pages
 Straight Conveyor
2 Pages
 Ladder-Flex™
2 Pages
 Wire Belt Imagebrochure
9 Pages


Archived catalogs
 Compact-Grid™ 2021
1 Page
- Rail conveyor
- Belt conveyor
- Conveying belt
- Electric drive conveyor
- Industrial conveyor belt
- Flush grid conveyor belt
- Modular conveyor belt
- Conveyor belt for the food industry
- Curved conveyor
- Straight-toothed sprocket wheel
- Food conveyor belt
- Conveyor system
- Process conveyor belt
- Metal conveyor belt
- Flexible conveyor belt
- High-resistance conveyor belt
- Abrasion-resistant conveyor belt
- Conveyor belt for the chemical industry
- Heavy load conveyor belt
- Heat-resistant conveyor belt