- Catalogs
- Werner Electric GmbH
- 770 Series Spring-Up Screw Terminal Blocks
770 Series Spring-Up Screw Terminal Blocks
1 /10Pages

770 Series Spring-Up Screw Terminal Blocks
1 /10Pages
Catalog excerpts
PRODUCT SPECIFICATION Spring-Up Screw Terminal Blocks
Open the catalog to page 1
770 Series Spring-Up Screw Terminal Blocks
Open the catalog to page 2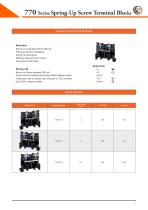
770 Series Spring-Up Screw Terminal Blocks General Purpose Terminal Blocks Standard Mount on a standard 35mm DIN rail Flame and shock resistance Variety of fuse blocks Marking strips and dust covers One-piece construction Approvals Spring Lift Mount on 35mm standard DIN rail Touch-down terminals with spring-loaded captive screws Fuse block with or without fuse indicator in LED or Neon. Up to 30A Jumper models Model Selection Model Number
Open the catalog to page 3
770 Series Spring-Up Screw Terminal Blocks Technical Data - Dielectric Strength Wire Sizes Terminal Torque DIN Rail Stop - Aluminum Dust Cover Strip Marking Ring Terminal Jumpers Fork Terminal Jumpers Insulation Resistance Operating Temperature Operating Humidity
Open the catalog to page 4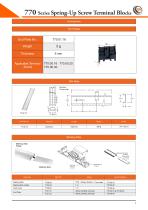
770 Series Spring-Up Screw Terminal Blocks Accessories End Plates End Plate No. 200 g Marking Strip Elements Marking Strip
Open the catalog to page 5
770 Series Spring-Up Screw Terminal Blocks Dust Cover With Black Color Insulation - PVC With Black Color Insulation - PVC With Black Color Insulation - PVC With Black Color Insulation - PVC With Black Color Insulation - PVC With Black Color Insulation - PVC
Open the catalog to page 6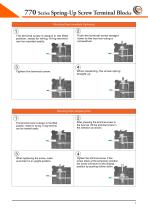
770 Series Spring-Up Screw Terminal Blocks Mounting Clips Immediate Tightening 1 The terminal screw is always in the lifted position, ready for wiring. A ring terminal can be inserted easily. 3 Tighten the terminal screw. Push the terminal screw straight down to the bus bar using a screwdriver 4 When loosening, the screw spring straight up Mounting Clips Temprary Hold 1 The terminal screw is always in the lifted position, ready for wiring. A ring terminal can be inserted easily. 3 When tightening the screw, make sure that it is in upright position. 2 After pressing the terminal screw to the bus...
Open the catalog to page 7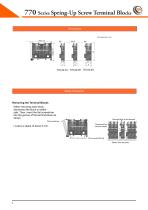
770 Series Spring-Up Screw Terminal Blocks Dimensions Safety Precaution Removing the Terminal Blocks When removing each block, disconnect the block on either side. Then, insert the flat screwdriver into the groove of the terminal block as shown Terminal block to be removed Flat screwdriver ∗ Leave a space of about 5 mm. Disconnect the terminal blocks ∗ 35-mm-wide DIN rail Detach from the join
Open the catalog to page 8
770 Series Spring-Up Screw Terminal Blocks Terms And Conditions Please read this catalog before purchasing any products. Please consult your WERNER representative for any clarifications or comments. Application Considerations WERNER shall not be responsible for conformity with any regulations, codes or standards that apply to use of the products. WERNER shall provide applicable third party certification documents identifying ratings and limitations of use that apply to the products in case of the customer's request. Prevent use the products for an application involving risk to life or property....
Open the catalog to page 9
Werner Elektrik GmbH Dorotheastraße, 2, 27568 Bremerhaven, Germany T: +49 711 - 6740 0552
Open the catalog to page 10All Werner Electric GmbH catalogs and technical brochures
 90 Series Mosaic
27 Pages
 70-75 Series Sockets
22 Pages
 65 Series SMPS
27 Pages
 31 Series Stack Lights
16 Pages
 26 Series PC Board Relays
13 Pages
 24 Series Ultra Slim Relays
11 Pages
 23 Series Power Relays
15 Pages
 22 Series Relays
12 Pages
 21 Series General Purpose Relays
19 Pages
 290 Series PCB Power Relays
7 Pages
 General Purpose Contactors 53
26 Pages
 Annunciator Windows 30 Series
17 Pages
 46 Series Foot Switches
10 Pages
 9000 Series Mosaic
24 Pages
 45 Series Catalogue
35 Pages
 LED Light Bar
11 Pages
 Annunciator Logic Controller
13 Pages
 Contactors
26 Pages
 MCB
MCB16 Pages
 Miniature Limit Switch
15 Pages
 Foot Switches
10 Pages
 General Purpose Limit Switches
16 Pages
 Annunciator Windows
15 Pages
 Miniature LED Indicators
11 Pages
 PC Board Relays - 25 Series
11 Pages
 20 Series - Power Relays
19 Pages
 Capacitive Sensors
31 Pages
 Photoelectric Sensors
50 Pages
 Inductive Sensors
144 Pages


- Power supply unit
- DC power supply
- AC/DC power supply
- Single-pole switch
- Challenge Power Transmission push-button switch
- Single-output power supply
- Switching relay
- Challenge Power Transmission technology switch
- Circuit breaker
- Wireless remote control
- Remote control with buttons
- Power supply with overload protection
- Challenge Power Transmission multipole switch
- Compact power supply
- Programmable logic controller
- DIN rail power supply
- Screw connection terminal block
- Electromechanical switch
- Control pedal