- Catalogs
- Waukesha Cherry-Burrell
- DTL Blender
DTL Blender
1 /26Pages

DTL Blender
1 /26Pages
Catalog excerpts
611 Sugar Creek Road Delavan, WI 53115 USA Tel: (800) 252-5200 or (262) 728-1900 Fax: (800) 252-5012 or (262) 728-4904 E-mail: [email protected] Web site: www.spx.com Information contained in this manual is subject to change without notice and does not represent a commitment on the part of SPX. No part of this manual may be reproduced or transmitted in any form or by any means, electronic or mechanical, including photocopying and recording, for any purpose, without the express written permission of SPX. Copyright © 2007 All Rights Reserved. Issued Date: December 22, 2000 Revised Date: February 2007...
Open the catalog to page 2
Waukesha Cherry-Burrell Waukesha Cherry-Burrell Warranty Seller warrants its products to be free from defect in materials and workmanship for a period of one (1) year from the date of shipment. This warranty shall not apply to products which require repair or replacement due to normal wear and tear or to products which are subjected to accident, misuse or improper maintenance. This warranty extends only to the original Buyer. Products manufactured by others but furnished by Seller are exempted from this warranty and are limited to the original manufacturer’s warranty. Seller’s sole obligation...
Open the catalog to page 4
Waukesha Cherry-Burrell Safety READ AND UNDERSTAND THIS MANUAL PRIOR TO INSTALLING, OPERATING OR SERVICING THIS EQUIPMENT Waukesha Cherry-Burrell recommends users of our equipment and designs follow the latest Industrial Safety Standards. At a minimum, these should include the industrial safety requirements established by: 1. Occupational Safety and Health Administration (OSHA), Title 29 of the CFR Section 1910.212- General Requirements for all Machines National Fire Protection Association, ANSI/NFPA 79 ANSI/NFPA 79- Electrical Standards for Industrial Machinery National Electrical Code, ANSI/NFPA...
Open the catalog to page 5
Waukesha Cherry-Burrell Introduction Description The DTL Blender is designed to introduce a dry material to a liquid and through a mechanical action provide a blended end product for a process. The DTL Blender has two sections, the dry material section and the liquid material section. The DTL Blender model WP3218MD is mounted on a base plate. The blender is driven by belts located under the base plate. These belts are driven by the drive motor mounted next to the blender assembly. A electrically controlled butterfly valve and control panel are standard equipment on model WP3218MD. The control...
Open the catalog to page 6
Waukesha Cherry-Burrell Installation Unpacking The model WP3218MD DTL Blender is packed in two separate shipping containers, the hopper is in one crate, the Blender and its components are packaged in another crate. The blender and drive motor are mounted to the base plate which is secured to a wood pallet. For best performance locate DTL Blender unit within 3 feet of the liquid source and in a position where the supply piping will be short and direct with a minimum number of elbows and fittings. When installing the unit consider accessibility for future cleaning and inspection. The adjusting...
Open the catalog to page 7
Waukesha Cherry-Burrell Maintenance The DTL Blenders are relatively maintenance free, requiring normal cleaning and inspection to ensure optimum performance. Cleaning DANGER: ALWAYS turn off the electrical power supply and Lock Out, using a locking device for which only the person doing the work has the key, before performing service or maintenance. 10. Rinse with hot water to facilitate quick drying and to eliminate water spotting. WARNING: Hydrochloric acid, even with inhibitors added, is not recommended for cleaning stainless. (Inhibitors are specific compounds that are added to cleaning chemicals...
Open the catalog to page 8
Waukesha Cherry-Burrell DTL Blender Disassembly It is recommended that periodic inspection of all parts of the DTL Blender be made to prevent malfunctions caused by worn or broken parts. At this point, disassembly will vary, depending on the type of seal the blender has refer to the following procedures specific to your seal arrangement. The following disassembly procedures cover the WP2116MD and WP3218MD models. Portions of the disassembly are identical for all models, but where differences occur the procedure for each model will be indicated. External Balanced Type D, F. Dg Seals: 1. Rotate...
Open the catalog to page 9
Waukesha Cherry-Burrell Deflector and Stub Shaft Removal 1. Loosen the two set screws and remove the drive collar. The remaining carbon seal, seal O-ring, cup and the follower may now be removed from the shaft. When removing the drive motor from the base plate, place a suitable block beneath the motor and turn the adjustable legs until the motor rests firmly on the block. To remove deflector, lift straight off. Remove the four nuts, bolts, and lock washers securing the motor to the base plate. With the motor resting on the blocks, lift the base plate off of the motor, leaving the stub shaft attached...
Open the catalog to page 10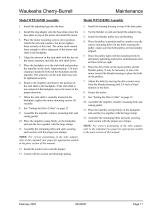
Waukesha Cherry-Burrell Install the adjusting legs into the base. Install the bearing housing on top of the base plate. Install the ring adapter onto the base plate, place the base plate on top of the motor and install the motor. Tip the blender on end and install the adapter ring. Install the blender pulley key and bushing. Place the motor mounting screws (4) in position. Attach the nuts and washers, but do not tighten them securely at this time. The motor must remain loose enough to allow alignment of the motor stub shaft in the backplate. Place the pulley in position and be certain to use...
Open the catalog to page 11
Waukesha Cherry-Burrell Disassembly of the Butterfly Valve Setting the Drive Collar In the event that repair or replacement becomes necessary, the following procedures are suggested: Blenders With D, F. Or DG Seals Install the deflector on the shaft. When the drive collar has been removed or the carbon seal has been replaced, the drive collar must be positioned on the shaft by one of two following methods: Drain and flush the piping surrounding the valve. To remove handle, remove the socket head capscrew found at the top of the valve handle with the proper sized allen wrench. Remove the nuts...
Open the catalog to page 12All Waukesha Cherry-Burrell catalogs and technical brochures
 Universal TS Series
8 Pages
 Manual Valves
12 Pages
 C-Series
8 Pages
 Universal® 2 Series
12 Pages
 Butterfly Valves 200 Series
4 Pages
 Universal® 1 Series
12 Pages
 Universal 2 Pump Seal
1 Page
 Universal 3 Pump Seal
1 Page
 WCB Control Tops
2 Pages
 Scraped Surface Heat Exchangers
12 Pages
 Filters And Strainers
4 Pages
 Universal 3 Series
12 Pages
 Votator® I
12 Pages
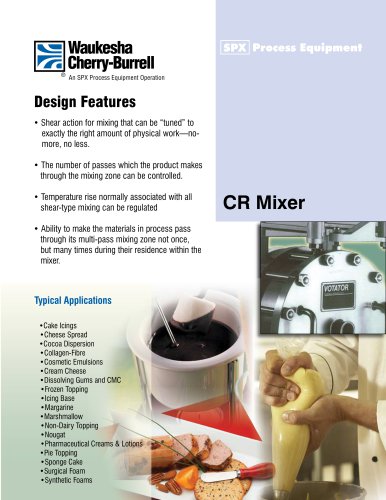
 CR Mixer_2016
2 Pages
 Colloid Mill
2 Pages
 Shear Pump
2 Pages
 WFI Centrifugal Pump
2 Pages
 Universal 420/520 High Capacity
12 Pages
 Postive Displacement Pumps
12 Pages
 Shear Pumps
2 Pages
 Colloid Mills
2 Pages
 Rising Stem Valve Sensor
1 Page
 Manual Ball Valve Key
4 Pages
 Over-Pressure Valves
12 Pages
 W75 Series PMO Mix Proof Valves
12 Pages
 W68 Series Control Valves
16 Pages
 FH-1723 - Universal II Series
12 Pages
 FH-1702 - 200 Centrifugal Pump
12 Pages
 BPE Fittings
32 Pages
 We Know Bacon - Flyer
1 Page
 Self-Priming Pump Flyer
2 Pages
 Close Coupled Pump Drive
1 Page
 Sanitary Fittings & Clamps
68 Pages
 Filters/Strainers
4 Pages


Archived catalogs
 CR Mixer_2007
2 Pages
 W45 Check Valves
2 Pages
 W72 RS Mix Proof Valves
4 Pages
 Mix Proof Valve Key
8 Pages
 Single Seat Valve Key
8 Pages
 Manual Valves (WCB-1858)
12 Pages
 Pumps “C” Series
4 Pages
 Universal Lobe Product Line
12 Pages
 Pump Remanufacturing Program
8 Pages
 420/520 UHC (EHP)
12 Pages


- Liebherr pump
- Liebherr industrial pump
- Liebherr electric pump
- Liebherr stationary pump
- Liebherr water pump
- Liebherr centrifugal pump
- Liebherr manual valve
- Liebherr self-priming pump
- Liebherr chemical pump
- Liebherr control valve
- Liebherr stainless steel valve
- Liebherr water valve
- Liebherr ball valve
- Liebherr stainless steel pump
- Lubricant pump
- Liebherr pneumatic valve
- Liebherr dynamic mixer
- Liebherr oil pump
- Liebherr suction pump