

Installation manual thermostat TP750

Installation manual thermostat TP750
The TP 750 thermostat is designed for controlling electric underfloor heating systems in indoor environments. It uses a floor sensor and a built-in room sensor to maintain desired temperatures efficiently.
The package includes a thermostat, a floor sensor, and a user manual.
Installation must be performed by a qualified electrician according to DIN-VDE rules and national laws. Ensure the power supply is disconnected before installation.
- Floor Temperature Sensor Installation: The sensor cable should be laid in a separate conduit and positioned under the heating mat.
- Connecting the Thermostat: Only qualified personnel should perform the electrical connection.
- Mounting the Thermostat: Install in a flush-mounted box and connect the necessary cables.
The display includes indicators for various functions such as temperature adjustments, modes, and status indicators.
- Switching ON/OFF: Hold the home button for 3 seconds.
- Activate Key Lock: Press the up button for 3 seconds.
- Display Sleep Mode: The display dims after 25 seconds of inactivity.
- Select Operating Mode: Use the home button to switch between modes.
- Comfort Mode: Maintains a set temperature continuously.
- ECO Mode: Similar to comfort mode but with a lower default temperature.
- Program Mode: Allows for scheduled temperature settings.
- Holiday Mode: Maintains a lower temperature during absences.
- F1 - Date and Time Setting: Adjust the current date and time.
- F2 - Program Mode Setting: Configure the schedule for program mode.
- F3 - Operation Time Reading: View the total operation time.
- F4 - Advanced Settings: Access additional configuration options.
Guidance on resolving common issues and understanding alarm indicators.
Specifications include power supply, maximum load, and sensor details.
Information on warranty coverage and how to file claims.
- Temperature range: +5 °C to +40 °C for regular operation, +5 °C to +20 °C in vacation mode.
- Power supply: 230 VAC, 50 Hz.
- Maximum switching current: 16 A.
- Power consumption: < 2 W.
- Weight: 140 g.
- Sensor selection and calibration.
- Temperature limits and adaptive start settings.
- Window open detection and frost protection.
- Display settings and reset options.
- Installation and maintenance should be performed by qualified personnel.
- Settings are retained for 30 days after power interruption.
- Error codes indicate sensor issues requiring professional inspection.
- 2-year warranty from purchase date, covering manufacturing defects.
- Excludes damage from improper handling or installation.
- Claims require proof of purchase and completed warranty documentation.
Catalog excerpts

BENUTZERHANDBUCH INSTRUCTIONS FOR USE AND INSTALLATION INSTRUCTIONS D'INSTALLATION E
Open the catalog to page 1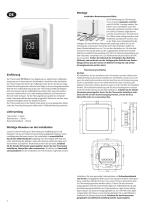
Einführung Der Thermostat TP 750 dient zur Regelung von elektrischen Fußbodenheizsystemen in Innenräumen (Heizmatten, Heizfolien oder Heizkabel). Der Thermostat hält die für den Fußboden oder die für den Raum eingestellte Wunschtemperatur aufrecht und trägt zu einem energiesparenden Betrieb Ihrer Fußbodenheizung bei. Der Thermostat bietet die Möglichkeit einer Steuerung des Fußbodenheizsystems über zwei Temperatursensoren: Bodensensor (im Lieferumfang enthalten) und Raumsensor (fest im Gerät verbaut). Für die Heizungssteuerung können entweder beide Temperaturfühler gleichzeitig ausgewählt (aktiviert)...
Open the catalog to page 2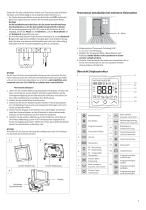
Verbinden Sie alle erforderlichen Kabel zum Thermostat und schlieften Sie diese vorschriftsmaftig an die entsprechenden Klemmen an. • Der Bodentemperaturfuhler muss an die beiden mit NTC markierten Klemmen angeschlossen werden (die Polaritat spielt keine Rolle). Wichtig! Ist die Installationsstrecke kurzer als die Sensor-Anschlussleitung (werksseitig 3m), so ist das Sensorkabel entsprechend zu kurzen. • Die Versorgungsspannung (230 V AC) wird an die Klemmen N und L angelegt, wobei die Phase an die Klemme L und der Neutralleiter an die Klemme N angeschlossen wird. • Die Anschlussleitung von Heizkreis...
Open the catalog to page 3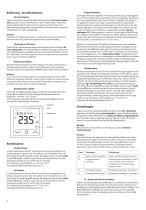
Bedienung - Grundfunktionen Ein-/Ausschalten Tippen Sie auf den Homebutton O und halten Sie ihn fur etwa 3 Sekun-den gedruckt, um das Thermostat ein- bzw. auszuschalten. Wenn das Gerat ausgeschaltet (im Stand-by) ist, werden auf dem Display die Informationen entsprechend der getroffenen Auswahl in den erweiteren Einstellungen F4, Code 16 angezeigt. Hinweis: Bei jedem Einschalten des Gerates erscheinen fur einen kurzen Moment samtliche Icons (vgl. Obersicht Displaystruktur) auf dem Display. Tastensperre aktivieren Gehen Sie zur Displayhauptanzeige und drucken Sie den ^ Button fur etwa 3 Sekunden,...
Open the catalog to page 4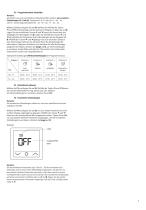
F2 - Programmmodus einstellen Hinweis: Sie können aus zwei verschiedenen Wochenprofilen wählen, vgl. erweitere Einstellungen F4, Code 05. Entweder 5 - 1 - 1 = Mo. bis Fr. - Sa. - So., oder 7 = wochentagsindividuell, Mo. - Di. - Mi. - Do. - Fr. - Sa. - So. Wählen Sie F2 und tippen Sie auf o. Wählen Sie mithilfe der Tasten ˄ und ˅den Wochentag und den Zeitraum (Ereignis). Tippen Sie auf o. Legen Sie nun mithilfe der Tasten ˄ und ˅zuerst die Uhrzeit fest und bestätigen Sie die Eingabe mit o. Legen Sie mithilfe der Tasten ˄ und ˅als nächstes die Temperatur fest und bestätigen Sie die Eingabe mit...
Open the catalog to page 5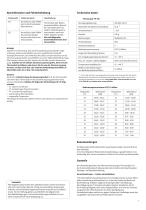
Technische Daten Alarmhinweise und Fehlerbehebung Fehlercode Wichtig! Arbeiten am Thermostat, den externen Bodentemperaturfuhler einge-schlossen, durfen ausschlie&lich von einer qualifizierten Fachkraft durchgefuhrt werden. Der elektrische Anschluss und derAnschluss an die Stromversorgung durfen ausschlie&lich von einerElektrofachkraft durchgefuhrt werden, ebenso wie das Trennen des Gerotes von der Stromversorgung. Schalten Sie Ihr lokales Stromnetz spannungsfrei, bevor Sie den Thermostat installieren oder bevor Sie ihn von der Stromversorgung trennen, um das Gerat bzw. den externen Bodentemperaturfuhler...
Open the catalog to page 7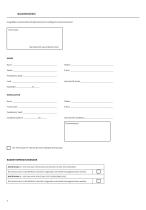
Garantieschein Ausgefüllter Garantieschein/Prüfprotokoll ist Grundlage für Garantieanspruch. (Typ-Bezeichnung, Artikelnummer) KUNDE Name ____________________________________________ Telefon__________________________________________ Straße____________________________________________ E-Mail ___________________________________________ Postleitzahl, Stadt __________________________________ Land _____________________________________________ Unterschrift Kunde_________________________________ INSTALLATEUR Name ____________________________________________ Telefon__________________________________________...
Open the catalog to page 8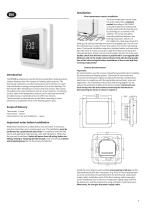
Introduction The TP 750 is designed to control electrical underfloor heating systems indoors (heating mats, film heaters or heating cable sections). The thermostat maintains a comfort temperature set for the floor or room and contributes to energy-saving operation of your floor heating. The thermostat offers temperature control using two sensors: floor sensor (included in the scope of delivery) and air sensor (built-in). For heating control, either both temperature sensors can be selected (activated) simultaneously, or optionally only one of the two sensors. The thermostat is mounted onto a wall...
Open the catalog to page 9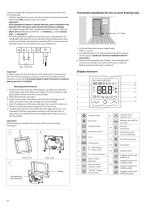
Connect all required wiring to the thermostat using its terminals with screw fastening. • The floor temperature sensor must be connected to the two terminals marked with NTC (polarity does not matter). Important! If the installation distance is shorter than the sensor installation wire (standard3m), the sensor cable must be shortened accordingly. • The supply voltage (230 V AC) is applied to terminal N and L, with the phase wire (detected by voltmeter) - to terminal L, and the neutral wire - to terminal N. • The heating element installation wires are to be connected to terminals N load and L...
Open the catalog to page 10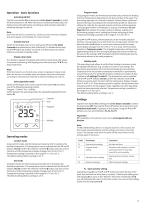
Operation - basic functions Switching ON/OFF Tap the home button O and keep pressed for about 3 seconds to switch the thermostat on or off. When the device is switched off (stand-by), the display shows the information according to what has been selected in advanced settings F4, code 16. Note: Each time the device is switched on, all the icons (see overview of display structure) appear on the display for a short moment. Activate key lock Switch to the display main screen and tap the ^ button for about 3 seconds to activate the key lock (child lock). To disable the key lock, tap the ^ button for...
Open the catalog to page 11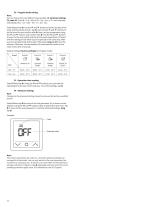
F2 - Program mode setting Note: You can choose from two different week profiles, cf. advanced settings F4j code 05. Either 5 -1 -1 = Mon to Fri - Sat - Sun, or 7 = each weekday individually, Mon - Tue - Wed - Thu - Fri - Sat - Sun. Select F2 and tap O. Use the ^ and V buttons to select the day of the week and the period (event). Tap O. Now use the ^ and V buttons to set the time first and confirm with O. Next, set the temperature using the ^ and V buttons and confirm with O. Use the ^ and V buttons to move to the next period and day of the week respectively. Proceed with the settings for all...
Open the catalog to page 12All Warm-On catalogs and technical brochures
 Installation manual insulation
36 Pages
 Installation manual Ecotwin s
16 Pages
 Installation manual EcoPro
16 Pages
 Installation manual AluPro
16 Pages
 OneKeyElectro
84 Pages


- Drum heater
- Industrial drum heater
- Electric drum heater
- Freeze protection heating cable
- Belt drum heater
- Plastic drum drum heater
- Self-regulating heating cable
- Drum heater with thermostat
- Liquid drum heater
- Steel keg drum heater
- Oil drum heater
- Food drum heater
- Barrel drum heater
- Chemical drum heater
- Resistive heating cable
- Paint drum heater
- Viscous product drum heater
- Soap drum heater