
Catalog excerpts

Microhardness Tester Measuring instruments for manual, semiautomatic or fully automatic microhardness testing. Technische Mikroskopie
Open the catalog to page 1
UHL VMHT - straight to the point! Test forces All the instruments offer 12 steps of test force: 1, 5, 10, 15, 25, 50, 100, 200, 300, 500, 1000, 2000 p (gf) covering the range of test forces required by the standards ASTM E-384, EN ISO 6507 and EN ISO 4545. At the touch of a button, the test force is automatically selected. The test force can also be changed by the computer when running automated measurement cycles and as a consequence allowing different test forces in the inspection. Focus finder The newly introduced focus finder is available with all 3 Leica Plan objectives and enables the...
Open the catalog to page 2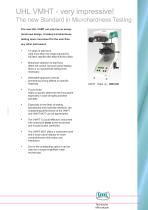
UHL VMHT - very impressive! The new Standard in Microhardness Testing The new UHL VHMT not only has an exceptional new design, it makes microhardness testing more convenient for the user than any other instrument: • 12 steps of test force yield more than the range required by ASTM E-384/EN ISO 6507/EN ISO 4545. Motorized selection of test force offers full control via touch panel display there is no mechanical dialing knob necessary. Selectable approach velocity prevents bouncing effects on specific materials. Focus finder helps to quickly determine the focal plane especially in case of...
Open the catalog to page 3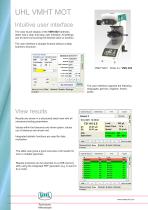
Intuitive user interface The color touch-display of the VMH-002 hardness tester has a clear and easy user interface. All settings can be done by touching the desired value or function. The user interface is straight forward without a deep submenu structure. Microscope Settings Indentation Load Indentation Speed Turret Position □well Time Heat Treatment: Lower Limit: Upper Limit: Measurement Data Statistic Graphic Settings The user interface supports the following languages: german, englisch, french, View results Results are shown in a structured detail view with all necessary testing...
Open the catalog to page 4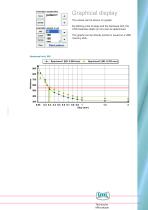
Indentation steplist files Graphical display The values can be shown in a graph. By defining a list of steps and the hardness limit, the CHD hardness depth (in mm) can be determined. The graphs can be directly printed or saved on a USB memory stick.
Open the catalog to page 5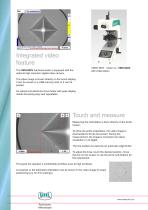
Integrated video feature The VMH-002V hardness tester is equipped with the optional high resolution digital video camera. VMHT MOT Order no.: VMH-002V with video option The video image is shown directly on the touch-display. It can be saved on a USB memory stick or it can be printed. An optical and electronic focus finder with peak display makes focussing easy and repeatable. Touch and measure Measuring the indentation is done directly on the touchscreen. To show the entire indentation, the video image is downscaled to fit into the screen. During the measurement, the image is zoomed to its...
Open the catalog to page 6
To simplify the edge detection and to increase the accuracy, an on-screen Image analysis indentation user independent by image After defining just a few parameters, the system determines size and The measurement is done by touching After automatic detection of the indentation edges, the result is shown
Open the catalog to page 7
Coordinate stage The specimen stage of the hardness tester VMHT MOT can be equipped with digital micrometer spindels or stepper motors (incl. motor controller) This enables the comfortable creation of hardness Order options: digital micrometer spindels: stepper motors with controller: For hand driven stages, a dialog appears to move the stage to a position. This position must be driven by the micrometer spindels, and is reached when two figures are overlapping completely. with video option and digital micrometer spindels Current Position Measurement | X/Y Data Statistic Graphic Settings...
Open the catalog to page 8
Indentation distance: With the video option and coordinate stage, more complex manual patterns can be created easily and comfortable in a graphic view. The positions are shown in relation to an alignment line The distance to the edge and the x/y distance to the last indentation is calculated and shown. With this ferature e.g. a zig-zag pattern can be created. If the specimen database contains nominal hardness values, the current position and the button to do an indentation are coloured red when the distance between the indentations is smaller than it is allowed in the The lenses used to...
Open the catalog to page 9
VMHT AUTO mot Order no.: VMH-I04 UHL VMHT AUTO Fully Automated Measurements In case of many similar samples like in production sites with high capacities or where the test parameters have to be applied always in the same reproduceable condition, the VMHT AUTO brings its full capacity. The operator just orientates the specimen on the motorized stage and defines the test parameters using the Interactive Measuring Software IMS-VMHT. Consecutively, the system performs the measurements fully automated without any further attendance. If the sample thickness is not parallel, the operator can...
Open the catalog to page 10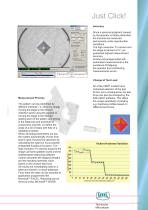
Just Click! Accuracy Since a personal judgment caused by the operator is totally eliminated, the imprints are measured permanently under reproducible conditions. The high resolution TV camera and the stage increment of 0.1 µm guarantee highest measurement accuracy. Another advantage linked with automated measurements is the avoidance of fatiguing the operator thus introducing measurements errors. Change of Test Load All of the VMHT models have motorized selection of the test forces. As a consequence, the test force can also be changed by the IMS-VMHT software. This offers the unique...
Open the catalog to page 11
Applications Metallography Variation of hardness through a nitrided steel case Surface phenomena – surface treatment Case-hardening of steels Surface hardening of titanium Electrodeposited coating: hardness, brittleness, adhesion Effects of various mechanical and thermal treatments on the surface layers Study of Alloys and Alloy Constitution Quantification of transition areas Determination of the Effect of Thermal Treatment Distance from the specimen edge (µm) Heat treatment of steels, non ferrous alloys, precipitation treatments and age-hardening Segregation and coring, rates of diffusion...
Open the catalog to page 12All Walter Uhl catalogs and technical brochures
-
Centring Microscope ZM1
14 Pages
-
Measuring Microscope TM2
2 Pages
-
Measuring Microscope MS1
6 Pages
-
Rod Microscope SM
4 Pages
-
VMM150
22 Pages
-
Measuring Microscopes MS-Series
20 Pages
-
Spinneret Inspection Microscopes
22 Pages
-
Components
61 Pages
-
Alignment Tester FLZ
4 Pages
-
Positioning systems
88 Pages
-
toolmakers microscope WM2
2 Pages
-
UHL Video Measuring Microscopes
20 Pages


