


FENCE & DECKING SPRAYER

FENCE & DECKING SPRAYER
Catalog excerpts

FENCE & DECKING SPRAYER gft ORIGINAL-BETRIEBSANLEITUNG OWNERS MANUAL
Open the catalog to page 1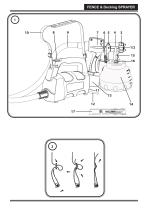
FENCE & Decking SPRAYER 1 8
Open the catalog to page 2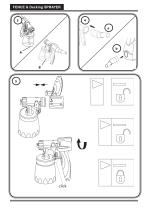
FENCE & Decking SPRAYER 4
Open the catalog to page 3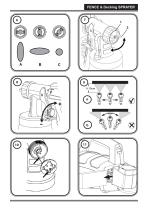
FENCE & Decking SPRAYER 6
Open the catalog to page 4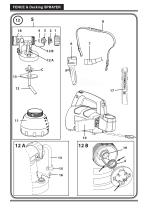
FENCE & Decking SPRAYER
Open the catalog to page 5
FENCE & Decking SPRAYER GB Fragen? · Questions? · Des questions? · V
Open the catalog to page 6
FENCE & Decking SPRAYER Translation of the original operating instructions MANY THANKS FOR PLACING YOUR TRUST IN US We would like to congratulate you on purchasing this brand product from Wagner; we are sure that you will enjoy working with it greatly. Please read the Operating Manual carefully and observe the safety information before starting the device. Store the Operating Manual in a safe place close to the product in case it needs to be used by someone else. We would be happy to be of assistance if you have any questions, suggestions or requests. Please contact us via the phone number included...
Open the catalog to page 7
FENCE & Decking SPRAYER 2. General Safety Instructions WARNING! Read all safety warnings and all instructions. Failure to follow the warnings and instructions may result in electric shock, fire and/or serious injury. Save all warnings and instructions for future reference. The term "power tool" in the warnings refer to your mains-operated (corded) power tool or battery-operated (cordless) power tool. 1. Work area safety a) Keep work area clean and well lit. Cluttered or dark areas invite accidents. b) Do not operate power tools in explosive atmospheres, such as in the presence of flammable liquids,...
Open the catalog to page 8
FENCE & Decking SPRAYER c) Do not expose power tools to rain or wet conditions. Water entering a power tool will increase the risk of electric shock. d) Do not abuse the cord. Never use the cord for carrying, pulling or unplugging the power tool. Keep cord away from heat, oil, sharp edges or moving parts. Damaged or entangled cords increase the risk of electric shock. e) When operating a power tool outdoors, use an extension cord suitable for outdoor use. Use of a cord suitable for outdoor use reduces the risk of electric shock. f) If operating a power tool in a damp location is unavoidable,...
Open the catalog to page 9
FENCE & Decking SPRAYER b) Do not use the power tool if the switch does not turn it on and off. Any power tool that cannot be controlled with the switch is dangerous and must be repaired. c) Disconnect the plug from the power source and/or the battery pack from the power tool before making any adjustments, changing accessories, or storing power tools. Such preventive safety measures reduce the risk of starting the power tool accidentally. d) Store idle power tools out of reach of children and do not allow persons unfamiliar with the power tool or these instructions to operate the power tool....
Open the catalog to page 10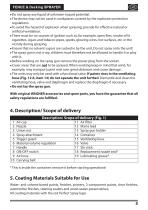
FENCE & Decking SPRAYER • Do not spray any liquid of unknown hazard potential. • The device may not be used in workplaces covered by the explosion-protection regulations. • To avoid the hazard of explosion when spraying, provide for effective natural or artificial ventilation. • There must be no sources of ignition such as, for example, open fires, smoke of lit cigarettes, cigars and tobacco pipes, sparks, glowing wires, hot surfaces, etc. in the vicinity during spraying. • Ensure that no solvent vapors are sucked in by the unit. Do not spray onto the unit! • The spray gun is not a toy; children...
Open the catalog to page 11
FENCE & Decking SPRAYER 6. Coating Materials Not Suitable for Use Wall paints without the red Perfect Spray logo. Materials that contain highly abrasive components, plaster, facade paint, caustic solutions and acidic coating substances. Flammable materials. 7. Preparation of the Coating Material The enclosed spray attachment can be used to spray paints, varnishes and glazes that are undiluted or slightly diluted. Detailed information is available in the technical data sheet of the manufacturer (^ Internet Download). 1. Stir the material up and put the required amount into the paint container....
Open the catalog to page 12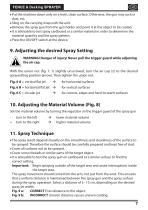
FENCE & Decking SPRAYER • Put the machine down only on a level, clean surface. Otherwise, the gun may suck in dust, etc. • Sling on the carrying strap with the unit. • Remove the spray gun from the gun holder and point it at the object to be coated. • I t is advisable to test spray cardboard or a similar material in order to determine the material quantity and the spray pattern. • Press the ON/OFF switch at the device. 9. Adjusting the desired Spray Setting WARNING! Danger of injury! Never pull the trigger guard while adjusting the air cap. With the union nut (fig. 7, 1) slightly unscrewed, turn...
Open the catalog to page 13
FENCE & Decking SPRAYER • Move the spray gun evenly cross-wise or up-and-down, depending on the spray pattern setting. • An even movement of the spray gun results in an even surface quality. • When coating material builds up on the nozzle and air cap, clean both parts with a solvent or water. 12. Interruption of Work till 4 Hours • Turn the machine off. • Insert the spray gun into the gun holder. • When processing 2-component varnishes, clean the device immediately. 13. Taking Out of Operation and Cleaning Proper cleaning is the prerequisite for problem-free operation of the paint application...
Open the catalog to page 14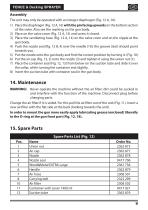
FENCE & Decking SPRAYER Assembly The unit may only be operated with an integer diaphragm (Fig. 12 A, 16). 1) Place the diaphragm (Fig. 12 A, 16) with the pin facing upwards on the bottom section of the valve. Also see the marking on the gun body. 2) Place on the valve cover (Fig. 12 A, 15) and screw it closed. 3) Place the ventilating hose (Fig. 12 A, 14) on the valve cover and on the nipple at the gun body. 4) Push the nozzle seal (fig. 12 B, 4) over the needle (19); the groove (slot) should point towards you. 5) Put the nozzle onto the gun body and find the correct position by turning it. (Fig....
Open the catalog to page 15
FENCE & Decking SPRAYER
Open the catalog to page 16
FENCE & Decking SPRAYER Measured in accordance with EN 60745-1 Information about the oscillation level The specified oscillation level has been measured according to a standard test procedure and can be used to compare against electric tools. The oscillation level is also for determining an initial assessment of the vibrational strain. Attention! The vibration emission value can differ from the specified value when the electric tool is actually in use, depending on how the electric tool is being used. It is necessary to specify safety measures to protect the operating personnel. These measures...
Open the catalog to page 17All WAGNER catalogs and technical brochures
 Brochure PEM-X1 CG
4 Pages
 Brochure Manual application
3 Pages
 Corona and Tribo Guns
10 Pages
 Brochure Cobra
4 Pages
 Press release IceBreaker
3 Pages
 STATIONARY Wood- & Metalworking
11 Pages
 Manual powder coating
3 Pages
 PXS Powder Centers
2 Pages
 TOPFINISH DD10
2 Pages
 C-Line
6 Pages
 WOOD- & METALWORKING
12 Pages
 Unica AME
4 Pages
 Flyer EvoMotion-Revers AME
2 Pages
 WAG Datenblatt DD10 GER
2 Pages
 BROSCHÜRE COBRA AME
8 Pages
 DD10
DD102 Pages
 Control Pro 350 R
144 Pages
 Control Pro 350 M
144 Pages
 Control Pro 250 M
140 Pages
 W 990 FLEXiO
122 Pages
 W 950 FLEXiO
130 Pages
 FineCoat 9900
6 Pages
 FineCoat 9900 PowerCart
52 Pages
 Zip 52
68 Pages
 FinishControl 5000
132 Pages
 FinishControl 3500
132 Pages
 Basic Booth Systems
2 Pages
 SuperCube
4 Pages
 Prima Cube
4 Pages
 ID-Booth System LV
4 Pages
 Profi Tech M
8 Pages
 Profi Tech S
6 Pages
 Prima Tech CCM
4 Pages
 Facades and interior walls
12 Pages
 SuperFinish
5 Pages
 Finish Control 5000
2 Pages
 PROTEC GM
2 Pages
 WOOD & METAL APPLICATIONS
7 Pages
 BO AIRSPRAY-MANUAL AME
8 Pages
 BO GM 4000AC AME WEB
8 Pages
 BO AIRSPRAY-AUTOMATIC AME
2 Pages
 SuperFinish SF 27
8 Pages
 Finish 270
6 Pages
 EPG_SL_5
2 Pages
 TempSpray
6 Pages
 PS 3.21 Spraypack
8 Pages
 Finish 230 Lacquer Spraypack
2 Pages
 PrimaTechCCM
4 Pages
 profitech S
6 Pages
 PrimaCube automatic system
4 Pages
 BO Modular Painting System
4 Pages
 ProfiTech
2 Pages
 C4 HiCoat
4 Pages
 DigiTech
2 Pages
 PrimaTech Control Technology
4 Pages
 SuperTech
4 Pages
 VertiCube
1 Page
 The C4 generation of guns
6 Pages
 Inline pump IP5000
2 Pages
 EPG-DP 5 Multi Control
2 Pages
 Wagner 3D Pro Coating
1 Page
 Unica 4-270
4 Pages
 TwinControl
8 Pages
 SupraCoat
4 Pages
 RoboCoat
2 Pages
 IceBreaker®
8 Pages
 WAGNER Thermo-technology
2 Pages
 The WAGNER Thermo-System
2 Pages
 GA 3000 AC
4 Pages
 Evobell
4 Pages
 Electrostatic guns
8 Pages
 AirCoat guns
4 Pages


Archived catalogs
 Cobra® 40-10
8 Pages
 SuperCube_en
4 Pages
 C4_brochure
4 Pages

