

Motor mounting

Motor mounting
- Ensure motor shaft and clamping sleeve bore are free of dirt and grease.
- Fit the clamping bush to the motor shaft up to the shaft shoulder.
- Tighten coupling screws in three steps (20%, 50%, 100%) to the recommended torque, indicated on the coupling.
- Grease the tooth profile and mount the motor vertically onto the gearbox.
- Tighten motor flange screws.
- Similar to Version A, but uses a profiled bush with a shrink disc.
- Follow the same cleaning and assembly steps, ensuring correct torque application.
- Uses a shrink disc bush without a keyway.
- Motors should have reduced shaft tolerance and concentricity as per DIN 42955 R standards.
- Degrease motor shaft and gearbox blind hole before assembly.
- Insert a long Allen key to access the clamping screw, and tighten in three steps (20%, 50%, 100%).
- Reinsert lock screw or plastic plugs after assembly.
- Motor shaft diameters range from 9x20 mm to 28x60 mm.
- Maximum torque transmission varies from 30 Nm to 180 Nm depending on size.
- Screw torque figures and sizes are specified, with M6/12.9 and M8/12.9 screws used.
Catalog excerpts
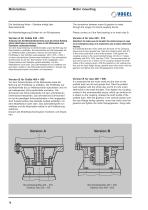
Motor mounting Die Verbindung Motor - Getriebe erfolgt über Spannelemente. The connection between motor & gearbox is made through the usage of a shrink-coupling device. Bei Motorfestlagerung B bitten wir um Rücksprache. Please contact us if the fixed bearing is on motor side B. Achtung! Um die Motordrehmomente auch bei einem Notstop sicher übertragen zu können, muss in der Motorwelle eine Passfeder verwendet werden. Vor dem Zusammenbau ist die Motorwelle sowie die Bohrung der Klemmhülse zu entfetten. Die Klemmhülse auf die Motorwelle bis zur Wellenschulter aufschieben. Danach die Schrauben der Profilhülse in drei Schritten wechselseitig ( 20% / 50% / 100% ) mit dem erforderlichen Drehmoment festziehen. Das erforderliche Drehmoment ist auf der Klemmhülse in Nm angegeben. Zum Zusammenbau das Getriebe vertikal aufstellen, mit dem Motorflansch nach oben. Das Zahnwellenprofil nun einfetten und den Motor vertikal in das Zahnwellenprofil einführen. Danach die Motorflanschschrauben montieren und festziehen. Attention! To make sure to transfer the motor torque in case of an emergency stop, it is required to use a motor shaft with keyway. It is essential that the motor shaft and the bore on the clamping sleeve are dirt and grease free. Take the clamping bush and fit it to the motor shaft back to the shaft shoulder. Then tighten the coupling screws to the recommended torque. Do this in 3 steps eitherway with 20%, 50% and then 100%. The recommended torque can be found on a sticker on the coupling. Grease the tooth profile of the clumping bush. With the gearbox in the vertical position and the input flange facing upwards mount the motor onto the gearbox and tighten the motor flange/gearbox fixing bolts. Vor dem Zusammenbau ist die Motorwelle sowie die Bohrung der Profilhülse zu entfetten. Die Profilhülse auf die Motorwelle bis zur Wellenschulter aufschieben und mit der beiliegenden Schrumpfscheibe montieren. Die Schrauben der Schrumpfscheibe mit dem erforderlichen Drehmoment festziehen. Das erforderliche Drehmoment ist auf der jeweiligen Schrumpfscheibe in Nm angegeben. Zum Zusammenbau das Getriebe vertikal aufstellen, mit dem Motorflansch nach oben. Das Zahnwellenprofil nun einfetten und die Motorwelle vertikal in die Profilbohrung einführen. Danach die Motorflanschschrauben montieren und festziehen. It is essential that the motor shaft and the bore on the profiled bush are dirt and grease free. Take the profiled bush together with the shrink disc and fit it to the motor shaft back to the shaft shoulder. Then tighten the coupling screws to the recommended torque, which can befound on a sticker on the coupling. Grease the tooth profile of the profiled bush. With the gearbox in the vertical position and the input flange facing upwards mount the motor onto the gearbox and tighten the motor flange/gearbox fixing bolts. Bei Getriebegröße 230 - 370 Gearbox size 230 - 370 Bei Getriebegröße 400 + 500 Gearbox size 400 + 500
Open the catalog to page 1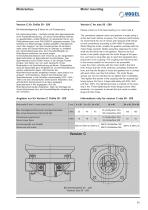
Motor mounting Bei Motorfestlagerung B bitten wir um Rücksprache. Please contact us if the fixed bearing is on motor side B. Die Verbindung Motor – Getriebe erfolgt über Spannelemente ohne Passfederverbindung. Um einen einwandfreien Betrieb zu gewährleisten, sollten Motoren mit reduzierten Rund- und Planlauftoleranzen nach DIN 42955 R eingesetzt werden. Das Getriebe zur Motormontage vertikal aufstellen, Motorflansch nach oben zeigend. Vor dem Zusammenbau ist die Motorwelle sowie die Sacklochbohrung im Getriebe zu entfetten. Die Verschlußschraube bzw. die 2 Kunststoffstopfen im Motorflansch entfernen...
Open the catalog to page 2All VOGEL catalogs and technical brochures
 Mechanical-Getriebe
152 Pages
 2018 Servo gearboxes
72 Pages
 Rack & Pinion Drive_2013
44 Pages
 Mechanical gearboxes
152 Pages
 Industrial gearboxes
164 Pages
 Image brochure english
14 Pages
 Bevel helical gearboxes
48 Pages
 Spiral bevel gearboxes
76 Pages
 Planetary gearboxes
80 Pages
 Phase shifter gearboxes
36 Pages


Archived catalogs
 Rack & Pinion Drive_2012
40 Pages
 2014 Servo gearboxes
140 Pages
 WELCOME TO VOGEL ANTRIEBSTECHNIK
14 Pages
- Planetary gearbox
- Coaxial gearhead
- Precision gearhead
- Right angle gearhead
- Compact gearhead
- Gear train gear reducer
- Shaft gearhead
- Helical gear gearhead
- Low-backlash gearhead
- Bevel gearhead
- Servo-gearbox
- Spur gearhead
- Waterproof gear reducer
- Planetary servo-gearbox
- IP65 gear reducer
- Spiral bevel gear reducer
- Precision servo-gearbox
- Coaxial servo-gearbox
- Universal gear reducer
- Right angle servo-gearbox