
- Catalogs
- VIA Technologies
- AMOS-825-Android EVK v5.0.3


AMOS-825-Android EVK v5.0.3

AMOS-825-Android EVK v5.0.3
This guide provides instructions for booting the Android EVK system image for the AMOS-825 system and configuring its hardware functions. The AMOS-825 Android EVK v5.0.3 is based on Android 6.0 Marshmallow and supports various hardware features.
The package includes three folders: Firmware, Document, and Tools. The Firmware folder contains installation scripts and precompiled U-Boot and Android images. The Document folder includes this Quick Start Guide. The Tools folder contains demo programs for Smart ETK and Bluetooth SPP testing.
- U-Boot version: 2015.04
- Kernel version: 3.14.52
- Evaluation image: Android Marshmallow 6.0
- Supports SPI with eMMC boot, 7” capacitive touch monitor, COM debug port, FlexCAN TX/RX, Gigabit Ethernet, Mic-in, Wi-Fi, Bluetooth 4.0, GPS/GNSS module, Mobile Broadband module, Smart ETK, OTA technology, and Ethernet configuration.
The system supports booting from SPI ROM with eMMC. To boot from a Micro SD card, extract the Images_autoinstall_sd.zip file, prepare the Micro SD card, and set the boot switch to Micro SD. Insert the card into the AMOS-825, connect an HDMI display, and power on the device to start the update process.
This section covers enabling and testing hardware functions such as setting U-Boot parameters, restoring default U-Boot parameters, using the Android Console, and enabling GPS, Wi-Fi, and Bluetooth. It also includes instructions for using the VIA Smart ETK sample program for testing Watchdog timer and FlexCAN functions.
Connect the host machine and AMOS-825 through the COM port using a serial port communication program. Adjust settings in the U-Boot console and list current parameters using the command 'printenv'.
Use the 'destroyenv' command in the U-Boot console to restore factory default settings. Restart the device with the 'reset' command.
Connect the host machine and AMOS-825 through the COM port to access the debug console. After booting, log in to the Android console.
Enable GPS through Settings -> Location. Enable Wi-Fi through Settings -> Wi-Fi -> On. For Bluetooth, enable it through Settings -> Bluetooth and pair with devices for A2DP and SPP profiles.
The Smart ETK supports Watchdog, UART, and CAN bus functions. Install the AMOS-825_Smart_ETK_Demo_v1.0.apk from a USB drive to experiment with these functions.
The Watchdog Timer is an electronic timer used to detect and recover from system malfunctions. It includes functions such as Enable/Disable, Set Timeout, Keep Alive, and Countdown Timer. To test, enter a time value (1-128 seconds) in the Timeout setting, enable the timer, refresh the countdown, or stop the function as needed.
The AMOS-825 supports debugging via COM and two CAN buses, adhering to CAN protocol specification Version 2.0 B. A transceiver circuit is required for testing. The CAN ID frame structure is 32 bits, including flags and identifiers. Testing involves setting the BitRate, connecting, and using Filter_ID and FilterMask for advanced testing. Examples illustrate how to set filters and masks to accept specific frames.
This module supports 3G functions. To connect to the internet, insert an active SIM card into the module, install it in the miniPCIe slot, and connect the antenna. Ensure no LAN cables or USB Wi-Fi dongles are connected. Configure APNs settings to enable the 3G network and access the internet.
Catalog excerpts
QUICK START GUIDE
Open the catalog to page 1
Copyright Copyright © 2018 VIA Technologies Incorporated. All rights reserved. No part of this document may be reproduced, transmitted, transcribed, stored in a retrieval system, or translated into any language, in any form or by any means, electronic, mechanical, magnetic, optical, chemical, manual or otherwise without the prior written permission of VIA Technologies, Incorporated. Trademarks All brands, product names, company names, trademarks and service marks are the property of their respective holders. Disclaimer VIA Technologies makes no warranties, implied or otherwise, in regard to this...
Open the catalog to page 2
AMOS-825 Android EVK v5.0.3 Quick Start Guide Revision History Version Remarks Initial release
Open the catalog to page 3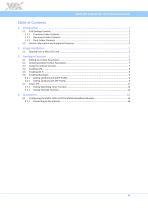
AMOS-825 Android EVK v5.0.3 Quick Start Guide Table of Contents 1. Introduction 1 1.1 EVK Package Content 1 1.1.1 Firmware Folder Contents 1 1.1.2 Document Folder Contents 1 1.1.3 Tools Folder Contents 1 1.2 Version Information and Supported Features 2 Booting from a Micro SD Card 3 3.1 Setting Up U-Boot Parameters
Open the catalog to page 4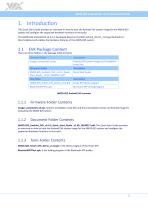
AMOS-825 Android EVK v5.0.3 Quick Start Guide 1. Introduction This Quick Start Guide provides an overview on how to boot the Android EVK system image for the AMOS-825 system and configure the supported hardware functions in the build. The AMOS-825 Android EVK v5.0.3 is developed based on the NXP android_m6.0.1_1.0.0-ga (Android 6.0 Marshmallow) and enables the hardware features of the AMOS-825 system. There are three folders in the package listed as below. Firmware folder Android EVK system image and installation script files Document folder Quick Start Guide Tool folder Smart ETK demo program...
Open the catalog to page 5
AMOS-825 Android EVK v5.0.3 Quick Start Guide 1.2 Version Information and Supported Features • U-Boot version: 2015.04 • Kernel version: 3.14.52 • Evaluation image: Android Marshmallow 6.0 • Development based on NXP android_M6.0.1_1.0.0-ga (Android 6.0 Marshmallow) • Supports SPI with eMMC boot • Supports 7” Projective capacitive touch monitor (800x480) through I2C interface • Supports COM as debug port • Supports two FlexCAN TX/RX • Supports Gigabit Ethernet • Supports Mic-in • Supports IEEE 802.11b/g/n Wi-Fi • Supports Bluetooth 4.0 κκ A2DP and SPP profile • Supports U-blox MAX-7 GPS/GNSS module...
Open the catalog to page 6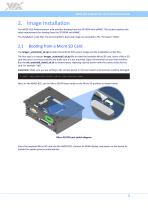
AMOS-825 Android EVK v5.0.3 Quick Start Guide 2. Image Installation The AMOS-825 Android system only provides booting from the SPI ROM with eMMC. This section explains the setup requirements for booting from the SPI ROM and eMMC. The installation script files, the precompiled U-boot and image are provided in the “Firmware” folder. 2.1 Booting from a Micro SD Card The Images_autoinstall_sd.zip includes the Android EVK system image and the installation scripts files. The first step is to extract Images_autoinstall_sd.zip file to make the bootable Micro SD card. Insert a Micro SD card into your...
Open the catalog to page 7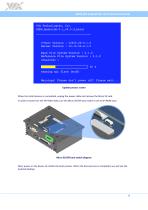
AMOS-825 Android EVK v5.0.3 Quick Start Guide Update process screen When the install process is completed, unplug the power cable and remove the Micro SD card. In order to boot from the SPI ROM make sure the Micro SD/SPI boot switch is set to SPI ROM boot. Micro SD/SPI boot switch diagram Next, power on the device to initiate the boot process. When the boot process is completed, you will see the Android desktop.
Open the catalog to page 8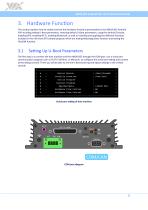
AMOS-825 Android EVK v5.0.3 Quick Start Guide 3. Hardware Function This section explains how to enable and test the hardware functions precompiled in the AMOS-825 Android EVK including setting U-Boot parameters, restoring default U-Boot parameters, using the Android Console, enabling GPS, enabling Wi-Fi, enabling Bluetooth, as well as installing and applying the different functions included in the VIA Smart ETK sample program which are testing Watchdog timer function and testing the FlexCAN function. 3.1 Setting Up U-Boot Parameters The first step is to connect the host machine and the AMOS-825...
Open the catalog to page 9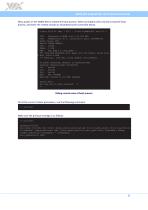
AMOS-825 Android EVK v5.0.3 Quick Start Guide Next, power on the AMOS-825 to initiate the boot process. When prompted, press any key to stop the boot process, and enter the U-Boot console as illustrated by the screenshot below. U-Boot 2015.04 (Mar 7 2017 - 18:49:13)AMOS-825 ver:5.0.3 CPU: Freescale i.MX6Q rev1.2 at 996 MHz CPU: Temperature 30 C, calibration data: 0x5894f169 Reset cause: POR Board: iMX6Q-VAB820 I2C: ready DRAM: 1 GiB MMC: FSL_SDHC: 0, FSL_SDHC: 1 SF: Detected W25Q32BV with page size 256 Bytes, erase size 4 KiB, total 4 MiB *** Warning - bad CRC, using default environment No panel...
Open the catalog to page 10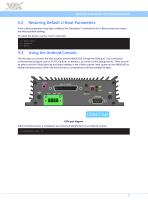
AMOS-825 Android EVK v5.0.3 Quick Start Guide 3.2 Restoring Default U-Boot Parameters If the U-Boot parameters have been modified, the “destroyenv” command in the U-Boot console can restore the factory default settings. To restart the device, use the “reset” command. => destroyenv => saveenv => Reset 3.3 Using the Android Console The first step is to connect the host machine and the AMOS-825 through the COM port. Use a serial port communication program such as PuTTY, GtkTerm, or Minicom, to connect to the debug console. There you will be able to see the U-Boot boot log and adjust settings in...
Open the catalog to page 11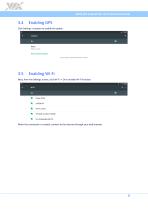
AMOS-825 Android EVK v5.0.3 Quick Start Guide 3.4 Enabling GPS Click Settings->Location to enable the option. 3.5 Enabling Wi-Fi Next, from the Settings screen, click Wi-Fi -> On to enable Wi-Fi function. When the connection is created, connect to the internet through your web browser.
Open the catalog to page 12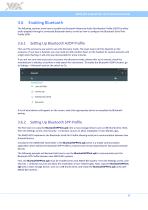
AMOS-825 Android EVK v5.0.3 Quick Start Guide 3.6 Enabling Bluetooth The following sections show how to enable the Bluetooth Advanced Audio Distribution Profile (A2DP) to allow audio playback through a connected Bluetooth device as well as how to configure the Bluetooth Serial Port Profile (SPP). 3.6.1 Setting Up Bluetooth A2DP Profile First, put the accessory you want to use into discovery mode. The exact way to do this depends on the accessory. If you have a headset, you may need to hold a button down on the headset for several seconds until a light starts flashing. It will only stay discoverable...
Open the catalog to page 13All VIA Technologies catalogs and technical brochures
 VIA Edge AI Developer Kit
10 Pages
 VIA Mobile360 ADAS
2 Pages
 VIA Mobile360
2 Pages
 COMe-9X90
3 Pages
 EMIO-2550
2 Pages
 AMOS-3005
3 Pages
 AMOS-820
3 Pages
 VIA_EPIA-E900
2 Pages
 VIA_VTS-8589
2 Pages
 VIA_SOM-6X50
3 Pages
 VIA_QSM-8Q60
3 Pages
 ALTA DS 4K
2 Pages
 ARTiGO_A820
2 Pages
 VIA_ARTiGO_A600
2 Pages
 VIA_AMOS-825
2 Pages
 ETX-8X90-10GR
3 Pages
 EPIA-M920
2 Pages
 ARTiGO A1300
3 Pages
 CX700M (Single-Chip)
2 Pages
 VX900/H
2 Pages
 VX11H
VX11H2 Pages
 VIA C7®
2 Pages
 Eden® ULV Fanless
2 Pages
 Eden® X2 (Dual Core)
2 Pages
 QuadCore E-Series
2 Pages
 VAB-600 (Pico-ITX)
2 Pages
 VIA AMOS 800
2 Pages
 VAB-1000
2 Pages
 ARTiGO A900
2 Pages
 VAB-820
2 Pages
 VIPRO VP7910
3 Pages
 VAB-800
2 Pages
 VIA EPIA-M840
2 Pages
 VIA EPIA-M850
2 Pages
 VIA EPIA-M860
2 Pages
 VIA VX900
2 Pages
 VIA Nano X2
2 Pages
 VIA EPIA-P720
2 Pages
 VIA EPIA-P900
2 Pages
 VIA EITX-3000
4 Pages
 VIA EITX-3001
4 Pages
 VIA EITX-3002
5 Pages
 VIA EPIA EN
2 Pages
 VIA EPIA-M830
2 Pages
 VIA VB7001
2 Pages
 VIA VB8001
2 Pages
 VIA VB8004
2 Pages
 VIA CN700
2 Pages
 VIA CN896
2 Pages
 VIA VX800
2 Pages
 VX855
VX8552 Pages
 VIA EPIA-M900
2 Pages
 VIA QuadCore Flyer
2 Pages


