
- Catalogs
- Tulsa Winch
- Winch application manual

Winch application manual

Winch application manual
This manual provides essential guidelines for the installation and operation of planetary winches by dp Manufacturing, Inc. It stresses the importance of thoroughly reading the manual to prevent serious injury or death.
- Avoid disengaging the gearbox under load to maintain control.
- Keep the last five wraps of wire rope on the drum for load holding.
- Winches are not for lifting or moving people.
- Maintain a safe distance from the winch and wire rope under load.
- Ensure proper alignment and support to prevent efficiency loss or failure.
- Familiarize with controls and proper use before operation.
- Keep the area clear of people.
- Wear safety gear like glasses, goggles, and gloves.
- Avoid operating under the influence of alcohol or drugs.
- Use only manufacturer-approved accessories.
- Inspect and repair the winch if it behaves abnormally.
- Follow international safety standards during installation.
Warning labels are placed on various parts of the winch. Their removal or defacement is the purchaser's responsibility.
- Include an open center or motor spool valve for correct operation.
- Do not exceed the winch's pressure rating to prevent failure.
- Mount close to the center and perpendicular to the line pull direction.
- The mounting surface must be flat and rigid.
- Maintain proper fleet angle to prevent wire rope failure.
- Follow specific steps for wire rope installation.
- Do not allow wire rope to extend past the drum edge.
- Ensure at least five full wraps of wire rope remain on the drum.
Understanding hydraulics and equipment application is crucial. Factors include total weight, surface drag, and gradient resistance. Calculations for rolling resistance are provided.
Calculated as 1/60th of the vehicle's weight per degree of slope. A table provides gradient values for various height-to-distance ratios.
Snatch blocks increase pulling power or change pull direction. Diagrams illustrate configurations like self-recovery and indirect pulls. Maintain a minimum distance between snatch blocks and ensure the winch's capacity is not exceeded.
Cable hold-down devices and fairleads are discussed. Proper maintenance and usage are emphasized to prevent damage or failure. Maintain the correct fleet angle and limit wire rope contact with fairlead rollers.
Common issues like hydraulic oil leaks, winch not pulling load, and brake problems are addressed with potential causes and corrective actions. Specific pressure checks and component replacements are recommended.
Lubrication points for fairlead rollers and pneumatic systems are outlined. Extended storage procedures include cleaning, lubricating, and protecting components from corrosion.
Fluid specifications emphasize maintaining correct viscosity and cleanliness. Recommendations for fluid types and maintenance schedules are provided.
Gear lubrication specifications include viscosity requirements and performance standards for lubricants.
- Lubricant Types: Shipped with GL5 80W90 lubricant. Recommended lubricants vary by temperature.
- Change Interval: Initial change after 10 hours; subsequent changes every 250 hours or annually.
- Lubrication Level: Check oil level with winch centerline horizontal.
- Grease: Use grease conforming to MIL-G-10924 for fairlead rollers.
- Remove oil fill plug and check oil level.
- If overfull and thin, check for hydraulic oil leakage.
- Add specified gear lubrication oil as needed.
- Inspect for leaks if oil level is consistently low.
- Remove oil drain & fill plug and drain oil.
- Clean drain plug, replace, and refill with oil to proper level.
- Change oil after the first 10 hours, then annually.
- Coverage: Covers defects in material and workmanship for one year from shipment.
- Remedies: Repair, replace, or refund for defective items.
- Exclusions: Does not cover improper use.
- Limitations: No liability for indirect or consequential damages. Non-transferable.
Catalog excerpts

To prevent serious injury or death, do not install or operate this winch Winch operators must read and understand contents fully.before reading this manual. Keep this manual with the winch at all times. 07/2006 Rev - 1 Because of continued productimprovement, we reserve the right to make changes withoutnotice. Go to www.dpwinch.comfor the latest issue of this manual. Tulsa, OK. FAX: (918) 250-0690Manufacturing, Inc.www.d p winch.com1-800- -WINCH >
Open the catalog to page 1
Do not disengage gear box while winch is under load.Immediate loss of load control will result. The last five wraps of wire rope must be left on the drum to assist the wire rope clamp in holding the load. Winches are not to be used for the lifting or moving of persons. Wire rope can break without warning. Always keep a safe distance from the winch and wire rope while under a load. Consult the wire rope manufacturer for wire rope ratings and maintenance procedures. Failure to adequately align, support, or attach winch to a suitable mounting base could result in a loss of efficiency or premature...
Open the catalog to page 2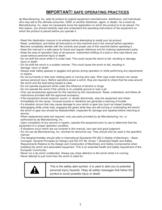
dp Manufacturing, Inc. sells its product to original equipment manufacturers, distributors, and individuals who may sell to the ultimate consumer, OEM, or another distributor, agent, or dealer. As a result dp Manufacturing, Inc. does not necessarily know the application on which the product is to be placed. For that reason, you should carefully read and understand the operating instructions of the equipment on which the product is placed before you operate it. > - Read this Application manual in its entirety before attempting to install your dp product. > - Read, understand, and follow all instructions...
Open the catalog to page 3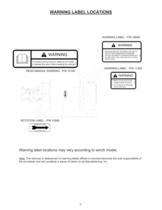
To prevent serious injury or death do not installor operate this winch before reading the manual. 15140 Make sure the winch is fullyengaged before operating. 11309 Do not attempt to disengagewinch under load. PULL DIRECTIONDRUM ROTATION PULL DIRECTIONDRUM ROTATION Note: The removal or defacement of warning labels affixed to winches becomes the sole responsibility of the purchaser and will constitute a waver of claims to > dp Manufacturing, Inc. 3 >
Open the catalog to page 4
The hydraulic system shown below must contain an open center,or motor spool, valve in order for the winch to operate correctly.Failure to use the correct control will result in loss of load control,possibly resulting in damage to property, personal injury or death. 3 POSITION 4 WAY SELF CENTERING CONTROLAND PRESSURE RELIEFVALVE WITH MOTOR SPOOL PUMP > FITTINGS TO WINCHINCLUDING HOSES AND WINCH > The relief must be set so the pressure supplied to the winch does not exceed thepressure rating of the winch. If the pressure or flow exceeds those rated for the winch, it could cause the winch, winch...
Open the catalog to page 5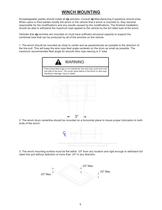
Knowledgeable parties should install all > dp winches. Consult > dp Manufacturing if questions should arise. When users or third parties modify the winch or the vehicle that a winch is mounted to, they become responsible for the modifications and any results caused by the modifications. The finished installation should be able to withstand the maximum load applied to the vehicle by the full rated load of the winch. Vehicles that > dp winches are mounted on must have sufficient structural capacity to support the combined load that can be produced by all of the winches on the vehicle. 1. The winch...
Open the catalog to page 6
WINCH MOUNTING (Continued) > 4. Attach the winch to the mounting base. Shim stock may be used between the mounting surface and winch to insure the winch base is flat and fully supported. The winch shall be adequately attached to mounting base to support the full rated load without any movement between the winch and base. Shim as required Failure to adequately align, support, or attach winch to a suitable mounting base could result in a loss of efficiency or premature failure of winch. 6 size="-2">
Open the catalog to page 7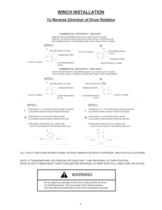
REMOVE THE COUNTERBALANCE VALVE AND OUTLET FLANGE.REMOVE THE MOTOR MOUNTING BOLTS AND ROTATE THE MOTOR 180.REASSEMBLE MOTOR, COUNTERBALANCE VALVE, AND OUTLET FLANGE. > OUTLET FLANGEMOTOR DRAIN TO TANK COUNTERBALANCE VALVE PRESSURE PORT COUNTERBALANCE MOTOR DRAIN TO TANKPRESSURE PORT VALVE OUTLET FLANGE > SWITCH POSITIONS OF COUNTERBALANCE VALVE AND OUTLET FLANGE.NOTE: HOSES GOING TO BRAKE HOUSING MAY NEED TO BE LENGTHENED.MOTOR DRAIN TO TANKCOUNTERBALANCEPRESSURE PORT > PRESSURE PORTCOUNTERBALANCEMOTOR DRAIN TO TANK OUTLET FLANGE OUTLET FLANGE VALVEVALVE SWITCH POSITIONS OF CARTRIDGE AND PLUG.TO...
Open the catalog to page 8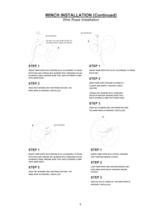
SETSCREWS SETSCREWS DO NOT ALLOW WIRE ROPE TOEXTEND PAST EDGE OF DRUM. > INSERT WIRE ROPE INTO PROPER SLOT ACCORDING TO DRUMROTATION AND THREAD SET-SCREWS INTO THREADED HOLESIN DRUM FLANGE, MAKING SURE THAT BOTH SCREWS CLAMPONTO WIRE ROPE. INSERT WIRE ROPE INTO SLOT ACCORDING TO DRUMROTATION. > WRAP WIRE ROPE AROUND OUTSIDE OFFLANGE AND INSERT THROUGH CABLEANCHOR.THREAD SET-SCREWS INTO THREADEDHOLES IN ANCHOR, MAKING SURE THATBOTH SCREWS CLAMP ONTO WIRE ROPE. ONCE SET-SCREWS ARE TIGHTENED SECURE, THEWIRE ROPE IS PROPERLY INSTALLED. > ONCE SET-SCREWS ARE TIGHTENED SECURE,THE WIRE ROPE IS PROPERLY...
Open the catalog to page 9
WIRE ROPE WEDGE WEDGE POCKET TAKE UP SLACK FROM THIS ENDDO NOT ALLOW WIRE ROPE TOEXTEND PAST EDGE OF DRUM. > INSERT WIRE ROPE INTO POCKET OPENINGAND THROUGH WEDGE POCKET. > LOOP WIRE ROPE END AROUND WEDGE ANDFEED WIRE ROPE BACK THROUGH WEDGEPOCKET. > ONCE SLACK IS TAKEN UP, THE WIRE ROPE ISPROPERLY INSTALLED. HEX NUTU-BOLT > ALIGN WIRE ROPE BETWEEN PROPER HOLES ACCORDINGTO DRUM ROTATION. INSERT U-BOLT INTO HOLESAND THEAD ON NUTS FROM BACK OF FLANGE. > ONCE NUTS ARE TIGHTENED SECURE, THE WIRE ROPE ISPROPERLY INSTALLED. >
Open the catalog to page 10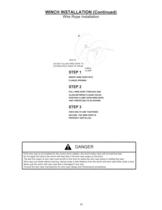
BOLTSCABLECLAMP DO NOT ALLOW WIRE ROPE TOEXTEND PAST EDGE OF DRUM. > INSERT WIRE ROPE INTOFLANGE OPENING. > PULL WIRE ROPE THROUGH ANDALIGN BETWEEN FLANGE HOLES.POSITION CLAMP OVER WIRE ROPE,AND THREAD BOLTS AS SHOWN. > ONCE BOLTS ARE TIGHTENEDSECURE, THE WIRE ROPE ISPROPERLY INSTALLED. >
Open the catalog to page 11
Surface Type Surface Drag (S) > The values and calculations in this section are approximate and are for reference only. > Note : This equation is only applicable for flat surfaces. For all other surfaces, the calculation must include the gradient resistance co-efficient. >
Open the catalog to page 12All Tulsa Winch catalogs and technical brochures
 TULSA
TULSA6 Pages
 RUFNEK PLANETARY WINCHES
12 Pages
 RUFNEK Worm Gear Catalog
16 Pages
 Safer Operation by Design
2 Pages
 Hydraulic Pump Drives Catalog
52 Pages
 LINEMAN Catalog
18 Pages
 Winch Power. Built to Order.
2 Pages
 R7 Unimog
2 Pages
 Gear products
2 Pages
 Model 24
2 Pages
 RN30W
RN30W1 Page
 RN20W
RN20W1 Page
 Model 18G
2 Pages
 Model 12
2 Pages
 Model 1060/1242
4 Pages
 Model 1060
4 Pages
 RN15W
RN15W1 Page
 RN10W
RN10W1 Page
 Model 938
2 Pages
 RN130P
3 Pages
 RN100P
3 Pages
 RN80P
RN80P3 Pages
 RN60P
RN60P3 Pages
 RN45P
RN45P3 Pages
 3541RL
1 Page
 Model 30P
2 Pages
 Model 1500W
4 Pages
 Model 1200W
4 Pages
 Model 707W
4 Pages
 Swing/Winch Drives
4 Pages
 Speed Reducers
8 Pages
 Model 800H
2 Pages
 Model 506W
4 Pages
 Planetary Reducer Series
1 Page


- Planetary gearbox
- Coaxial gearhead
- Right angle gearhead
- Gearbox for industrial applications
- Friction brake
- Shaft gearhead
- High-performance gearhead
- Spring brake
- Disc brake
- Lifting winch
- High load capacity gear reducer
- Parallel-shaft gearhead
- Hydraulic winch
- Electric winch
- Compact winch
- Gear winch
- Gear reducer for heavy-duty applications
- Hydraulic brake
- Gear reducer for lifting applications