
Catalog excerpts

Processes MIG (GMAW) Welding Description Ethernet Equipped Robotic Nozzle Cleaning Station, MIG (GMAW) Welding Peripheral TOUGH GUN™ TT3E Reamer OWNER’S MANUAL Tregaskiss 2570 North Talbot Road Windsor, Ontario N0R 1L0 Canada Phone: 1-855-MIGWELD (644-9353) (US & Canada) +1-519-737-3030 (International) Fax: 519-737-2111 For more information, visit us at Tregaskiss.co
Open the catalog to page 1
Thank You for Choosing Tregaskiss Thank you for selecting a Tregaskiss product. The TOUGH GUN™ TT3E Reamer you have purchased has been designed and engineered to be a reliable tool to support high production within a robotic cell. The TOUGH GUN TT3E Reamer is made from durable materials and components engineered to perform in a demanding robotic welding environment. Before installing, compare the equipment received against the invoice to verify that the shipment is complete and undamaged. It is the responsibility of the purchaser to file all claims of damage or loss that may have occurred...
Open the catalog to page 2
Subject to Change - The information presented in this manual is accurate to the best of our knowledge at the time of printing. Please visit Tregaskiss.com for the most up-to-date information.
Open the catalog to page 3
SECTION 1 – SAFETY PRECAUTIONS – READ BEFORE USING 1-1 Additional Safety Warnings for Installation, Operation and Maintenance READ INSTRUCTIONS • Read and follow all labels and the Owner’s Manual carefully before installing, operating, or servicing the unit. Read the safety information at the beginning of the manual and each section. Use only genuine replacement parts from the manufacturer. Perform maintenance and service according to the Owner’s Manual, industry standards and national, state/provincial and local codes. NOISE can damage hearing • • FIRE OR EXPLOSION hazard • • • MOVING...
Open the catalog to page 4
1-4 Commercial Warranty Seller’s Products specified below shall be free from defects in material and workmanship for the period specified below from the delivery to an authorized Buyer provided the Products are operated, maintained, and repaired properly and pursuant to Product documentation provided by the manufacturer. The Warranty against defects does not apply to: (1) consumable components or ordinary wear items; or (2) use of the Products with equipment, components or parts not specified or supplied by Seller or contemplated under the Product documentation. Should there be a defect...
Open the catalog to page 5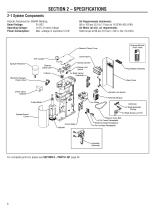
Robotic Peripheral for GMAW Welding Operating Voltage: ±10% of rated voltage Power Consumption: Max. wattage in operation 5.3 W Stall torque at 80 psi (5.5 bar) = 83 in.-lbs. (9.4 Nm) Sprayer Reservoi Electronic Sprayer Check Valvi •Reamer Clamp Cover Ethernet Module (Front View) Spinde Shroud Push Button Switches ^^^^Air Blast Bulkhead ■Air Blast Supply Line Kit :eamer Drive Belt Ethernet Cable Receptacle For complete parts list, please see SECTION 8 - PARTS LIST page 29
Open the catalog to page 6
SECTION 3 – INSTALLATION 3-1 Installing TOUGH GUN™ TT3E Reamer WARNING: Ensure power supply is off and disconnected before proceeding. Please follow your facility’s lockout / tagout procedures. A. To Mount TOUGH GUN TT3E Reamer The TOUGH GUN Reamer should be installed within the weld cell where it is clear of all tooling and convenient for the robot to access the unit. • Affix the Reamer base to a sturdy platform using four (4) bolts (provided). Mounting Hole Locations and Footprint 12.00”/ 304.8 mm 11.00”/ 279.4 mm 0.44”/ 11.2 mm Front of Reamer (Top View) NOTE: The Reamer can be mounted...
Open the catalog to page 7
3-2 Connect Air Blast WARNING: Ensure power supply is off and disconnected before proceeding. Please follow your facility’s lockout / tagout procedures. A. To Connect Air Blast 1. If configured with air blast there will be two air blast ports on the Comm Plate of the Reamer. 2. Remove the two plastic plugs from the quick connect fittings (see Figure 1). 3. Insert the air blast air lines going to the welding gun into the quick connect fitting (see Figure 2). B. Programming the Air Blast 1. The Ethernet module is already pre-programmed to be able to run the air blast option and can support...
Open the catalog to page 8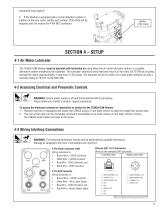
(continued from page 8) 2. If the Reamer is equipped with a nozzle detection system in addition to the wire cutter, splitter part number TT3E-2343 will be required, and will receive the 4-Pin M12 connector. SECTION 4 – SETUP 4-1 Air Motor Lubricator The TOUGH GUN Reamer must be operated with lubricated air using either the air motor lubricator option or a suitable alternative system installed by the customer. The lubricator should be set to feed one drop of oil for every 50-75 CFM of air going through the motor (approximately 1 drop every 5-10 cycles). The lubricant can be air motor oil or...
Open the catalog to page 9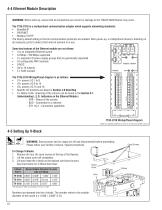
4-4 Ethernet Module Description WARNING: Before start-up, ensure that all connections are correct or damage to the TOUGH GUN Reamer may occur. The TT3E-2310 is a multiprotocol communication adapter which supports networking standards: • EtherNet/IP • PROFINET • Modbus TCP/IP The factory default setting is that all communication protocols are enabled. After power-up, a multiprotocol device is listening on all necessary ports to detect which kind of network is in use. Some key features of the Ethernet module are as follows: • It is an Integrated Ethernet switch • 10 Mbps / 100 Mbps supported...
Open the catalog to page 10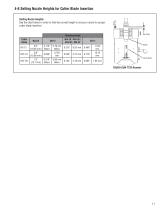
4-6 Setting Nozzle Heights for Cutter Blade Insertion Setting Nozzle Heights See the chart below in order to find the correct height to set your nozzle for proper cutter blade insertion: See Chart Retaining Head Cutter Blade Cutter Blade
Open the catalog to page 11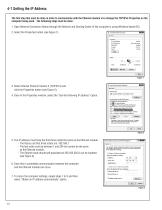
The first step that must be done in order to communicate with the Ethernet module is to change the TCP/IPv4 Properties on the computer being used. The following steps must be done: 1. Open Network Connection Status through the Network and Sharing Center (if the computer is using Windows based OS). 2. Select the Properties button (see Figure 1). ^ Local Area Correction Status Media State: Sent - - Received | '.gjjlProperties") | ^Disable | [ Diagnt 3. Select Internet Protocol Version 4 (TCP/IPv4) and click the Properties button (see Figure 2). 4. Once in the Properties window, select the...
Open the catalog to page 12All Tregaskiss catalogs and technical brochures
-
TREGASKISS™ POWER PINS
3 Pages
-
TOUGH GUN™ TT3 Reamer
8 Pages
-
Tregaskiss™
14 Pages
-
AUTOMATION CATALOG
15 Pages
-
TOUGH GUN I.C.E
2 Pages
-
Tregaskiss Automation Catalog
13 Pages
-
Power Pins Spec Sheet
3 Pages
-
Control Plugs Spec Sheet
2 Pages


