
Catalog excerpts

TECHNICAL GUIDE Air-Cooled TOUGH GUN™ Automatic Air-Cooled MIG Guns 500 amp & 600 amp TOUGH GUN™ Automatic Water-Cooled MIG Guns 450 amp & 600 amp SAFETY & WARRANTY INFORMATION INSTALLATION MAINTENANCE GUIDE TECHNICAL DATA OPTIONS EXPLODED VIEW & PARTS LIST QUICK LOAD™ Liners Standard on all TOUGH GUN™ Robotic Air-Cooled MIG Guns Water Cooled TROUBLESHOOTING ORDERING INFORMATION Certified ISO 9001 : 2008 Please read instructions prior to use. Save this manua
Open the catalog to page 1
THANK YOU… …for selecting a Tregaskiss™ TOUGH GUN™ MIG Gun. Manufacturing operations demand extremely dependable robotic equipment. As the name implies, the TOUGH GUN MIG Gun is made from durable materials and components engineered to perform in a rugged welding environment. Your TOUGH GUN MIG Gun is completely assembled and ready to weld, and has undergone numerous quality checks to ensure high performance. The instructions and illustrations in this Technical Guide make it easy for you to maintain your TOUGH GUN MIG Gun. Please read, understand, and follow all safety procedures. Keep this...
Open the catalog to page 2
WARRANTY Product is warranted to be free from defects in material and workmanship for the period specified below after the sale by an authorized Buyer. Should there be a defect please refer to our Return Merchandise Policy. PRODUCT TOUGH GUN™ Robotic MIG Guns and Components TOUGH GUN Reamer TOUGH GARD™ Spatter Cleaner TOUGH GUN Robotic Peripherals (Clutch, Sprayer, Wire Cutter, Mounting Arms) Low-Stress Robotic Unicables (LSR Unicables) WARRANTY PERIOD 180 days 1 year 1 year 1 year 2 years Tregaskiss reserves the right to repair, replace or refund the purchase price of non-conforming...
Open the catalog to page 3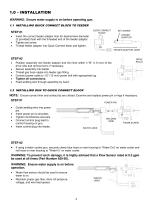
1.0 – INSTALLATION WARNING: Ensure water supply is on before operating gun. 1.1 INSTALLING QUICK CONNECT BLOCK TO FEEDER QUICK CONNECT BLOCK SET SCREW FEEDER ADAPTOR Insert the correct feeder adaptor liner for desired wire diameter (2 provided) flush with the threaded end of the feeder adaptor. Tighten set screw. Thread feeder adaptor into Quick Connect block and tighten. FEEDER ADAPTOR LINER Position assembly into feeder adaptor and trim liner within 1/16” (1.6 mm) of the drive rolls and remove burrs if necessary. Secure assembly into feeder. Thread gas hose nipple into feeder gas fitting....
Open the catalog to page 4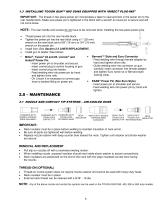
1.3 INSTALLING TOUGH GUN™ MIG GUNS EQUIPPED WITH “DIRECT PLUG-INS” IMPORTANT: The thread-in two-piece power pin incorporates a taper to seat and lock in the power pin to the rear handle block. Make sure power pin is tightened in the block with a wrench to insure pin is secure and will not come loose. NOTE: The rear handle and screws do not have to be removed when installing the two-piece power pins. Thread power pin into the rear handle block. Tighten the power pin into the rear block using a 1” (25 mm) wrench on the rear block and a 5/8” (16 mm) or 3/4” (19 mm) wrench on the...
Open the catalog to page 5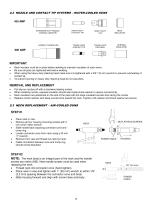
2.2 NOZZLE AND CONTACT TIP SYSTEMS – WATER-COOLED GUNS 450 AMP STANDARD DUTY NOZZLE VARIOUS LENGTHS AVAILABLE HEAVY DUTY CONTACT TIP TOUGH LOCK CONTACT TIP HEAVY DUTY GAS DIFFUSER TOUGH LOCK DIFFUSER NECK INSULATOR CERAMIC INSULATOR Neck insulator must be in place before welding to maintain insulation of neck armor. Be sure all parts are tightened well before welding. When using the heavy duty retaining head make sure it is tightened with a 5/8” (16 mm) wrench to prevent overheating of contact tip. To prevent scoring on heavy duty retaining head do not use pliers. Pull slip-on nozzles off...
Open the catalog to page 6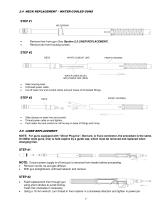
2.4 NECK REPLACEMENT – WATER-COOLED GUNS Remove liner from gun (See Section 2.5 LINER REPLACEMENT). Remove two front housing screws. WHITE CONDUIT LINE FRONT HOUSING WATER LINES (BLUE) AND POWER LINE (RED) Slide housing back. Unthread power cable. Cut off water line and conduit clamp and pull hoses off of barbed fittings. FRONT HOUSING Slide clamps on water line and conduit. Thread power cable on and tighten. Push water line and conduit on all the way to base of fittings and crimp. 2.5 LINER REPLACEMENT NOTE: For guns equipped with “Direct Plug-Ins”, Bernard, or Euro-connector, the...
Open the catalog to page 7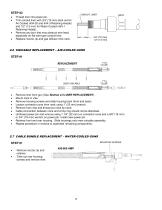
CONDUIT LINER Thread liner into power pin. Trim conduit liner with 3/4” (19 mm) stick out for Air Cooled (404-20 and 404-3 Retaining Heads) and 1/2” (13 mm) for Water Cooled (454-1 Retaining Heads). Remove any burr that may obstruct wire feed, especially on flat wire type conduit liner. Replace nozzle, tip and gas diffuser onto neck. 2.6 UNICABLE REPLACEMENT – AIR-COOLED GUNS REPLACEMENT UNICABLE USED UNICABLE Remove liner from gun (See Section 2.5 LINER REPLACEMENT). Mount neck in vise. Remove housing screws and slide housing back (front and back). Loosen connector cone from neck using 1”...
Open the catalog to page 8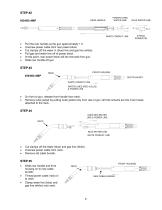
STEP #2 POWER & RED WATER LINE REAR HANDLE WHITE CONDUIT LINE BLUE WATER LINE Pull the rear handle up the gun approximately 1 ft. Unscrew power cable from rear power block. Cut clamps off the water in (blue) line and gas line (white). Pull gas and water line off of power block. At this point, rear power block will be removed from gun. Slide rear handle off gun. STEP #3 FRONT HOUSING OUTER JACKET WHITE CONDUIT LINE WATER LINES (RED & BLUE) & POWER LINE On front of gun, release front handle from neck. Remove outer jacket by pulling outer jacket only from rear of gun; all that remains are the...
Open the catalog to page 9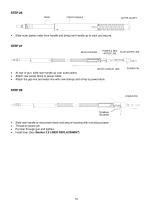
FRONT HANDLE OUTER JACKET Slide outer jacket under front handle and bring front handle up to neck and secure. STEP #7 REAR HOUSING POWER & RED WATER LINE WHITE CONDUIT LINE BLUE WATER LINE At rear of gun, slide rear handle up over outer jacket. Attach rear power block to power cable. Attach the gas line and water line with new clamps and crimp to power block. REAR HANDLE TERMINAL HOUSING Slide rear handle to rear power block and secure housing with mounting screws. Thread-on power pin Put liner through gun and tighten. Install liner (See Section 2.5 LINER REPL
Open the catalog to page 10All Tregaskiss catalogs and technical brochures
-
 TREGASKISS™ POWER PINS
3 Pages
-
 TOUGH GUN™ TT3 Reamer
8 Pages
-
 Tregaskiss™
14 Pages
-
 AUTOMATION CATALOG
15 Pages
-
 TOUGH GUN I.C.E
2 Pages
-
 Tregaskiss Automation Catalog
13 Pages
-
 Power Pins Spec Sheet
3 Pages
-
 Control Plugs Spec Sheet
2 Pages


