- Catalogs
- Transcover
- T3T TrailerCover Installation
T3T TrailerCover Installation
1 /14Pages

T3T TrailerCover Installation
1 /14Pages
Catalog excerpts

www.transcover.com Tel: +44 (0)1622 792006 Email: [email protected]
Open the catalog to page 1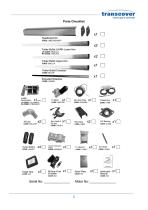
Parts Checklist
Open the catalog to page 2
Thank you for purchasing the Transcover T3T Trailer Cover. Please note that the following instructions are offered as a guide to installation only and are there to assist those who are already skilled in electrical installation and material fabrication. Please do not attempt to fit this system unless you are adequately trained, accompanied, and wearing the appropriate health and safety attire. Please contact us on 01622 792006 should you require any assistance with the fitting of our product and one of our skilled installers will be more than happy to assist you with you enquiries. STEP 1 Front...
Open the catalog to page 3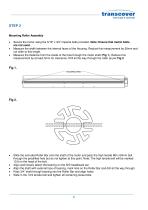
Mounting Roller Assembly • Secure the motor using the 5/16” x 3/4” imperial bolts provided. Note: Ensure that metric bolts are not used. • Measure the width between the internal faces of the Housing. Reduce this measurement by 50mm and cut roller to this length. • Measure the distance from the inside of the hole through the motor shaft (Fig 1). Reduce this measurement by at least 5mm for clearance. Drill all the way through the roller as per Fig 2. Fig 2. • Slide the extruded Roller Bar onto the shaft of the motor and pass the high tensile M8 x 60mm bolt through the predrilled hole but do not...
Open the catalog to page 4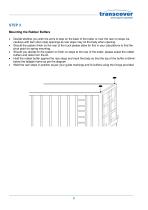
STEP 3 Mounting the Rubber Buffers Decide whether you wish the arms to stop on the back of the trailer or over the rear on stops, be cautious with barn door style openings as rear stops may hit the body when opening. Should the system finish on the rear of the truck please allow for this in your calculations to find the pivot point for spring mounting. Should you decide for the system to finish on stops at the rear of the trailer, please select the rubber buffers and rests from the kit. Hold the rubber buffer against the rear stops and mark the body so that the top of the buffer is...
Open the catalog to page 5
STEP 4 Mounting the Tower In some cases, alterations to this guide may need to be made to avoid obstacles e.g. tipping rams etc. Fabricate necessary bracket to mount the tower securely to the front body. Bolt tower to fabricated brackets ensuring clearance of 50mm from all obstacles is set to avoid contact when housing is being raised and lowered.
Open the catalog to page 6
STEP 5 Mounting the Tower In some cases, alterations to this guide may need to be made to avoid obstacles e.g. tipping rams etc. Fabricate necessary bracket to mount the tower securely to the front body. Bolt tower to fabricated brackets ensuring clearance of 50mm from all obstacles is set to avoid contact when housing is being raised and lowered.
Open the catalog to page 7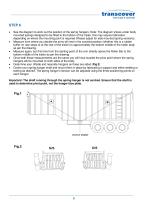
STEP 6 • See the diagram to work out the position of the spring hangers. Note: The diagram shows under body mounted springs designed to be fitted to the bottom of the trailer, this may require fabrication depending on where the mounting point is required (Please adjust for side-mounted spring versions). • Measure from where you decide the arms will rest in the covered position (whether this is a rubber buffer on rear stops or at the rear of the trailer) to approximately the bottom middle of the trailer body as per the drawing. • Measure again, but this time from the starting point of the arm...
Open the catalog to page 8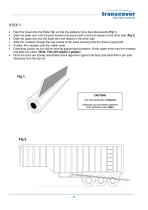
• Feed the sheet onto the Roller Bar so that the webbing hems face downwards (Fig 1). • Slide the lower arm onto the pivot bracket and secure with a bolt and repeat on the other side (Fig 2). • Slide the upper arm into the lower arm and repeat on the other side • Slide the crossbar through the rear pocket of the sheet ensuring that the sheet is laying flat. • Position the crossbar onto the rubber rests. • Exercising caution as you will be working against spring tension, lift the upper arms onto the crossbar and slide into place. (Note: This will require 2 people.) • Once the arms are loosely...
Open the catalog to page 9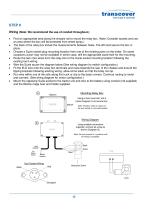
STEP 8 Wiring (Note: We recommend the use of conduit throughout.) • Find an appropriate area along the chassis rail to mount the relay box. (Note: Consider access and use an area where the box will be protected from wheel spray.) • The back of the relay box shows the measurements between holes. Pre-drill and secure the box in place. • Choose a Suzie socket plug mounting location from one of the existing ports on the trailer. On some occasions a port may not be available in which case, drill the appropriate sized hole for the mounting. • Route the twin core wires from the relay box to the Suzie...
Open the catalog to page 10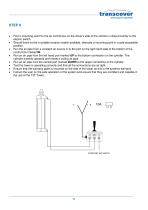
Find a mounting point for the air control box on the driver’s side of the vehicle in close proximity to the electric switch. Should there not be a suitable location readily available, fabricate a mounting point in a safe accessible position. Run the air pipe from a constant air source in to the port on the right hand side of the bottom of the control box marked IN. Run an air pipe from the left hand port marked UP to the bottom connection on the cylinder. The cylinder extends upwards and needs a coiling air pipe. Run an air pipe from the central port marked DOWN to the upper connection of the...
Open the catalog to page 11
• Retract the system to the headboard and mark where the arms land. • Mount rubber buffers if required onto the marked areas for the arms to sit on when un-sheeted. Operating instructions • Ensure that the power supply is connected. • Operate the system when the vehicle is stationary on a level surface using either the rocker switch in the cab or the waterproof switch on the trailer. • When sheeting the vehicle let enough sheet un-roll so that the sheet lies on the load, a taught straight sheet will allow the wind to get underneath and will not secure the load correctly. • When un-sheeting ensure...
Open the catalog to page 12
Warranty on Motors Transcover offer 1 and 3 year warranties depending on the product that is purchased, it is the customer’s responsibility to ensure that he is aware of the products warranty at the time of purchase. Should your product be within the purchased warranty term and meet our warranty requirements Transcover will repair or replace your motor and cover delivery costs within the UK. When is the motor not covered on warranty? Warranty is void if the motor end bell has been opened - No Exception. Warranty is void if the gearbox has been cracked open - No Exception. Damage caused...
Open the catalog to page 13All Transcover catalogs and technical brochures
 V-Cover-Installation
11 Pages
 AgriCover
1 Page
 DoubleCover Manual
2 Pages
 UnderCover brochure
4 Pages
 HyCover product range brochure
18 Pages

