
Catalog excerpts

Hardware Installation Guide
Open the catalog to page 1
Chapter 1: Before You Start Chapter 2: Hardware Setup Tools and Parts for Component Installation 10 Install Storage Drives 10 Install and Remove Rail Kits 13 Connect with Synology NAS 22 Chapter 3: System Maintenance Replace Power Supply Unit (PSU) 30
Open the catalog to page 2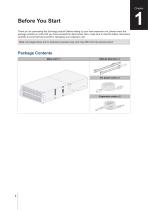
Before You Start Thank you for purchasing this Synology product! Before setting up your new expansion unit, please check the package contents to verify that you have received the items below. Also, make sure to read the safety instructions carefully to avoid harming yourself or damaging your expansion unit. Note: All images below are for illustrative purposes only, and may differ from the actual product. Package Contents Main unit x 1
Open the catalog to page 3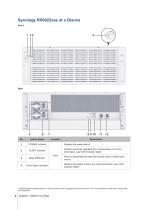
1RX6022sas automatically powers on when the power cord is plugged into the power source. For more information, please see "Connect with Synology NAS".
Open the catalog to page 4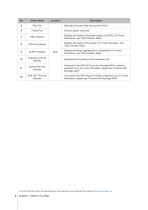
1For more information about Synology Expansion Unit supported by your Synology NAS, please visit www.synology.com.
Open the catalog to page 5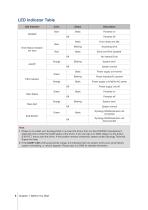
Note: 1 Please try to restart your Synology NAS or re-insert the drives, then run the HDD/SSD manufacturer's diagnostic tool to check the health status of the drives. If you can sign in to DSM, please run the built-in S.M.A.R.T. test to scan the drives. If the problem remains unresolved, please contact Synology Technical Support for help. 2 If the ALERT LED continuously blinks orange, this indicates there are system errors such as fan failure, system overheating, or volume degrade. Please sign in to DSM for detailed information.
Open the catalog to page 6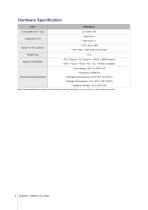
Note: Model specifications are subject to change without notice. Please refer to www.synology.com for the latest information
Open the catalog to page 7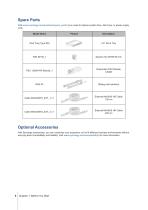
Spare Parts Visit www.synology.com/products/spare_parts if you need to replace system fans, disk trays, or power supply units Optional Accessories With Synology accessories, you can customize your expansion unit to fit different business environments without worrying about compatibility and stability. Visit www.synology.com/compatibility for more information.
Open the catalog to page 8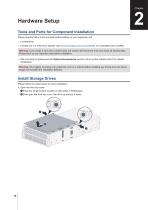
Hardware Setup Tools and Parts for Component Installation Please prepare below tools and parts before setting up your expansion unit: • A screwdriver • At least one 3.5" SAS drive (please visit www.synology.com/compatibility for compatible drive models) Warning: If you install a drive that contains data, the system will format the drive and erase all existing data. Please back up any important data before installation. • Rail mounting kit (please see the Optional Accessories section to find out the suitable rail kit for cabinet installation) Warning: We suggest mounting your expansion unit...
Open the catalog to page 10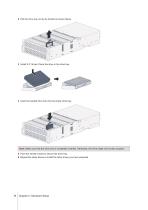
2 Pull the drive tray out by its handle as shown below. 3 Install 3.5" drives: Place the drive in the drive tray. 4 Insert the loaded drive tray into the empty drive bay. Note: Make sure that the drive tray is completely inserted. Otherwise, the drive might not function properly. 5 Push the handle inward to secure the drive tray. 6 Repeat the steps above to install the other drives you have prepared. 11 Chapter 2: Hardware Setup
Open the catalog to page 11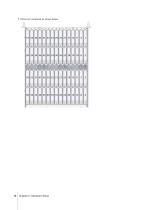
7 Drives are numbered as shown below. 12 Chapter 2: Hardware Setup
Open the catalog to page 12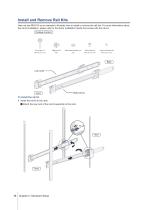
Install and Remove Rail Kits Here we use RKS-03 as an example to illustrate how to install or remove the rail kits. For more information about the rail kit installation, please refer to the Quick Installation Guide that comes with the rail kit. To install the rail kit 1 Install the rail kit to the rack: 1 Attach the rear end of the rail kit assembly to the rack. 13 Chapter 2: Hardware Setup
Open the catalog to page 13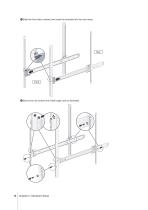
2 Slide the front latch outward and insert the brackets into the rack holes. 3 Secure the rail screws and install cage nuts as illustrated. 14 Chapter 2: Hardware Setup
Open the catalog to page 14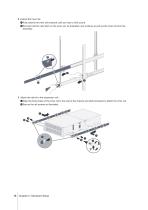
2 Extend the inner rail: 1 Fully extend the inner rail outwards until you hear a click sound. 2 Pull and hold the rear latch on the inner rail, as illustrated, and continue to pull out the inner rail from the assembly. 3 Attach the rail kit to the expansion unit: 1 Align the fixing holes of the inner rail to the side of the chassis and slide backward to attach the inner rail. 2 Secure the rail screws as illustrated. 15 Chapter 2: Hardware Setup
Open the catalog to page 15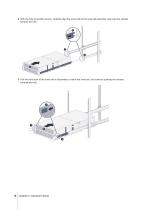
4 With the help of another person, carefully align the inner rails to the outer rail assembly, and push the chassis towards the rack. 5 Pull the front latch of the inner rail as illustrated to unlock the inner rail, and continue pushing the chassis towards the rack. 16 Chapter 2: Hardware Setup
Open the catalog to page 16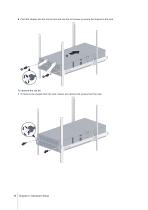
6 Push the chassis into the end of rack and use the 4U screws to secure the chassis to the rack. To remove the rail kit 1 To remove the chassis from the rack, loosen and remove the screws from the rack. 17 Chapter 2: Hardware Setup
Open the catalog to page 17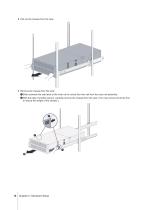
2 Pull out the chassis from the rack. 3 Remove the chassis from the rack: 1 Slide outwards the rear latch of the inner rail to unlock the inner rail from the outer rail assembly. 2 With the help of another person, carefully remove the chassis from the rack. (You may remove all drives first to reduce the weight of the chassis.) 18 Chapter 2: Hardware Setup
Open the catalog to page 18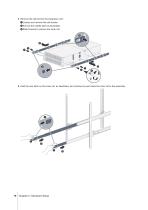
4 Remove the rail kit from the expansion unit: 1 Loosen and remove the rail screws. 2 Pull out the middle latch as illustrated. 3 Slide forward to remove the inner rail. 5 Hold the rear latch on the inner rail, as illustrated, and continue to push back the inner rail to the assembly. 19 Chapter 2: Hardware Setup
Open the catalog to page 19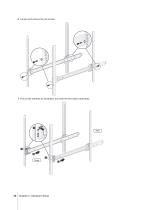
6 Loosen and remove the rail screws. 7 Pull out the brackets as illustrated, and slide the front latch backwards. 20 Chapter 2: Hardware Setup
Open the catalog to page 20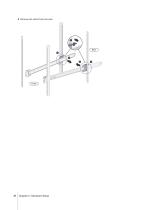
8 Remove the rail kit from the rack. 21 Chapter 2: Hardware Setup
Open the catalog to page 21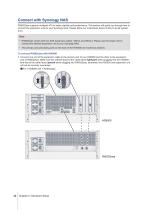
Connect with Synology NAS RX6022sas supports multipath I/O for better stability and performance. This section will guide you through how to connect the expansion units to your Synology NAS. Please follow our instructions below strictly to avoid system error. Note: • RX6022sas comes with two SAS expansion cables (100cm and 200cm). Please use the longer one to connect the farthest expansion unit to your Synology NAS. • The primary and secondary ports on the back of the HD6500 are marked by stickers. To connect RX6022sas with HD6500 1 Connect one end of the expansion cable to the primary port...
Open the catalog to page 22All Synology America catalogs and technical brochures
-
DS923+
8 Pages
-
DS224+
9 Pages
-
FS3410
8 Pages
-
SA3600 & SA3400 Series
10 Pages
-
SA3200D
8 Pages
-
RS3618xs
5 Pages
-
RS1619xs+
7 Pages
-
RS2821RP+
8 Pages
-
RS1221+ RS1221RP+
8 Pages
-
RS822+ RS822RP+
8 Pages
-
UC3400
8 Pages
-
UC3200
6 Pages
-
RX1223RP
4 Pages
-
RS4021xs+
8 Pages
-
HD6500
8 Pages
-
FS6400
8 Pages
-
DS723+
8 Pages
-
DS3622xs+
8 Pages
-
DS223j
9 Pages
-
DS423
9 Pages
-
Synology Router RT6600ax
17 Pages
-
PBeeDrive
38 Pages
-
3.5” SATA HDD Plus Series
6 Pages
-
UProduct Manual C3400
55 Pages


