- Products
- Catalogs
- News & Trends
- Exhibitions
USER MANUAL
1 /24Pages
USER MANUAL
1 /24Pages
Catalog excerpts
THANK YOU FOR CHOOSING A SPYPOINT PRODUCT The FLEX G-36 is one many SPYPOINT trail cameras. While SPYPOINT has been a cellular trail camera leader for some time, the FLEX G-36 is a major step forward in customer-friendly and innovative design, optimized antenna, straightforward interface, TEST and FORMAT buttons, and automatic carrier connection technology. This User Manual will introduce you to the features of your new FLEX G-36 and will guide you through the acquisition of its functionalities so that you can use it to its full potential. The FLEX G-36 is a cellular trail camera that works with...
Open the catalog to page 2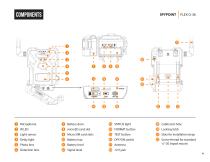
Microphone IR LED Light sensor Delay light Photo lens Detection lens Battery door microSD card slot Micro SIM card slots Battery tray Battery level Signal level STATUS light FORMAT button TEST button OFF/ON switch Antenna Cable lock hole Locking latch Slots for installation strap Screw-thread
Open the catalog to page 4
Components MICROPHONE Records sound in video mode. IR LED 4 powerful LEDs that illuminate at night for clear black and white photos and videos. LIGHT SENSOR Detects the ambient lighting conditions for taking photos and videos: in colors during the day, black and white at night. DELAY LIGHT During installation, once the signal is found, this light flashes for 30 seconds to allow the user to walk away without being captured. SIGNAL LEVEL During startup, the camera will illuminate the number of lights corresponding with the signal level. 5 bars being excellent and 1 bar being poor. STATUS LIGHT...
Open the catalog to page 5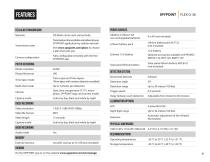
CELLULAR TRANSMISSION Network LTE Multi-carrier auto connectivity Transmission of your photos and videos to your SPYPOINT application by cellular network. Transmission plan Visit www.spypoint.com/plans to choose a plan that suits you.
Open the catalog to page 6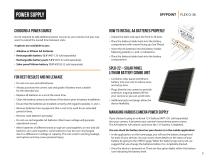
CHOOSING A POWER SOURCE Its not required to add additional power sources to your camera, but you may want to extend the overall time between visits. • Rechargeable battery 12 V (#KIT-12V sold separately) • Rechargeable battery pack 7.4 V (#LIT-22 sold separately) • Solar panel lithium battery 12 V (#SPLB-22 sold separately) • Always purchase the correct size and grade of battery most suitable for the intended use. • Replace all batteries in a set at the same time. • Clean the battery contacts and those of the device prior to battery installation. • Ensure that the batteries are installed correctly...
Open the catalog to page 7
INSTALLING A MEMORY CARD (NOT INCLUDED) The use of a memory card is necessary for the operation of the camera. It is used to save photos, videos and other camera status files. Note that photos and videos in their original format are kept on the memory card. The files sent to your application are lighter versions. You can retrieve your photos and videos at any time by removing the card from the camera and transferring the contents to another device (e.g.: computer). Your camera requires a microSD memory card, with a maximum capacity of 512 GB, sold separately. Here is a table showing the approximate...
Open the catalog to page 8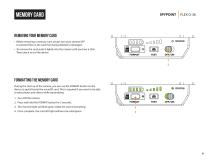
REMOVING YOUR MEMORY CARD • Before removing a memory card, always turn your camera OFF to prevent files on the card from being deleted or damaged. • To remove the card, push it lightly into the camera until you hear a click. Then take it out of the device. During the start up of the camera, you can use the FORMAT button on the device to quick format the microSD card. This is required if you want to be able to take photos and videos while transmitting. 2. Press and hold the FORMAT button for 5 seconds. 3. The microSD light will blink green while the card is formatting. 4. Once complete, the microSD...
Open the catalog to page 9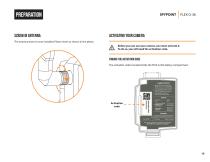
SCREW IN ANTENNA ACTIVATING YOUR CAMERA The antenna doesn't come installed. Please insert as shown in the photo. Transmitting Issue: signal, batteries or microSD Before you can use your camera, you must activate it. To do so, you will need the activation code. FINDING THE ACTIVATION CODE The activation code is located inside the FLEX G-36's battery compartment.CAMERA STARTUP 1. Power ON and wait for all LEDs to turn ) GREEN, then OFF (If not solid green, refer to legend) 2. External delay LED blinks for 10 s, then OFF: Camera is now ready 3. Press BTEST button to receive 1 photo in yourapp MICROSD...
Open the catalog to page 10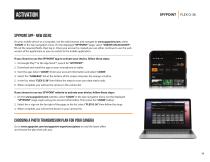
SPYPOINT APP - NEW USERS On your mobile device or a computer, use the web browser and navigate to www.spypoint.com, select “LOGIN” in the top navigation menu. On the displayed “SPYPOINT” page, select “CREATE AN ACCOUNT“, fill out the required fields, then log in. Once your account is created you can either continue to use the web version of the application or you can switch to the mobile application. If you choose to use the SPYPOINT app to activate your device, follow these steps: 1. On Google PlayTM or the App StoreTM, search for “SPYPOINT”. 2. Download and install the app on your smartphone...
Open the catalog to page 11
INSTALLATIONINSTALLING YOUR CAMERA 1. To install the camera, loop the installation strap through the intended slots. 2. Choose a solid tree that does not move in the wind, as movement will cause false detections. 3. Make sure the area immediately in front of your camera is free of branches or twigs that could be blown away by the wind. 4. The camera should be at the same height of the animal's mid-body. 5. The targeted animal should be at 25 feet (7.5 meters) away from the camera. 6. To produce brighter photos and videos at night, there should be items reflecting the camera's flash in the background....
Open the catalog to page 12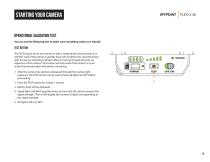
OPERATIONAL VALIDATION TEST You can use the following test to make sure everything works as it should: The TEST button forces the camera to take a single photo and transmits it. It will NOT work if the camera is already busy with another task. (Synchronizing with the server, recording a photo/video or running through the start up sequence of the camera.) This button will only work if the camera is on an active transmission plan with photos remaining. 1. After the camera has started, and passed through the startup light sequence, the TEST button can be used. Ensure all lights are OFF before proceeding....
Open the catalog to page 13