
Catalog excerpts

SZM SERIES MICROSCOPE User‘s Manual Omxie Corporation http://www.smtmax.com Copyright
Open the catalog to page 1
This manual is for the Madell SZM series microscopes. To ensure the safety and to achieve optimum performance, please read it carefully.
Open the catalog to page 2
1) Microscope ought to be placed in a dry and clean circumstance. Do not expose the microscope to the sun directly. Avoid high temperature and violent vibration. 2) Microscope is a precise instrument, so it must be avoid impact and bump during the conveyance and must be handled with care. 3) To keep the quality of the image, must avoid the dirt and do not leave finger marks on the surfaces of the lens. 4) Never turn the left and right focusing knobs in the adverse direction at the same time, otherwise the microscope will be damaged. 5) Hold the camera w'ith one hand for fear of falling when...
Open the catalog to page 3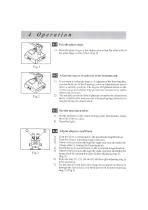
Use the glass stage Press the glass stage on the sunken place then the other side of the glass stage will be lifted. (Fig.l) Adjust the degree of tightness of the focusing arm. If you want to adjust the degree of tightness of the focusing arm, you can hold one of the focusing knobs and turn another one to attain a suitable position. The degree of tightness relies on the direction to be turned. The clockwise direction is tight, otherwise, is loose. The suitable position of the tightness can make the adjustment more comfortable and prevent it from slipping down by its weight during the...
Open the catalog to page 8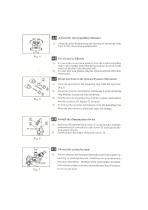
-4diust the interpupillary distance 1) Adjust the prism housing along the direction of arrowhead of the Fig.4 till the observation is comfortable. 1) For user who do not wear glasses, hold the diopter adjusting rings to prevent they from rotating and turn the eyepiece till the eyepiece shields fit the observer well. 2) For user who wear glasses, take the eyepiece shields off before observation. Mount and Remove the Optional Eyepiece Micrometer 1) Turn out and remove the mounting ring from the eyepiece. (Fig-5) 2) Clean the eyepiece micrometer, and mount it to the mounting ring with the...
Open the catalog to page 9
4-10 Mount the photo eyepiece and the PK-mount adapter 1) Put the photo eyepiece in the eyepiece socket of the trinocular. 2) Connect the PK-mount adapter with the photo eyepiece, and then tighten the lock-screw. (Fig.8) 1) Adjust the CTV to a suitable position by rotating focusing lens. Note: The range of the adjustment is l~2mm in general. Adjust the brightness of the bottom light Turn the light regulation knob according to the sign marked on the base, along the clockwise the brightness will be added , otherwise' it will be weaken. (Fig.10) 1) Press the stage on the sunken place then...
Open the catalog to page 10
Replace the fuse Screw the fuse tube out with a screwdriver and then pull the fuse out of the tube©. Renew the fuse and mount it in an adverse way. (Fig. 13)
Open the catalog to page 11
Note: The items markerM0"included and others for option.
Open the catalog to page 12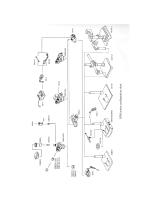
SZM series configuration chart
Open the catalog to page 13
The base electronic specification of SZMseries Model Parts Working distance is fixed regardless of the magnification factor. ^ Total mag.=Zoom mag. XEyepiece mag.X Auxiliary objective mag. Field number of eyepiece Diameter of field of view (mm) = - Zoom mag.X Auxiliary objective mag. ★ Photo adaptor mag.=Zoom mag. ( X Auxiliary objective mag.) X Eyepiece mag. ★ TV adaptor mag.=Zoom mag. ( X Auxiliary objective mag.) X C-mount TV adaptor middle
Open the catalog to page 14
The performance of the microscope can't be made full use of because ofunfomiliur with the use, this table will give some advices.
Open the catalog to page 15All SMT MAX catalogs and technical brochures
Archived catalogs
-
QK855PG BGA Repair System
9 Pages
-
QK702ESD 3-in-1 Rework Station
16 Pages
-
Screen Printer QSY3401
3 Pages
-
AE Reflow Oven
21 Pages
-
Automatic Paste Dispenser
15 Pages


