SM3-30 . SM4-30 . SM9-36
1 /36Pages

SM3-30 . SM4-30 . SM9-36
1 /36Pages
Catalog excerpts

Manual ● Mode d’emploi ● Handleiding ● Handbuch ● Manuale Dough divider/rounder Diviseuse-Bouleuse Verdeler-opboller Teigteil- und Wirkmaschine Divisora boleadora Spezzatrice arrotondatrice
Open the catalog to page 1
Congratulations with the purchase of this dough divider/rounder. This machine has been tested thoroughly in our warehouse in Belgium before delivery. This way, Sinmag Europe is able to guarantee delivery of a machine ready for installation. For correct use and long service life of your semi-automatic dough divider/rounder, we recommend that you read this manual attentively before starting to use the machine. Sinmag Europe thank you for your trust and wish you much job satisfaction with this dough divider/rounder. Sinmag Europe Team. 2 uiuMui.sinmriGEunoPG.cam sinmag Europe bvba
Open the catalog to page 2
Use the attached paper with anchor bolt position drawing to prepare the 4 anchor bolts on the ground. When the 4 anchor bolts are ready, put the machine on the position that the 4 anchor bolts go through the holes of the frame. Tighten the nuts of the anchor bolts to fix the machine in position. Take out the moulding plate Part N°42, fill with the attached lubrication oil for the moulding mechanism. The moulding plate must be put back correctly. The slits in the base footing of the moulding plate have to fit upon the upper sliding faces of the side and the pin of the drive shaft has to fit into...
Open the catalog to page 3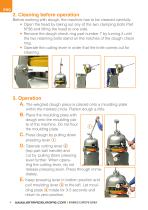
2. Cleaning before operation Before working with dough, the machine has to be cleaned carefully. Open the head by taking out any of the two clamping bolts Part N°36 and lifting the head to one side. Remove the dough check ring part number 7 by turning it until the two retaining bolts stand on the notches of the dough check ring. Operate the cutting lever in order that the knife comes out for cleaning. 3. Operation A. The weighed dough piece is placed onto a moulding plate within the marked circle. Flatten dough a little. Place the moulding plate with dough onto the moulding plate of the machine....
Open the catalog to page 4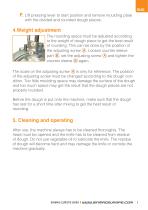
Si F. Lift pressing lever to start position and remove moulding plate with the divided and rounded dough pieces. 4.Weight adjustment The rounding space must be adjusted according to the weight of dough piece to get the best result of rounding. This can be done by the position of the adjusting screw A . Loosen counter sleeve part B , set the adjusting screw A and tighten the counter sleeve B again. The scale on the adjusting screw A is only for reference. The position of the adjusting screw must be changed according to the dough condition. Too little moulding space may damage the surface of the...
Open the catalog to page 5
6. Maintenance A. ightening of V-Belts should be done from time to time when T machine slows down. B. rease the nipples with grease gun every 3 months. G C.. very 3 months, check the lubrication oil in the oil bath under E the moulding plate. Refill when oil is not enough. Type of oil to be used is “SHELL W-R68”
Open the catalog to page 6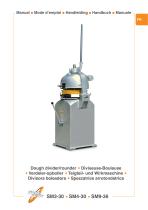
Manual ● Mode d’emploi ● Handleiding ● Handbuch ● Manuale FR Dough divider/rounder Diviseuse-Bouleuse Verdeler-opboller Teigteil- und Wirkmaschine Divisora boleadora Spezzatrice arrotondatrice
Open the catalog to page 7
Nous vous félicitons pour l’achat de votre diviseuse-bouleuse. FR Avant l’expédition, cette machine a été contrôlée dans notre dépôt en Belgique. De cette façon, nous pouvons vous assurer la livraison d’une machine prête à l’installation. Pour une bonne utilisation et une longue durée de vie de la machine, nous vous recommandons de lire ce mode d’emploi avec attention avant d’employer la machine. Sinmag Europe vous remercie pour la confiance et l’intérêt et nous vous souhaitons beaucoup de joie au travail avec cette machine Sinmag Europe Team.
Open the catalog to page 8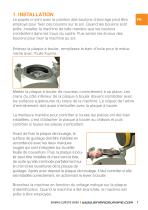
Le papier ci-joint avec la position des boulons d’ancrage peut être employé pour fixer ces boulons sur le sol. Quand les boulons sont prêts, installez la machine de telle manière que les boulons s’emboîtent dans les trous du cadre. Puis serrez les écrous des boulons pour fixer la machine au sol. Enlevez la plaque à bouler, remplissez le bain d’huile pour le mécanisme avec l’huile fournie. Mettez la plaque à bouler de nouveau correctement à sa place. Les crans du côté inférieur de la plaque à bouler doivent s’emboîter avec les surfaces supérieures du corps de la machine. Le cliquet de l’arbre...
Open the catalog to page 9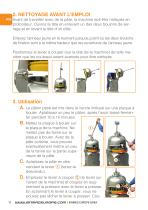
2. NETTOYAGE AVANT L’EMPLOI FR Avant de travailler avec de la pâte, la machine doit être nettoyée en profondeur. Ouvrez la tête en enlevant un des deux boulons de serrage et en levant la tête d’un côté. Enlevez l’anneau jaune en le tournant jusqu’au point où les deux boulons de fixation sont à la même hauteur que les ouvertures de l’anneau jaune. Positionnez le levier à couper (sur la tête de la machine) de telle manière que les couteaux soient avancés pour être nettoyés. 3. Utilisation A. Le pâton pesé est mis dans le cercle indiqué sur une plaque à bouler. Aplatissez un peu le pâton, après...
Open the catalog to page 10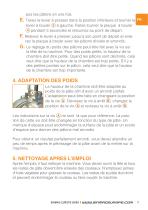
E. Tenez le levier à presser dans la position inférieure et tourner le levier à bouler 3 à gauche. Faites tourner la plaque à bouler 4 pendant 5 secondes et retournez au point de départ. F. elevez le levier à presser jusqu’à son point de départ et enleR vez la plaque à bouler avec les pâtons divisés et arrondis. G. Le réglage du poids des pâtons peut être fait avec la vis sur la tête de la machine. Pour des poids petits, la hauteur de la chambre doit être petite. Quand les pâtons sont déchirés, cela veut dire que la hauteur de la chambre est trop petite. S’il y a des petites pointes sur le pâton,...
Open the catalog to page 11All Sinmag catalogs and technical brochures
 SM-520A;SM-520S;SM-520F
2 Pages
 SE10L;SE7L
2 Pages
 Tablo
Tablo2 Pages
 Manotrad
4 Pages
 Primo
Primo2 Pages
 Autobun
2 Pages
 LAMINATO
2 Pages
 DIVOTRAD
4 Pages
 PIZZAROLLO
2 Pages
 LIFTO
LIFTO2 Pages
 CREAMCO
2 Pages
 Spiralo
2 Pages
 LAVO dishwashers
4 Pages
 Horizontal Slicer
2 Pages
 Divobun 3-30/4-30
2 Pages
 TAGLIO
21 Pages
 DIVOBUN
33 Pages
- Tipping station
- Mixing and metering unit
- Vertical freezer
- Bakery oven
- Dough mixer
- Stainless steel freezer
- Bakery dough mixer
- Dough sheeter
- Baked goods bakery oven
- Industrial bread slicer
- Stainless steel industrial cooker
- Cooling freezer
- Heating bakery oven
- Stainless steel dough mixer
- Fixed bowl dough mixer
- 380 V freezer
- Lifting tipping station
- Spiral dough mixer
- Curing bakery oven