- Catalogs
- Siglent Technologies Co., Ltd
- Custom waveforms using EasyWave and CSV Templates
- Company
- Products
- Catalogs
- News & Trends
- Exhibitions
Custom waveforms using EasyWave and CSV Templates
1 /13Pages

Custom waveforms using EasyWave and CSV Templates
1 /13Pages
Catalog excerpts

APPLICATION NOTE Custom waveforms using EasyWave and CSV Templates INTRODUCTION: Arbitrary waveform generators (AWGs) are programmable voltage sources. They can be extremely useful tools when your application requires the output of waveforms that contain complicated features or shapes. Many AWGs come pre-loaded with arbitrary waveforms like cardiac, voice, and a host of trigonometric functions. These “built-in” waveforms can be useful, but the real power of an AWG is the ability to build custom waveforms. In many cases, AWGs have basic software packages that allow you to create and edit simple waveforms by applying simple mathematics to basic wave shapes like Sine or Square waves. This technique is useful when you are building composite waveforms using basic shapes or if you wish to “hand draw” a waveform, but what if you want to create or edit a more complicated waveform? Most AWGs can be programmed directly using a remote computer connection, USB or Ethernet connection from the computer to the instrument, and a software package that can communicate to the instrument. Some common programs include .NET, Python, and LabVIEW. While this configuration is extremely powerful, it is cumbersome to develop quickly. To send a custom arbitrary waveform you need to build the application and deal with formatting the arbitrary waveform before you can get actually start using the AWG for the intended application. In this application note, we are going to describe a simple method of creating a custom arbitrary waveform by creating a Comma Separated Variable (CSV) template, edit and save the CSV file, and finally how to transfer the CSV file to a SIGLENT SDG2000X series arbitrary waveform generator. The theory can then be applied to any generator that has a similar arbitrary waveform generator software packag
Open the catalog to page 1
Create an EasyWave Template: The SIGLENT SDG series of arbitrary waveform generators work with the EasyWave software package. To begin, download and install the EasyWave package that matches your generator. This can be found on your favorite SIGLENT website (www.siglentamerica.com) Open EasyWave by clicking on the EasyWave desktop icon: Here is the EasyWave user interface
Open the catalog to page 2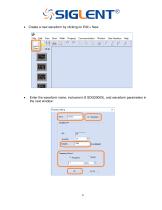
Property setting Wave wavel
Open the catalog to page 3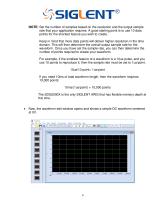
NOTE: Set the number of samples based on the resolution and the output sample rate that your application requires. A good starting point is to use 10 data points for the shortest feature you wish to create. Keep in mind that more data points will deliver higher resolution in the time domain. This will then determine the overall output sample rate for the waveform. Once you have set the sample rate, you can then determine the number of points required to create your waveform. For example, if the smallest feature of a waveform is a 10us pulse, and you use 10 points to reproduce it, then the sample...
Open the catalog to page 4
Save the file as a CSV by pressing File > Save As > set the file location and name. If you are using an SDG2X, you can also directly open the SDG2X template file that is available with this application note
Open the catalog to page 5
Editing an EasyWave Template: Once you have saved a template as a CSV, you can edit and reuse it any time you need to create a new waveform. Open the template file using a CSV capable spreadsheet program like Microsoft Excel©. You can edit the data length, frequency (Hz), amplitude (Volts), offset (Volts), and phase values (degrees) in the file. Note that the data length cannot be easily changed on the front panel of the instrument. You can edit the data manually, or use a program like Mathematica or Matlab to write to the template cells directly. The actual voltage values in column B represent...
Open the catalog to page 6
NOTE: There are some things to keep in mind when creating your waveform: 1. The data format in each field must match the parameter for your instrument requirements. For example, the SDG2X has 16-bit amplitude resolution, but other models have 14-bits. 216 = 65,536 counts For a 16-bit generator with a 20Vp-p waveform amplitude, the minimum voltage step size is given by the following: 20V/65,536 = 3.0518E-4 V For a 14-bit generator with a 20Vp-p waveform amplitude, the minimum voltage step size is given by the following: 20V/16,384 = 1.2207E-3 V 2. Use the exponential or long version of the data...
Open the catalog to page 7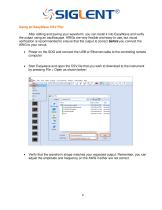
Using an EasyWave CSV File: After editing and saving your waveform, you can recall it into EasyWave and verify the output using an oscilloscope. AWGs are very flexible and easy-to-use, but visual verification is recommended to ensure that the output is correct before you connect the AWG to your circuit. Power on the SDG and connect the USB or Ethernet cable to the controlling remote computer Start Easywave and open the CSV file that you wish to download to the instrument by pressing File > Open as shown below: Verify that the waveform shape matches your expected output. Remember, you can adjust...
Open the catalog to page 8
If the waveform is correct, download the wave by selecting Communication > Send Wave > and select USBTMC for USB or enter the IP address for LAN/Ethernet communications to the instrument: Select the channel that you wish to control and press send Verify and, if needed, adjust the output voltage and frequency/sample rate by connecting the AWG to an oscilloscope
Open the catalog to page 9
Here is an example in Excel in which we manually built a function with sweeping amplitude and frequency Haversines. First, the Haversine waveform: Haversine(x) = sine2(x/2) You can build a column of data in Excel that represents a single Haversine function. Next, you can create the sweep by adding multipliers to the amplitude and frequency portions of the Haversine function: SweepHaversine2(x) = 2*sine2(2x/2) SweepHaversine3(x) = 3*sine2(3x/2) SweepHaversine4(x) = 4*sine2(4x/2) In this example, we use this technique to build a sweep with increasing amplitude and decreasing frequency, as shown...
Open the catalog to page 10
Once we have built the column of data, simply open the CSV template, copy-and-paste the column of new data into the CSV template, adjust the template data points to match the new data length, and save the file as a CSV with a new name. Reopen the new CSV using EasyWave and verify that it matches the application:
Open the catalog to page 11All Siglent Technologies Co., Ltd catalogs and technical brochures
 SDS6000A Series
21 Pages
 SDS 7000A Series
21 Pages
 SDL1000X Series
10 Pages
 SSM5000A Series
15 Pages
 Spectrum Analyzer Bandwidth
6 Pages
 Siglent_Product Catalog 2016
48 Pages
 Siglent Selection Guide 2016
10 Pages
 Benefits of deep memory
3 Pages
 SIGLENT Probes Datasheet
7 Pages
 Siglent SDS2000X User Manual
197 Pages
 Siglent SDS2000X Service Manual
59 Pages
 Probe Data Sheet + Siglent
7 Pages
 USB-GPIB User Manual_Siglent
13 Pages
 ISFE User Manual
12 Pages
 Siglent TrueArb Technology
9 Pages
 SDS2000 VS DS2000A_EN_Siglent
10 Pages
 SIGLENT SDS1000CFL
8 Pages
 SIGLENT SHS800 Data Sheet
10 Pages


- Power supply unit
- DC power supply
- AC/DC power supply
- Automation software solution
- Monitoring analyzer
- Analysis software solution
- Automatic analyser
- Windows software
- Computer-aided design software
- Cloud-based software
- Control software
- Benchtop analyser
- Switching power supply
- Design software solution
- Portable analyzer
- Interface software
- Measurement software
- Tabletop power supply
- Real-time analyzer