- Catalogs
- Shaw Moisture Meters
- Superdew 3 WP Instruction Manual
- Company
- Products
- Catalogs
- News & Trends
- Exhibitions
Superdew 3 WP Instruction Manual
1 /28Pages
Superdew 3 WP Instruction Manual
1 /28Pages
Catalog excerpts
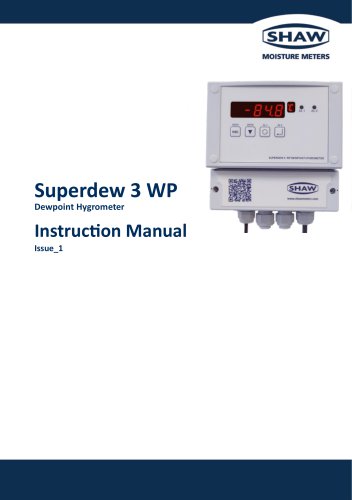
Superdew 3 WP Dewpoint Hygrometer
Open the catalog to page 1
MOISTURE METERS UK & EU Declaration of Conformity Manufacturer Shaw Moisture Meters (UK) Ltd Network House Lister Hill Leeds LS18 5AZ England We declare under our sole responsibility that: Product & Type Conforms to the relevant provisions of the following directives 2014/30/EU Electromagnetic Compatibility (EMC) Directive 2014/35/EU Low Voltage Directive (LVD) Compliance has been EN IEC 61326-1:2021 Electrical equipment for measurement, control assessed by reference to and laboratory use. EMC requirements - General requirements the following standards Tested in accordance with Class A for Industrial...
Open the catalog to page 2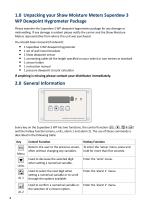
Please examine the Superdew 3 WP dewpoint hygrometer package for any damage or mishandling. If any damage is evident please notify the carrier and the Shaw Moisture Meters representative from where this unit was purchased. You should have received (if ordered): • 1 Shaw dewpoint sensor • 1 connecting cable (of the length specified on your order) or two metres as standard • 1 pressure dewpoint circular calculator If anything is missing please contact your distributor immediately. Every key on the Superdew 3 WP has two functions, the control function (0, (▼] , (§( & 0 ) and the hotkey function...
Open the catalog to page 4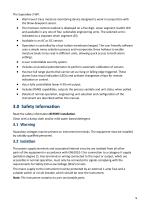
• Wall mount trace moisture monitoring device designed to work in conjunction with the Shaw dewpoint sensor. • The moisture content readout is displayed on a five digit, seven segment, backlit LED and available in any one of four selectable engineering units. The selected unit is indicated on a separate seven segment LED. • Operation is controlled by a four button membrane keypad. The user friendly software uses a simple menu selection process and incorporates three hotkeys to enable moisture levels to be read in different units, allowing quick access to both alarm settings. • A user controllable...
Open the catalog to page 5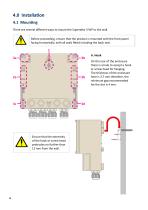
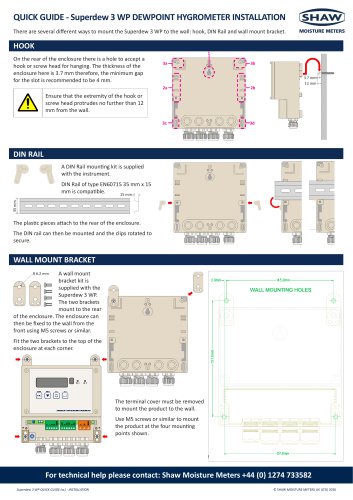
There are several different ways to mount the Superdew 3 WP to the wall. Before proceeding, ensure that the product is mounted with the front panel facing horizontally, with all seals fitted including the back seal. On the rear of the enclosure there is a hole to accept a hook or screw head for hanging. The thickness of the enclosure here is 3.7 mm therefore, the minimum gap recommended for the slot is 4 mm.
Open the catalog to page 6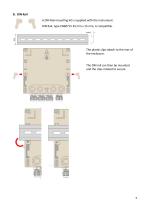
B. DIN Rail A DIN Rail mounting kit is supplied with the instrument. DIN Rail, type EN60715 35 mm x 15 mm, is compatible. The plastic clips attach to the rear of the enclosure. The DIN rail can then be mounted and the clips rotated to secure.
Open the catalog to page 7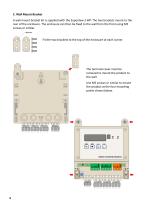
C. Wall Mount Bracket A wall mount bracket kit is supplied with the Superdew 3 WP. The two brackets mount to the rear of the enclosure. The enclosure can then be fixed to the wall from the front using M5 screws or similar. Fit the two brackets to the top of the enclosure at each corner. The terminal cover must be removed to mount the product to the wall. Use M5 screws or similar to mount the product at the four mounting points shown below.
Open the catalog to page 8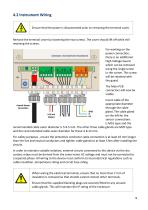
4.2 Instrument Wiring Ensure that the power is disconnected prior to removing the terminal cover. Remove the terminal cover by loosening the two screws. The cover should lift off while still retaining the screws. For working on the power connection, there is an additional High Voltage Guard which can be removed using the single screw in the corner. This screw will be retained with the guard. The Main PCB connectors will now be visible. Insert cable of the appropriate diameter through the cable gland. The cable gland on the left for the sensor connections is M16 type and the recommended cable...
Open the catalog to page 9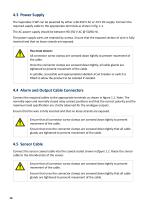
4.3 Power Supply The Superdew 3 WP can be powered by either a 90-250 V AC or 24 V DC supply. Connect the required supply cable to the appropriate terminals as shown in fig. 1.1. The AC power supply should be between 90-250 V AC @ 50/60 Hz. The power supply wires are retained by screws. Ensure that the exposed section of wire is fully inserted and that no loose strands are exposed. You must ensure: All connector screw clamps are screwed down tightly to prevent movement of the cable. Once the connector clamps are screwed down tightly, all cable glands are tightened to prevent movement of the cable....
Open the catalog to page 10
5.0 Installing the Air/Gas Sampling System The Piping Installation Schematic diagram (see section 5.1) shows all components that could be used in a dry gas measurement application. Not all the items shown will be required for every installation. Care should be taken to ensure that the sample presented to the measuring sensor is not contaminated with any other component that will damage, contaminate or affect the sensor in a way that will impair the system accuracy. It is strongly recommended that the sample should not contain particulate matter, oil or other heavy hydrocarbon condensate. If these...
Open the catalog to page 11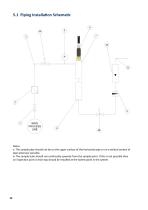
a. The sample pipe should not be on the upper surface of the horizontal pipe or on a vertical section of pipe wherever possible. b. The sample tube should run continually upwards from the sample point. If this is not possible then an inspection port or drain tap should be installed at the lowest point in the system.
Open the catalog to page 12
1. Sample Isolation Valve - This is a recommended item as it allows access to the sample system without interrupting the main process line. 2. Filter Unit - A filter unit is recommended when the samples are likely to contain particulate matter. Ifthe air/gas sample contains heavy hydrocarbon condensate, the filter must be of the coalescing type with a drain. The filter unit should be positioned as close to the sample point as practical. 3. Sample Tube - This should be stainless steel for dry air or gas applications but copper or carbon steel can be used where wetter gases are to be measured....
Open the catalog to page 13
6.0 Installing and Commissioning the Sensor It is advisable to carry out an initial purge routine of the sample loop before installing the sensor. This is to remove the possibility of sensor damage on start up. Refer to the Piping Installation Schematic in section 5.1. Open the inlet isolation valve slowly until a small flow of air/gas (at atmospheric pressure) flows through the inlet pipe work to the sensor holder, exhausting through the sensor entry port of the sensor holder. Allow this purge to continue for about 15 - 20 minutes to remove any residual moisture from the sample pipe work and...
Open the catalog to page 14All Shaw Moisture Meters catalogs and technical brochures


- Flowmeter
- Display module
- Volume flow monitor
- Industrial display panel
- Pressure gauge
- Pressure limiter
- Gas flow monitor
- Single-stage pressure regulator
- Stainless steel flow monitor
- Industrial pressure limiter
- Analog pressure gauge
- LED display panel
- Electronic display panel
- Filter housing
- Dial pressure gauge
- Gas pressure limiter
- Programmable display system
- Cartridge filter housing
- Industrial printer
- Bourdon tube pressure gauge