- Catalogs
- Shaw Moisture Meters
- Superdew 3 WP Dewpoint Hygrometer - Installation and Wiring
- Company
- Products
- Catalogs
- News & Trends
- Exhibitions
Superdew 3 WP Dewpoint Hygrometer - Installation and Wiring
1 /2Pages
Superdew 3 WP Dewpoint Hygrometer - Installation and Wiring
1 /2Pages
Catalog excerpts
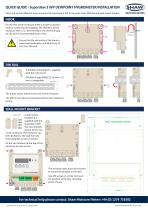
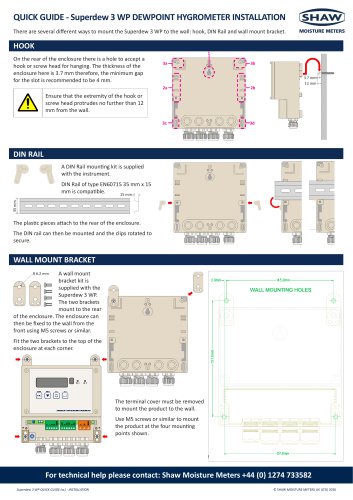
QUICK GUIDE - Superdew 3 WP DEWPOINT HYGROMETER INSTALLATION There are several different ways to mount the Superdew 3 WP to the wall: hook, DIN Rail and wall mount bracket. HOOK On the rear of the enclosure there is a hole to accept a hook or screw head for hanging. The thickness of the enclosure here is 3.7 mm therefore, the minimum gap for the slot is recommended to be 4 mm. Ensure that the extremity of the hook or screw head protrudes no further than 12 mm from the wall. DIN RAIL A DIN Rail mounting kit is supplied with the instrument. DIN Rail of type EN60715 35 mm x 15 mm is compatible. 15 mm The plastic pieces attach to the rear of the enclosure. The DIN rail can then be mounted and the clips rotated to secure. WALL MOUNT BRACKET A wall mount bracket kit is supplied with the Superdew 3 WP. The two brackets mount to the rear of the enclosure. The enclosure can then be fixed to the wall from the front using M5 screws or similar. R 6.2 mm Fit the two brackets to the top of the enclosure at each corner. The terminal cover must be removed to mount the product to the wall. Use M5 screws or similar to mount the product at the four mounting points shown. For technical help please contact: Shaw Moisture Meters +44 (0) 1274 733582 Superdew 3 WP QUICK GUIDE Iss1 - INSTALLATION © SHAW MOISTURE METERS UK (LTD) 2026
Open the catalog to page 1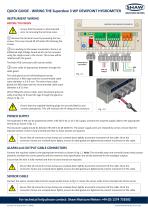
QUICK GUIDE - WIRING THE Superdew 3 WP DEWPOINT HYGROMETER INSTRUMENT WIRING BEFORE YOU BEGIN Remove the terminal cover by loosening the two screws. The cover should lift off while still retaining the screws. For working on the power connection, there is an additional High Voltage Guard which can be removed using the single screw in the corner. This screw will be retained with the guard. The Main PCB connectors will now be visible. Insert cable of appropriate diameter through the cable gland. The cable gland on the left feeding the sensor connections is M16 type and the recommended cable outer...
Open the catalog to page 2All Shaw Moisture Meters catalogs and technical brochures
 Superdew 3 WP Instruction Manual
28 Pages


- Flowmeter
- Display module
- Volume flow monitor
- Industrial display panel
- Pressure gauge
- Pressure limiter
- Gas flow monitor
- Single-stage pressure regulator
- Stainless steel flow monitor
- Industrial pressure limiter
- Analog pressure gauge
- LED display panel
- Filter housing
- Electronic display panel
- Dial pressure gauge
- Gas pressure limiter
- Programmable display system
- Cartridge filter housing
- Industrial printer
- Bourdon tube pressure gauge