- Catalogs
- Seeed Studio
- SenseCAP All-in-One Weather Station User Guide(V2)
- Company
- Products
- Catalogs
- News & Trends
- Exhibitions
SenseCAP All-in-One Weather Station User Guide(V2)
1 /50Pages
SenseCAP All-in-One Weather Station User Guide(V2)
1 /50Pages
Catalog excerpts
User manual/ Technical information SenseCAP All-in-One Weather Station User Guide(V2) Version: V1.4 Dates: 2024-11-28 The 1 Page total 50 Page Seeed Technology Co., Ltd.
Open the catalog to page 1
User manual/ Technical information The 2 Page total 50 Page Seeed Technology Co., Ltd.
Open the catalog to page 2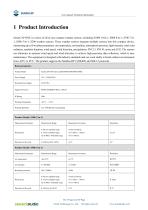
SENSECAP User manual/ Technical information 1 Product Introduction SenseCAP ONE is a series of all-in-one compact weather sensors, including S1000 10-in-1, S800 8-in-1, S700 7-in-1, S500 5-in-1, S200 weather sensors. These weather sensors integrate multiple sensors into this compact device, monitoring up to10 weather parameters: air temperature, air humidity, atmospheric pressure, light intensity, total solar radiation, sunshine duration, wind speed, wind direction, precipitation, PM 2.5, PM 10, noise and CO2. The sensors use ultrasonic to measure wind speed and wind direction, to achieve high-precision...
Open the catalog to page 3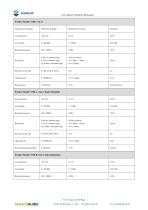
User manual/ Technical information seeed studio The 4 Page total 50 Page Seeed Technology Co., Ltd. All rights reserved.
Open the catalog to page 4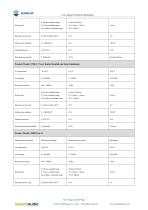
User manual/ Technical information Wind speed seeed studio The 5 Page total 50 Page Seeed Technology Co., Ltd. All rights reserved.
Open the catalog to page 5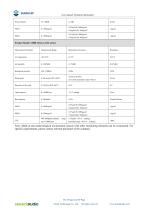
User manual/ Technical information The 6 Page total 50 Page Seeed Technology Co., Ltd. All rights reserved.
Open the catalog to page 6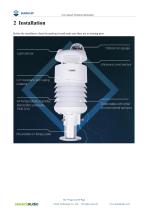
User manual/ Technical information 2 Installation Before the installation, check the packing list and make sure there are no missing parts. The 7 Page total 50 Page Seeed Technology Co., Ltd.
Open the catalog to page 7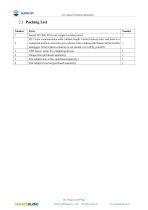
SENSECAP User manual/ Technical information 2.1 Packing List Number seeed studio The 8 Page total 50 Page Seeed Technology Co., Ltd. All rights reserved.
Open the catalog to page 8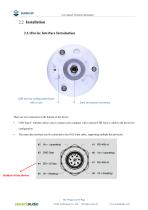
<£> SENSECAP User manual/ Technical information 2.2 Installation2.2.1 Device Interface Introduction USB port for configurationOpen V Data and power connector with a coin v There are two connectors at the bottom of the device. • USB Type-C interface allows you to connect your computer with a normal USB Type-C cable to the device for configuration. • The main data interface can be connected to the M12 8-pin cable, supporting multiple bus protocols seeed studio The 9 Page total 50 Page Seeed Technology Co., Ltd. All rights reserved.
Open the catalog to page 9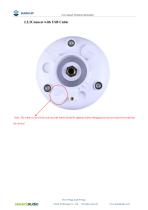
User manual/ Technical information Note: The white cover (on the side near the label) should be tightened after debugging to prevent water from entering the device! The 10 Page total 50 Page Seeed Technology Co., Ltd.
Open the catalog to page 10
SENSECAP User manual/ Technical information RS-485-A Vin- (operating) GND Data SDI-12 Data Vh - (Heating) The device adopts an M12 8-pin connector, the different colored pins provide power and data communication (as shown in the above diagram). When working with the RS-485, you can connect only 4 wires (not using a heating function), and the rest can be individually wrapped with tape to prevent short circuit The holes of the cable and the pins of the device connector must be aligned when the cable is plugged in. The 11 Page total 50 Page Seeed Technology Co., Ltd. All rights reserved.
Open the catalog to page 11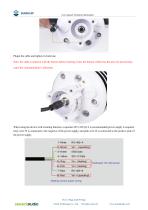
User manual/ Technical information Plugin the cable and tighten it clockwise Note: the cable is aimed at with the bottom before inserting it into the bottom. Otherwise,the pins are skewed may cause the communication is abnormal . When using the device with a heating function, a separate 24V (24V@1A is recommended) power supply is required. Gray wire #5 is connected to the negative of the power supply, and pink wire #6 is connected to the positive pole of the power supply. The 12 Page total 50 Page Seeed Technology Co., Ltd.
Open the catalog to page 12
User manual/ Technical information 1. When the device needs to add power extension cable, if its length is more than 100 meters, it needs to use 24V/2A for power supply (without heating function); 2. When the heating function is enabled, the power supply of the heating module should be within 3 meters of the SenseCAP ONE.The distance between the power supply of the heating module and the device is not more than 5m. Please use the 3m / 5m conversion cables sold by our company. There are two major installation methods, either mount on a pole with a sleeve or a platform with a flange plate. The...
Open the catalog to page 13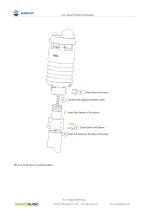
User manual/ Technical information Connect the data and power cable 2 Insert the sleeve to the sensor Screw down the sleeve (7) Inset the sleeve to the top of the pole The size of the sleeve is shown below. The 14 Page total 50 Page Seeed Technology Co., Ltd. All rights reserved.
Open the catalog to page 14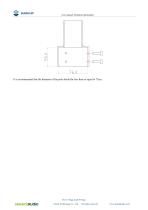
SENSECAP User manual/ Technical information It is recommended that the diameter of the pole should be less than or equal to 75cm. seeed studio The 15 Page total 50 Page Seeed Technology Co., Ltd. All rights reserved.
Open the catalog to page 15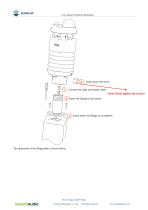
User manual/ Technical information Note: Please tighten the screws ! The dimension of the flange plate is shown below. The 16 Page total 50 Page Seeed Technology Co., Ltd.
Open the catalog to page 16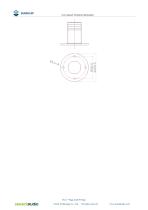
SENSECAP User manual/ Technical information seeed studio The 17 Page total 50 Page Seeed Technology Co., Ltd. All rights reserved.
Open the catalog to page 17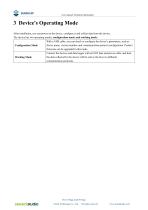
User manual/ Technical information After installation, you can power on the device, configure it and collect data from the device. The device has two operating modes, configuration mode, and working mode. The 18 Page total 50 Page Seeed Technology Co., Ltd. All rights reserved.
Open the catalog to page 18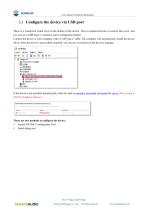
SENSECAP User manual/ Technical information 3.1 Configure the device via USB port There is a waterproof round cover at the bottom of the device. Turn it counterclockwise to remove this cover, and you can see a USB Type-C connector and a configuration button. Connect the device to your computer with a USB Type-C cable. The computer will automatically install the device driver. After the driver is successfully installed, you can see a serial port in the device's manager. If the driver is not installed automatically, click this link to manually download and install the driver.(The version is CP210x...
Open the catalog to page 19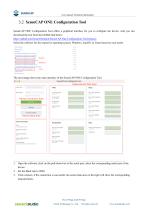
User manual/ Technical information SenseCAP ONE Configuration Tool SenseCAP ONE Configuration Tool offers a graphical interface for you to configure the device. And you can download the tool from the GitHub link below: https://github.com/Seeed-Solution/SenseCAP-One-Configuration-Tool/releases Select the software for the respective operating system, Windows, macOS, or Linux based on your needs. The next image shows the main interface of the SenseCAP ONE Configuration Tool. 1. Open the software, click on the pull-down box at the serial port, select the corresponding serial port of the device. 2....
Open the catalog to page 20All Seeed Studio catalogs and technical brochures
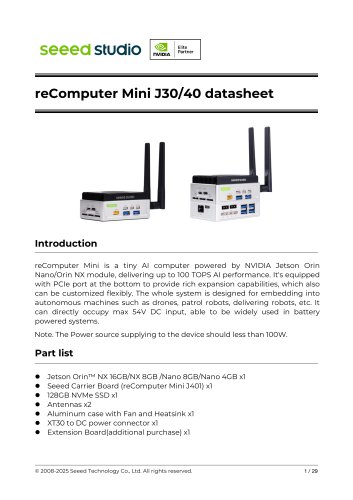 reComputer Mini J30/40 datasheet
29 Pages
 SenseCAP Sensor Probes
29 Pages
 2025 Product Catalog
99 Pages

Archived catalogs
 SenseCAP LoRaWAN Sensor Catalog
18 Pages
 2023-Seeed Studio Catalog
228 Pages