- Catalogs
- RIFTEK EUROPE
- Back-to-back Distance Measuring Gauge IMR-L-BT Series Manual
- Company
- Products
- Catalogs
- News & Trends
- Exhibitions
Back-to-back Distance Measuring Gauge IMR-L-BT Series Manual
1 /32Pages

Back-to-back Distance Measuring Gauge IMR-L-BT Series Manual
1 /32Pages
Catalog excerpts
BACK-TO-BACK DISTANCE MEASURING GAUGE IMR-L-BT Series User's manual www.riftek.com [email protected]
Open the catalog to page 1
Back-to-Back Distance Measuring Gauge. IMR-L-BT Series
Open the catalog to page 2
Back-to-Back Distance Measuring Gauge. IMR-L-BT Series
Open the catalog to page 3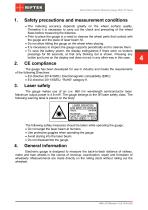
Back-to-Back Distance Measuring Gauge. IMR-L-BT Series Safety precautions and measurement conditions · The metering accuracy depends greatly on the wheel surface quality. · · · · Therefore it is necessary to carry out the check and presorting of the wheel flaws before measuring the distance. Prior to place the gauge is a need to cleanse the wheel parts that contact with the gauge and the place of laser beam hit. Do not allow hitting the gauge on the wheel when placing. It is necessary to inspect the gauge supports periodically and to cleanse them. To save the battery power, the display extinguishes...
Open the catalog to page 4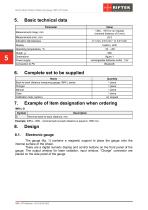
Back-to-Back Distance Measuring Gauge. IMR-L-BT Series Basic technical data Parameter Value 1340…1610 or on request (nominal distance ±15 mm) ±0.2 0.1 mm, 0.01 mm * or 0.01 inch Measurement range, mm Measurement error, mm Indication discreteness Display Weigh, g Dimensions Power supply Connection to PC 950 figure 1 rechargeable batteries 4xAA, 1.2V Bluetooth Name Back-to-back distance measuring gauge, IMR-L series Charger Manual Case Calibration tools (option) Quantity 1 piece 1 piece 1 piece 1 piece on request Example of item designation when ordering IMR-L-D Symbol D Nominal back-to-back distance,...
Open the catalog to page 5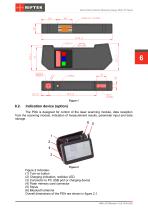
Back-to-Back Distance Measuring Gauge. IMR-L-BT Series Indication device (option) The PDA is designed for control of the laser scanning module, data reception from the scanning module, indication of measurement results, parameter input and data storage. Figure 2 indicates: (1) Turn-on button (2) Charging indication, red/blue LED (3) Connector to PC USB port or charging device (4) Flash memory card connector (5) Stylus (6) Bluetooth antenna Overall dimensions of the PDA are shown in figure 2.1. IMR-L-BT [Revision 1.0.0] 16.05.2022
Open the catalog to page 6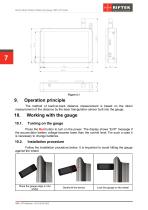
Back-to-Back Distance Measuring Gauge. IMR-L-BT Series Operation principle The method of back-to-back distance measurement is based on the direct measurement of the distance by the laser triangulation sensor built into the gauge. Working with the gauge Press the Red button to turn on the power. The display shows “ErrP” message if the accumulator battery voltage became lower than the control level. For such a case it is necessary to change batteries. Installation procedure Follow the installation procedure below. It is important to avoid hitting the gauge against the wheel. Place the gauge edge...
Open the catalog to page 7
Back-to-Back Distance Measuring Gauge. IMR-L-BT Series Single measurement To perform measurement, it is necessary to: · Turn the power on (press the Red button). The display shows “- - - - -”. · Place the gauge on the inner surface of the wheel. · Make sure that the magnetic support is tight against the surface of the wheel. · Press the Green button. · In 1 second the display will show the value of the back-to-back distance. To view the measurement result with indication discreteness of 0.01 mm (only available in direct indication mode), it is necessary to press the Blue button, thus the displayed...
Open the catalog to page 8
Back-to-Back Distance Measuring Gauge. IMR-L-BT Series To save the changed parameters, press the Red button. The display shows the “SAUE” message. Press the Green button to confirm saving or the Red button to cancel saving of the changed parameters. Image brightness To change the display brightness, it is necessary to: · Turn the power on (press the Red button). · Press the Blue button and keep it pressed for more than 3 seconds. Display will show “Up”. · Press the Blue button one more time, the image brightness set-up will be displayed “brt”. · Choose the necessary brightness value by pressing...
Open the catalog to page 9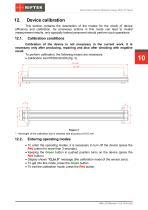
Back-to-Back Distance Measuring Gauge. IMR-L-BT Series Device calibration This section contains the description of the modes for the check of device efficiency and calibration. As erroneous actions in this mode can lead to invalid measurement results, only specially trained personnel should perform such operations. Calibration conditions Calibration of the device is not necessary in the current work. It is necessary only after producing, repairing and also after checking with negative result. To perform calibration, the following means are necessary: · Calibration tool RF260.90.000 (fig. 3)....
Open the catalog to page 10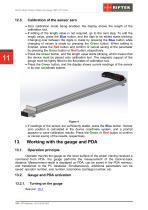
Back-to-Back Distance Measuring Gauge. IMR-L-BT Series Calibration of the sensor zero · Zero calibration mode being enabled, the display shows the length of the calibration tool. · If editing of the length value is not required, go to the next step. To edit the length value, press the Blue button, and the digit to be edited starts blinking. Changing over between the digits is made by pressing the Blue button while changing of values is made by pressing the Green button. When editing is finished, press the Red button and confirm or cancel saving of the parameter by pressing the Green button or...
Open the catalog to page 11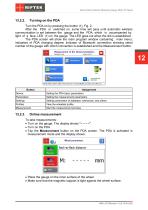
Back-to-Back Distance Measuring Gauge. IMR-L-BT Series Turn the PDA on by pressing the button (1), Fig. 2. After the PDA is switched on, some time will pass until automatic wireless communication is set between the gauge and the PDA, which is accompanied by light of a blue LED (1) on the gauge. The LED goes out when the link is established. The PDA screen will show the main program window containing: main menu; indicators of PDA charging degree; indicator of Bluetooth connection showing serial number of the gauge with which connection is established and the Measurement button. Button Device Parameters...
Open the catalog to page 12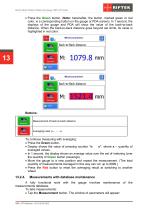
Back-to-Back Distance Measuring Gauge. IMR-L-BT Series · Press the Green button. (Note: hereinafter, the button, marked green or red color, is a corresponding button on the gauge or PDA screen). In 1 second, the displays of the gauge and PDA will show the value of the back-to-back distance. When the back-to-back distance goes beyond set limits, its value is highlighted in red color: Buttons: Measurement of back-to-back distance Averaging reset («- - - - -») To continue measuring with averaging: · Press the Green button. · Display shows the value of pressing counter “n x”, where x – quantity of...
Open the catalog to page 13All RIFTEK EUROPE catalogs and technical brochures
 PRODUCT CATALOG 2025
44 Pages
 RF603 Series Manual
49 Pages
 RF602 Series Manual
33 Pages
 RF603HS Series Manual
36 Pages
 RF609 (RF609Rt) Series Manual
33 Pages
 RF600 Series Manual
46 Pages
 RF605 Series Manual
29 Pages
 RF60i Series Manual
46 Pages
 RF62x Manual
174 Pages
 RF25x Series Manual
34 Pages
 RF651 Series Manual
32 Pages
 RF656 Series Manual
32 Pages
 RF656XY Series Manual
33 Pages
 Laser probes Manual
14 Pages
 Pipe ID Control System Manual
18 Pages
 Edge Sensor RF659 Series Manual
25 Pages
 RF627Smart-Weld manual
103 Pages
 PRODUCT CATALOG 2024
40 Pages


- LIMING measuring instrument
- LIMING measuring system
- LIMING Windows software
- Industrial software
- Measurement software
- Position transducer
- Sorting machine
- Linear position transmitter
- Digital gauge
- LIMING displacement sensor
- LIMING linear displacement sensor
- Automatic sorting system
- Automatic measurement system
- Micrometer
- Optical measurement system
- No-contact position sensor
- Inspection machine
- High-precision measurement system
- Linear encoder
- Optical sorting system