 Website:
RENISHAW
Catalog excerpts

MTP products technical specification H-2000-3020-09-B Probing systems for CNC machine tools
Open the catalog to page 1
Custom design service Introduction 11.2 The invention of the touch trigger probe in the early 1970s revolutionised the development of the CMM (co-ordinate measuring machine) as the industry standard for 3D measurement. Although the potential for applying probe routines on machine tools was quickly realised, it was not until the mid-1980s and development of more sophisticated machine controls, that probing became adopted by the world’s largest machine tool builders. Historically, there had been a marked reluctance by users of machine tools to use probing; typical objections included...
Open the catalog to page 2
Probing systems for CNC machine tools Contents 1.0 How to use this guide 2.0 Transmission selection 3.0 CNC machining centre and milling machine inspection probing systems 4.0 CNC machining centre tool setting and breakage detection probing systems 5.0 CNC lathe and grinder inspection probing systems 6.0 CNC lathe tool setting probing systems 7.0 Machine interface units 8.0 Shanks and shank adaptors 9.0 Styli and accessories 10.0 Software 11.0 Custom design service
Open the catalog to page 3
How to use this guide Probing systems for CNC machine tools 1:1 How to use this guide This document has been designed to help you to select the ideal probing system for your machine tool application. Renishaw’s broad product range covers inspection and tool setting applications on CNC machining centres, lathes and grinders, and manual milling machines. Comprehensive probing software, styli and accessories cater for every probing need. Where a standard product may not suit your exact requirements, Renishaw’s custom design service is available to tailor a solution. Probe system selection The...
Open the catalog to page 4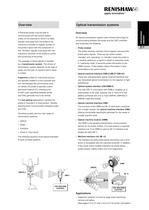
Optical transmission systems A Renishaw probe must be able to communicate with the control system (CNC) of the machine on which it is fitted. Signals must pass from the probe to the machine’s controller to register contact of the probe’s stylus with the component or tool. Similarly, signals must pass from the machine’s controller to the probe to control the functioning of the probe. Overview An optical transmission system uses infrared technology for communicating between the probe and the CNC controller and comprises the following: Transmission selection Overview · Probe module 2:1 The...
Open the catalog to page 5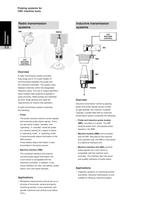
Probing systems for CNC machine tools Transmission selection Radio transmission systems RMI Inductive transmission systems RMP60 CNC MACHINE CONTROL 2:2 MI5 IMM CNC MACHINE CONTROL Overview A radio transmission system provides long range (up to 15 m path length) of communication between the probe and the machine’s controller. The system hops between channels, within the designated frequency band. The use of unique identifiers allow multiple radio systems to operate in close proximity. Radio probes are classified as short range devices and meet the requirements for licence-free operation. A...
Open the catalog to page 6
Transmission selection Hard-wired transmission systems An example of a contact tool setting system 2:3 CNC MACHINE CONTROL Overview Applications A hard-wired probe system has the simplest form of transmission system and typically, comprises the following elements: Hard-wired transmission systems are ideal for the following applications: · Signal cable connects the probe to a machine interface unit, carrying power and probe signals. · HSI interface unit is required to convert inspection probe signals into voltagefree solid state relay (SSR) outputs for transmission to the CNC machine...
Open the catalog to page 7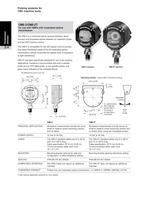
Probing systems for CNC machine tools The OMI-2 is a combined optical receiver/interface, which conveys and processes signals between an inspection probe and the CNC machine control. The OMI-2 is compatible for use with optical machine probes that utilise Renishaw’s state-of-the-art modulated optical transmission method, to provide the highest level of resistance to light interference. OMI-2T has been specifically designed for use in twin probing applications, therefore it communicates with both a spindle probe and an OTS table probe, or two spindle probes, and gives visual indication of...
Open the catalog to page 8
OMM-2 interface Transmission selection for use with the OSI interface The OMM-2 is an optical receiver that transmits control signals to the probe and receives probe data signals for onward transmission to the OSI and CNC control. The OMM-2, when connected to the OSI, operates using 'modulated' transmission and is compatible with all machine probes operating in 'modulated' mode. 2:5 A visual indication of system status is provided by LEDs. Status is continuously updated and indication is provided for start signal, low battery, probe status, error, signal strength and active system....
Open the catalog to page 9
Probing systems for CNC machine tools The OMI-2C is a combined optical receiver/interface and is an alternative to the OMI-2. It conveys and processes signals between an inspection probe and the CNC machine control. OMI-2C receiver/interface The OMI-2C is compatible for use with optical machine probes that utilise Renishaw’s state-of-the-art modulated optical transmission method, to provide the highest level of resistance to light interference. CNC machining centre spindle All dimensions are in mm (in). 8 (0.31) Socket head capscrew M4 x 12 Binder connector (Series 712) 09-0427-80-08 11...
Open the catalog to page 10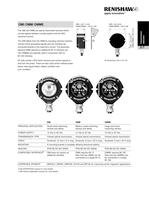
OMI = 84 (3.30) OMM/OMME = 86 (3.38) OMI = 85 (3.35) OMM/OMME = 80 (3.14) OMI = 46.7 (1.84) OMM/OMME = 46.5 (1.83) The OMI and OMM are optical transmitter/receivers which convey signals between a probe system and the CNC machine’s control. The OMI differs from the OMM by including machine interface circuitry which processes signals and can therefore be connected directly to the machine’s control. The physically identical OMM requires an additional MI 12 interface unit. Two OMMEs are typically used in conjunction with an MI 12E interface. All units contain LEDs which transmit and receive...
Open the catalog to page 11All RENISHAW catalogs and technical brochures
-
Metrology fixture table
4 Pages
-
Brochure: OMP60
6 Pages
-
OLP40 flyer
6 Pages
-
RFP1 fringe probe for REVO-2
2 Pages
-
RVP vision probe for REVO-2
2 Pages
-
MH20 articulating probe head
2 Pages
-
Data sheet: MH20 and MH20i
4 Pages
-
RTP20
2 Pages
-
PH10M-iQ PLUS
2 Pages
-
REVO-2 and RSP2 probes
2 Pages
-
SFP2 surface finish probe
2 Pages
-
Data sheet: HS20 laser head
2 Pages
-
Data sheet: RLU20 laser unit
2 Pages
-
Data sheet: RLU10 laser unit
2 Pages
-
RLMD01_09
13 Pages
-
RLBD01_04
9 Pages
-
RLCD03_03
9 Pages
-
HiLin™
20 Pages
-
PRIMO™ system
8 Pages
-
TP7M probe and stylus kit
5 Pages
-
RSP3-6 extended reach probe
4 Pages
-
RGH25F UHV, RGH20F UHV
8 Pages
-
RGH22 series readhead
4 Pages
-
Renishaw retrofit
12 Pages
-
Renishaw fixtures
8 Pages
-
SP80
4 Pages
-
SP600
4 Pages
-
Equator the versatile gauge
4 Pages
-
Styli for Zeiss applications
57 Pages
-
Precision styli
60 Pages
-
CMM technology guide
28 Pages


