- Catalogs
- Reece Safety Products
- BS09 Cable lockout, BS10 Gate Valve Lockout
BS09 Cable lockout, BS10 Gate Valve Lockout

BS09 Cable lockout, BS10 Gate Valve Lockout
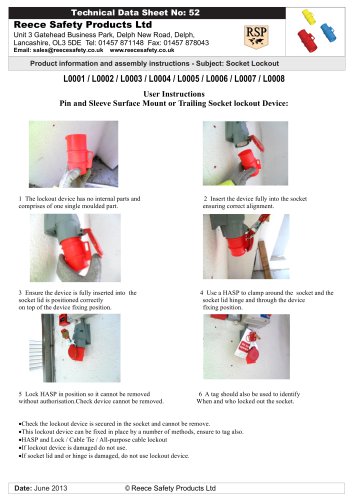
- Fit the two halves of the valve cover over the handwheel.
- Push the two halves together.
- Secure the lockout using a padlock.
- Ensure all hazardous energy is de-energized before and after installing the lockout device.
- Users are responsible for compliance with Health and Safety Regulations.
- The Scissor-Lok Lockout requires a 4.76mm O.D. plastic-coated cable and a compatible padlock shackle diameter to function correctly.
- Using undersized cables or padlocks may reduce gripping capacity and prevent proper operation.
- The load-bearing capacity depends on the plastic coating strength of the cable used.
- Thread the cable through or around the object to be secured and a stationary anchor point.
- Thread the free end of the cable through the loop.
- Feed the cable through the clamping slot or hole, pull tight, close the handle, and install 1-3 padlocks as needed.
- Verify that the object is properly restrained from activation after installation. Reconfigure and reinstall if necessary.
- Use with 6.3mm diameter shackle padlocks or larger, up to a maximum of 7.2mm diameter shackles.
- The Scissor-Lok Lockout can be configured in various ways, and users must determine the appropriate setup for each application.
- If padlock bodies interfere during installation, stagger them on opposite sides.
Catalog excerpts

Reece Safety Products Ltd Premier House, Manchester Road, Mossley, Lancashire OL5 9AA Tel: 01457 831133 Fax: 01457 831144 Email: [email protected] www.reecesafety.co.uk Product information and assembly instructions - Subject Adjustable Gate Valve Lockout Technical Data Sheet No: 8 1. Fit the two halves of the Valve cover over the handwheel 2. Push fit the two halves together 3. Lockout using your padlock. Date: January 2004 © Reece Safety Products Ltd WARNING!! ! All associated hazardous energy should be verified as de-energized prior to and following the installation of a Lockout device. ! Appropriate use of the Lockout product is the sole responsibility of the user in relation to compliance of employers and current Health and Safety Regulations. Caution: The Scissor-Lok Lockout must be used with 4.76MM O.D. plastic coated cable and a padlock with an appropriate diameter shackle to ensure proper operation. Use of undersized cable or padlocks could result in diminished gripping capacity which could prevent operation of the lockout. Note: The load bearing capacity of the Scissor-Lok is dependant on the strength of the plastic coating on specific cable being used. Use with our 6.3mm diameter shackle padlocks (or larger, up to maximum 7.2mm diameter shackles) The Scissor-Lok Lockout can be deployed in many different configurations and it is up to the user to determine the appropriate set up for each unique application. Product information and assembly instructions - Subject Scissor Cable Lockout STANDARD INSTALLATION WITH LOOPED CABLE ASSEMBLY 1 Thread cable through and/or around object to be secured and around a stationary anchor point. 2 Thread free end of cable through loop. 3 Feed cable through clamping slot (or clamping hole) and pull tight. Close handle and install 1-3 padlocks as needed. (See figure 2.) 4 After installation, verify that the object being locked out is properly restrained from activation. Reconfigure and reinstall if necessary. Figure 1 Figure 2 Figure 3 If padlock bodies interfere during installation, stagger on opposite sides.
Open the catalog to page 1All Reece Safety Products catalogs and technical brochures
 Power Protection Seal
2 Pages
 60kV Rescue Hook
1 Page
 ELE09 Switchboard Matting
4 Pages
 Lockable plug covers
1 Page
 Plug Block
1 Page
 Full 2015/16 Catalogue
100 Pages
 Electrical Safety Boots
1 Page
 Electrical Safety Gloves
1 Page
 RSPL1 Plug Lockout
1 Page
 ECBKIT MCB Lockout Kit
2 Pages
 Pneumatic Lockouts
1 Page
 Plug Lockouts
1 Page
 BS18 Cable Lockout
1 Page
 CB15 Breaker Blocker Kit
1 Page
 Fuse Lock / Blockouts
1 Page
 IEC 60320 Lockout
1 Page
 LP550 Plug Lockouts
1 Page
 Power Protection Seal
2 Pages