


Series X Cone Ring Flexible Couplings

Series X Cone Ring Flexible Couplings
- Ensure all parts are clean and free from grit.
- Check key fit in both shaft and hubs.
- Install each coupling half on its shaft, ensuring proper alignment and lubrication for press fits.
- Set the gap between coupling halves as per table 3.
- Adjust for acceptable shaft alignment using metal shim strips as needed.
To Install:
- Remove protective coatings and ensure surfaces are clean.
- Oil threads and insert screws loosely.
- Fit the hub and bush to the shaft, tighten screws alternately, and hammer to achieve maximum grip.
- Check screw tightness after initial operation and fill holes with grease.
- Slacken screws, use jacking off holes to loosen the bush, and remove the assembly.
- Check for errors of angularity and eccentricity using block gauges and dial indicators.
- Correct angularity errors before eccentricity.
- Allowable misalignment gaps are provided in table 3.
- Ensure cleanliness and apply silicon grease to rubber cone rings.
- Align pin holes and torque tighten pin/cone assemblies as per table 4.
Cone Ring Inspection:
- Inspect rubber cone rings every 6 months for wear and replace if necessary.
- Perform alignment checks as per Section 1.3.
- Options include purchasing new cone rings or new pin and cone assemblies.
- Ensure thorough cleaning and lubrication if reusing pins.
Catalog excerpts

INSTALLATION & MAINTENANCE CONE RING COUPLINGS (STANDARD & BRAKE DRUM TYPES)
Open the catalog to page 1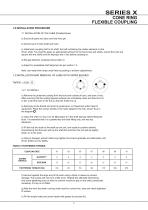
1.1 INSTALLATION OF THE HUBS (Parallel Bores) a) Ensure all parts are clean and free from grit. b) Check key fit in both shaft and hubs. c) Install each coupling half on its shaft, the half containing the rubber elements on the driven shaft. For press fits apply an appropriate lubricant to the hub bores and shafts, ensure the hubs are square with the shafts and the keyways are in line before pressing on. d) Set gap between coupling halves (table 3). e) Adjust for acceptable shaft alignment as per section 1.3. Note: use metal shim strips under feet as packing to achieve adjustments. a) Remove...
Open the catalog to page 2
1.2.2 TO REMOVE a) Slacken all screws by several turns. Remove one (size 08 to 10, remove two) and insert it (them) into the jacking off holes shown thus in diagram, after oiling thread and point of grub screws or thread and under head of cap screws. b) Tighten the screw(s) until the bush is loosened in the hub and the assembly is free on the shaft. c) Remove the assembly from the shaft. 1.3 SHAFT ALIGNMENT a) Check shaft alignment as follows:Errors of alignment fall into categories of angularity (see ¿gure 1) and eccentricity (see ¿gure 2), or a combination of both. Errors of angularity should...
Open the catalog to page 3
3b) Clock Gauge Method for Brake Drum Coupling 3c) Gauge Method for Brake Drum Coupling Feeler Gauge 4b) Brake Drum Coupling Setting Block
Open the catalog to page 4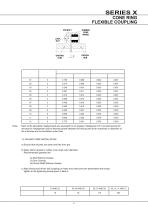
TABLE 3 ALLOWABLE GAP & ERROR
Open the catalog to page 5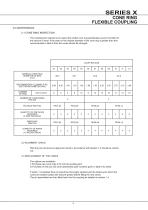
2.0 MAINTENANCE 2.1 CONE RING INSPECTION The maintenance required is to inspect the rubber cone ring periodically (every 6 months) for the amount of wear. If the wear on the outside diameter of the cone ring is greater than that recommended in table 5 then the cones should be changed. TABLE 5 CONE AND PIN DETAILS 2.2 ALIGNMENT CHECK With the pins removed an alignment check in accordance with Section 1.3 should be carried out. 2.3 REPLACEMENT OF THE CONES Two options are available:-i) Purchase new cone rings to fit onto the existing pins ii) Purchase of new pin and cone assemblies (part numbers...
Open the catalog to page 6All Radicon catalogs and technical brochures
 Series M Helical In-Line
116 Pages
 BR-Series-AM.
72 Pages
 adicon-SeriesX
32 Pages
 BR Series F
117 Pages
 Radicon Series X Couplings
32 Pages
 BR Series X Couplings
36 Pages
 BR Cone Ring Couplings
16 Pages
 Series J
73 Pages
 Motor
Motor4 Pages
 Series E Flyer
4 Pages
 G series
4 Pages
 BD
BD4 Pages
 Product Brochure radicon
8 Pages
 Benzlers Screw Jacks
69 Pages
 Series J - Shaft Mounted Gearbox
15 Pages
 Radicon Series ET
42 Pages
 BR Series G
71 Pages
 Metric
8 Pages
 Geared Pump
15 Pages
 Series P Planetary
4 Pages
 M series
120 Pages
 Sala Gears
74 Pages
 Screw Jacks
58 Pages
 Roloid Pump
17 Pages
 Heavy Duty Worm Gear Series ER
15 Pages
 SERIE G
71 Pages
 C series
120 Pages
 F series
119 Pages
 Series AM Worm Gear
73 Pages
 Worm Gear Series AJ
89 Pages
 Series BS Worm Gear
60 Pages
 Elflex Flexible Couplings
8 Pages
 Series H industrial gearboxes
123 Pages
 Geared Motor Series K
90 Pages
 Elign Gear Couplings
17 Pages


Archived catalogs
 Worm Gears Series AH
13 Pages


- Pump
- Industrial pump
- Pump with electric motor
- Stationary pump
- Seawater pump
- Electric gearmotor
- Planetary gearbox
- Coaxial gearhead
- Food product pump
- Right angle gearhead
- Direct current gear-motor
- Compact gearhead
- Solid-shaft gearhead
- Flexible coupling
- Hollow-shaft gearhead
- Gearbox for industrial applications
- Transmission gearhead
- Industrial electric gearmotor
- Coaxial gearmotor
- Shaft gearhead