- Catalogs
- pyroistech.sl
- FJORD-series
FJORD-series
1 /19Pages

FJORD-series
1 /19Pages
Catalog excerpts

FJORD-series User Manual Fiber coupled SLED light source NIR Pyroistech S.L. Edificio I+D Jerónimo de Ayanz Campus Arrosadía 31006, Pamplona, Spain +34 698 91 04 12 www.pyroistech.com [email protected] © 2020 Pyroistech
Open the catalog to page 1
All rights reserved. No part of this publication may be reproduced, stored in a retrieval system, or transmitted, by any means, electronic, mechanical, photocopying, recording, or otherwise, without written permission from Pyroistech S.L. This manual accompanies a product order and is subjected to the condition that it shall not, by way of trade or otherwise, be lent, re-sold, hired out or otherwise circulated without the prior consent of Pyroistech S.L. in any form of binding or cover other than that in which it is published. The specifications indicated in this manual are subject to change...
Open the catalog to page 2
www.pyroistech.com [email protected]
Open the catalog to page 4
0. Introduction Thank you for purchasing this FJORD light source from Pyroistech.SL. This document describes the FJORD light source and provides you with instructions for its correct operation. Please do not hesitate to contact us through [email protected] if you have any questions or doubts about this manual. FJORD is the superluminescent diode (SLED) broadband light source that allows you to combine up to 8 high power SLED, with peak wavelengths that range from 830 nm to 1650 nm. Its compact, silent and sturdy design permits its integration in whatever type of application, covering a wide...
Open the catalog to page 5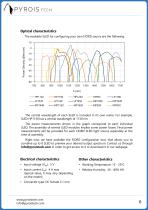
Optical characteristics The available SLED for configuring your own FJORD source are the following: Power Density (dBm/nm) The central wavelength of each SLED is included in its own name. For example, SLED HP1130 has a central wavelength of 1130 nm. The power measurements shown in the graph correspond to each individual SLED. The assembly of several SLED modules implies some power losses. Final power measurements will be provided for each FJORD SLED light source separately at the time of assembly. Right now, we have available the FJORD configuration tool, that allows you to combine up to 8 SLED...
Open the catalog to page 6
2. Operation 2.1 Package Content • Requested FJORD light source • Power source • Power cord • User’s manual Inspect carefully the devices and make sure there is no damage. On the contrary, do not employ the light source and please contact us through [email protected] for repair or replacement information. 2.2 Basic operation Insert the plug of the power cord into the power supply and connect the power cord to the power outlet. Then, introduce the plug of the power supply into the light source power input (DC female type). Unscrew the cap of the FC-PC/FC-APC connector on the front face of the...
Open the catalog to page 7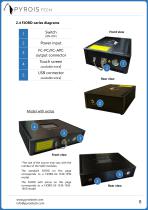
Front view Power input FC-PC/FC-APC output connector Touch screen (available extra) USB connector (available extra) 2 Model with extras Front view *The size of the source may vary with the number of the SLED modules. The standard FJORD on this page corresponds to a FJORD-X2-1330-1550 model. The FJORD with extras on this page corresponds to a FJORD-X3-1330-15501650 model. www.pyroistech.com [email protected] Rear view
Open the catalog to page 8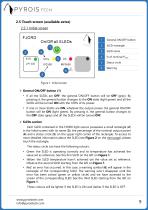
2.5 Touch screen (available extra) 2.5.1 Initial screen 1 2 SLED name SLED rectangle General ON/OFF button Status circle 3 Figure 1. Initial screen General ON/OFF button (1) • If all the SLEDs are OFF, the general ON/OFF button will be OFF (grey). By pressing it, the general button changes to the ON state (light green) and all the SLEDs will be turned ON with the 100% of its power. • If one or more SLEDs are ON, whatever the output power, the general ON/OFF button will be ON (light green). By pressing it, the general button changes to the OFF state (grey) and all the SLEDs will be turned OFF....
Open the catalog to page 9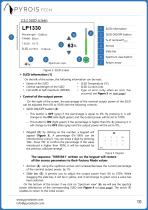
SLED ON/OFF button SLED information Spectrum view button Return arrow Figure 2. SLED screen SLED information (1) On the left of the screen, the following information can be read: • Name of the SLED • SLED Temperature (ºC) • Central wavelength of the SLED • SLED Current (mA) • Full width at half maximum (FWHM) • Type of error (only when an error has occurred, see Figure 5 on next page) Control of the output power On the right of the screen, the percentage of the nominal output power of the SLED can be adjusted from 0% to 100% with the following controls: • SLED ON/OFF button (2): – This button...
Open the catalog to page 10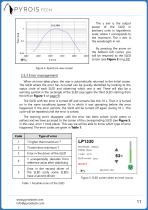
The y axis is the output power of the SLED in arbitrary units in logarithmic scale, where 1 corresponds to the maximum. The x axis is the wavelength in nm. By pressing the arrow on the bottom left corner, you will be returned to the SLED screen (see Figure 2 on p.10). Figure 4. Spectrum view screen 2.5.3 Error management When an error takes place, the user is automatically returned to the initial screen. The SLED where the error has occurred can be quickly identified by looking to the status circle of each SLED and observing which one is red. There will also be a warning symbol in the rectangle...
Open the catalog to page 11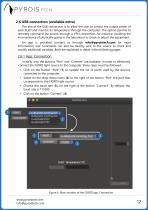
2.6 USB connection (available extra) The aim of the USB connection is to allow the user to control the output power of each SLED and monitor its temperature through the computer. This option permits to remotely command the source through a VPN connection, for instance; avoiding the inconvenience of physically going to the laboratory to check or adjust the equipment. An app is provided (contact us through [email protected] for more information) and commands can also be directly sent to the source to check and modify additional variables. Both are explained in detail in the following pages. 2.6.1...
Open the catalog to page 12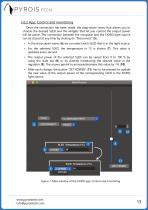
2.6.2 App: Control and monitoring Once the connection has been made, the drop-down menu that allows you to choose the desired SLED and the widgets that let you control the output power will be active. The connection between the computer and the FJORD light source can be closed at any time by clicking on “Disconnect” (5). • In the drop-down menu (6) we can select each SLED that is in the light source. • For the selected SLED, the temperature in ºC is shown (7). This value is updated every second. • The output power of the selected SLED can be varied from 0 to 100 % by using the slide bar (8) or...
Open the catalog to page 13All Pyroistech.sl catalogs and technical brochures
 COB-1050
2 Pages
 COB-940
2 Pages
 COB-840
2 Pages
 COB-740
2 Pages
 COB-660
2 Pages
 COB-6500
2 Pages
 COB-523
2 Pages
 COB-460
2 Pages
 COB-457
2 Pages
 COB-405
2 Pages
 COB-395
2 Pages
 COB-385
2 Pages
 COB-365
2 Pages
 TAKHI-MP
2 Pages
 TAKHI-HP
2 Pages
 COB-623
2 Pages
 COB-590
2 Pages
 COB-310
2 Pages
 COB-280
2 Pages
 COB-270
2 Pages
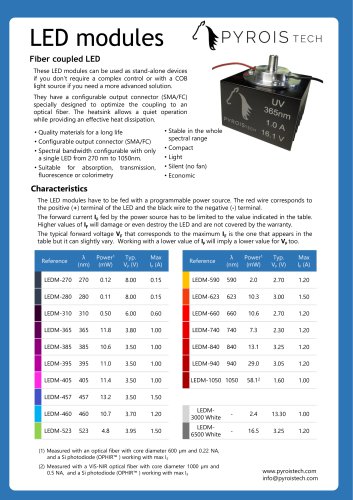 LED modules
2 Pages
 TAKHI-series
12 Pages
 COB-series
12 Pages