
- Catalogs
- Pulsarlube
- Operation manual M


Operation manual M

Operation manual M
1. Press the TEST button for 2 seconds to initiate a test cycle and ensure proper operation.
2. Use the MODE button to set the dispensing period.
3. Clean the area around the lube point and ensure a clear passage with a manual grease gun.
4. Remove the grease nipple and install appropriate adaptors.
5. Refit the top housing and turn clockwise until it clicks.
6. Install the Pulsarlube M unit on the lube point.
7. After the dispensing period, replace the unit with the Service Pack.
8. Screw in the grease pouch carefully and select the appropriate capacity using the 125/250/TEST button.
9. Record the installation and scheduled completion dates on the lubricator label.
Troubleshooting Guidelines
1. Blank LCD Screen: Check for electrical malfunctions or battery issues. Replace the battery pack or press reset.
2. Low Battery Indication: Store the battery pack in a cool, dry place and consider using a lithium battery for advanced applications.
3. Excessive Backpressure: Check backpressure, reduce remote installation distance, or clear blockages with a manual grease gun.
LCD Functions
- Power ON/OFF: Press the button for 2 seconds.
- Deactivate 'Automatic Lock Out' mode by pressing the button for 2-3 seconds.
- Display shows dispensing period, grease capacity, and alerts for low battery or excessive backpressure.
Installation Methods
- Single Point Installation: Prefer direct mount; use extension tube for remote installations.
- Multi-Point Installation: Use a divider block for remote multi-point lubrication, ensuring back pressure is below 30kgf/cm2.
Warnings and Warranty
- Warranty covers original defects for 1 year from purchase, excluding damage from misuse.
- Use lithium battery packs for specific conditions like extreme cold or long period settings.
Contact Information
Pulsarlube USA, Inc.
Phone: 1-847-593-5300
Fax: 1-847-593-5303
Website: www.pulsarlube.com
Email: [email protected]
Address: 1480 Howard Street, Elk Grove Village, IL 60007, USA
Catalog excerpts
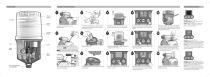
Product Details Installation/Disposal Guidelines Troubleshooting Guidelines Pouch Spring Housing Pouch Plate Grease Pouch Check the grease pouch capacity and the service pack items (battery pack, grease pouch & dust cover). Carefully screw the grease pouch in by turning clockwise. Do not over tighten. Select the appropriate grease pouch capacity by pressing the 125/250/TEST button. Note the installation date and the scheduled completion date of lube cycle on the lubricator using the label provided in the Service Pack for maintenance purposes. Pump Ensure a clear passage using a manual grease gun. Note1 Remove any hardened grease Main Body by purging the lube point with a manual grease gun. Note2 The grease in the equipment and the grease contained in the unit should be the same or compatible. Worm Gear Connecting Thread (3/8" M BSPT) Remove contaminants around the lube point. Remove the grease nipple and install appropriate adaptors. Insert battery pack. Purge the grease pouch until grease comes out of the tip. Refit the top housing on the unit and turn clockwise until it clicks. Press the POWER button for 2 seconds to turn the unit on. Press the MODE button to program the dispensing period. Press the TEST button for 2 seconds to run a test cycle and check for proper operation of the unit. Symptom: Blank LCD screen Possible Cause: Electrical malfunction of CPU or circuitry, battery problem Solution: Replace battery pack or press reset button to restart the lubricator. If the problem persists, contact your supplier. Install the Pulsarlube M unit on the lube point. When the selected dispensing period has completed, replace the unit with the Service Pack according to step #3~7. Symptom: Low Battery Indication Possible Cause: Rapid power consumption due to improper storage or harsh operating conditions (temperature, humidity, or high backpressure). Remedy: Store the battery pack in cool, dry place and choose proper battery type for application. Optional lithium battery pack is available for more advanced applications. Install the dust cover over the lubricator for added protection. Symptom: Excessive Backpressure Indication Possible Cause: Excessive backpressure due to hardened grease, over-lubrication, ruptured lube line, long distance remote installation, etc. Solution: A) Check backpressure at lube point and/or lube line, B) check grease dispensing rate, C) reduce remote installation distance, or D) use manual grease gun to clear blockage.
Open the catalog to page 1
Mounting Methods Selecting the dispensing period Single Point Installation Deactivate 'Automatic Lock Out' mode by pressing the button for 2~3 seconds Direct Mount or Remote Installation using Extension Tube Direct mount is always preferable. For applications not allowing any direct mounts, remotely mount the unit using appropriate accessories and keep the distance from the lube point as short as possible. Power ON/OFF Press the button for 2 seconds to turn unit on or off For 125ml/250ml unit A) Press the button to select 125ml or 250ml capacity B) Hold the button for 2 seconds to run a test...
Open the catalog to page 2All Pulsarlube catalogs and technical brochures
 2023 Pulsarlube E
2 Pages
 Master Catalogue
40 Pages
 Pulsarlube EO
2 Pages
 Pulsarlube OL
2 Pages
 Pulsarlube Master Catalogue
18 Pages
 Operation manual Mi
2 Pages
 PL10 Motor Bearing
2 Pages
 PL4 H1 Food Grade
2 Pages
 PL2 Heavy Duty
2 Pages
 PL1 Multipurpose
2 Pages
 Kit No. 1250RC-1
1 Page
 Kit No. 1000RC-1
1 Page
 Kit No. 2000RC-1
1 Page
 Pulsarlube MS
2 Pages
 Master-catalogue
18 Pages
 Operation manual PLC
2 Pages
 Pulsarlube Mi
2 Pages
 Pulsarlube PLC
2 Pages
 Operation manual MS
2 Pages
 Operation manual OL500
2 Pages
 Operation manual MSP
2 Pages
 Operation manusal S
1 Page
 Operation manual EX
2 Pages
 Operation manual E
2 Pages
 Operation manual V
2 Pages
 Pulsarlube EX
2 Pages
 Pulsarlube S
2 Pages
 Pulsarlube MSP
2 Pages
 Pulsarlube M
2 Pages
 Pulsarlube V
2 Pages
 Leaflet Pulsarlube C
2 Pages
 Operation manual C
2 Pages


Archived catalogs
 Pulsarlube E
2 Pages
- Automatic lubricator
- Single-point lubricator
- Electromechanical lubricator
- Multi-point lubricator
- Lubrication
- Battery-powered lubricator
- Explosion-proof lubricator
- Electrochemical lubricator
- Linear guide lubricator
- Hazardous area lubricator
- Precise lubrication lubricator
- Mechanical lubricator
- Spring-loaded lubricator
- Bluetooth lubricator