- Catalogs
- Pulsarlube
- Operation manual C
Operation manual C

Operation manual C
Pulsarlube C (KLT200C) is an advanced electrochemical automatic single-point lubricator designed to provide a precise and consistent supply of lubricant across various industrial applications. It operates by generating inert nitrogen gas through a controlled electrochemical reaction, ensuring safety and reliability compared to traditional methods using combustible hydrogen gas.
- Grease Capacity: 125cc and 250cc
- Normal Operating Pressure: 5.0 kgf/cm² (70 psi)
- Operating Temperature Range: Not specified
- Outlet Thread Size: 3/8” PT (NPT Available)
- Product Dimensions: 125cc - Ø 97 x 133mm (H), 250cc - Ø 97 x 150mm (H)
- Waterproof and suitable for NLGI 1, 2 greases
- Remote Installation: Up to 1.0m (3ft) using an 8mm (1/4") tube
- Open the transparent cap and press the green power button. The red LED will blink in mode "1".
- Select the desired mode by pressing the red button. The mode is confirmed when the LED blinks once long after five short blinks.
- Ensure the transparent cap is locked after mode selection. The LED will blink every 10 seconds, indicating gas generation.
- For re-installation, clean contaminants around lubrication points and connections.
- The transparent body allows easy monitoring of grease dispensing status.
- Purge the lubrication point with a grease gun to ensure a clear passage.
- Remove the grease nipple and check for hardened grease.
- Install the Pulsarlube C by screwing it clockwise onto the lubrication point.
- Press the green button to activate and set the dispensing rate with the red button.
- Record grease type, installation date, and expiration date on the label.
- Turn off the lubricator at the end of the dispensing cycle and dispose of it according to local regulations.
The guide provides general recommendations for bearing lubrication based on shaft diameter and grease volume requirements over different time periods (1, 3, 6, 12 months).
When using Pulsarlube C for the first time, fill the lube line with a manual grease gun. Ensure grease compatibility by consulting your distributor.
- Use a tube or pipe with an internal diameter greater than 1/4" and a length less than 1.0m (3ft).
- Fill the tube with compatible grease.
- Dispensing pressure decreases with distance; 1, 3, or 6-month modes are recommended.
The shelf life is 2 years from production, and the warranty is 1 year from installation.
- Remove the nozzle cap after turning the unit upside down.
- Connect the filter to the 3/8” female screw and assemble the unit tightly.
- Install the oiler at lubrication points, ensuring airtightness with Teflon tape.
- The LED will blink every 10 seconds when operating.
Catalog excerpts
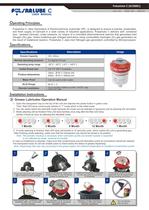
‡@ Open the transparent cap on the top of the unit and depress the power button in green color. Then, Red LED lamp continuously twinkle in “1” mode which is the initial mode. ‡A You can easily select the desirable mode because the mode can be selected in sequence just by pressing the red button. ‡B Mode selecting will be finished if the LED lamp twinkles once long after the Red LED lamp twinkle 5 times as soon as selecting the desirable mode. ‡C If mode selecting is finished, Red LED lamp will twinkle in 10 seconds cycle, which means the unit is generating gas. ‡D After finishing mode selecting, make sure that the transparent cap should be locked in its position. Note: The periodic checkup is necessary when lubrication points are located outside or expected to be infiltrated by water, moisture & humidity. ‡E In case re-installment is required, make sure that contaminants around lubrication points & connections should be cleaned. ‡F The transparent body of unit can enable users to check easily the status of grease dispensing. Note: Dispensing rate may vary according to the grease types, the ambient temperature & conditions of lubrication points. Grease Lubricator Operation Manual Operating Principles pecifications Installation Instructions C Pulsarlube C (KLT200C) Pulsarlube C, New Generation of Electrochemical, Automatic SPL, is designed to ensure a precise, predictable, and fresh supply of lubricant in a wide variety of industrial applications. Pulsarlube C delivers self- contained (pre - packed) lubricant, under pressure, by means of a controlled electrochemical reaction that generates inert nitrogen (N2) gas. Unlike traditional gas charged lubricators using combustible Hydrogen (H2) gas generation as the result of metal/acid reaction, Pulsarlube C uses inert Nitrogen gas generation controlled by Microprocessor. Doc No : 3203 Rev . 020610 5 6 7 8 1 2 3 4 Do not tamper with product. Purge the lube point with a grease gun to ensure a clear passage. Remove the grease nipple and double check for any hardened grease in bearing zerk. Install the Pulsarlube C lubricator on the lube point by screwing in clockwise. Press green button to turn on dispenser and set dispensing rate by pressing red button. Note grease type, installation date, expiration date, etc on the label for your records. Turn lubricator off at the end of dispensing cycle by pressing top green button.. Dispose of empty lubricator in compliance with local waste disposal regulations. Grease Capacity 125, 250cc Normal operating pressure 5.0 kgf/ (70 psi) Operating temp range Outlet thread size 3.8” PT (NPT Available) Product dimensions 125cc : Ø 97 x 133mm (H) 250cc : Ø 97 x 150mm (H) Water Proof NLGI Range Can be used under water. NLGI 1, 2 Remote installation Can be remotely installed up to Max 1.0m(3ft ) using a 8mm(1/4") tube Specifications Description Image 1 Month 1 3 6 12 3 Month 1 3 6 12 6 Month 1 3 6 12 12 Month 1 3 6 12 1 Month 1 3 6 12
Open the catalog to page 1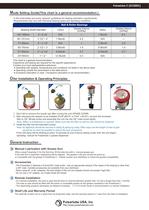
Pulsarlube C (KLT200C) Mode Setting Guide(This chart is a general recommendation.) In the chart below are some “general” guidelines for bearing lubrication requirements. Requirements may vary with individual bearing types and operating conditions. Bearing Shaft Diameter 125cc Grease Volume (cc/Day) 250cc Grease Volume (cc/Day) 4”~ 6 1/2” 3 1/2”~ 4” 3”~ 3 1/2” 2 1/2”~ 3” 2”~ 2 1/2” 1”~ 2” 102~165mm 90~101mm 77~89mm 65~76mm 51~64mm 25~50mm N/A 1 Month N/A 3 Month 6 Month 12 Month --- 4.2 --- 1.4 0.7 0.3 1 Month N/A 3 Month 6 Month 12 Month N/A 8.3 --- 2.8 1.4 0.7 --- Ball & Roller Bearings General...
Open the catalog to page 2All Pulsarlube catalogs and technical brochures
 2023 Pulsarlube E
2 Pages
 Master Catalogue
40 Pages
 Pulsarlube EO
2 Pages
 Pulsarlube OL
2 Pages
 Pulsarlube Master Catalogue
18 Pages
 Operation manual Mi
2 Pages
 PL10 Motor Bearing
2 Pages
 PL4 H1 Food Grade
2 Pages
 PL2 Heavy Duty
2 Pages
 PL1 Multipurpose
2 Pages
 Kit No. 1250RC-1
1 Page
 Kit No. 1000RC-1
1 Page
 Kit No. 2000RC-1
1 Page
 Pulsarlube MS
2 Pages
 Master-catalogue
18 Pages
 Operation manual PLC
2 Pages
 Pulsarlube Mi
2 Pages
 Pulsarlube PLC
2 Pages
 Operation manual MS
2 Pages
 Operation manual M
2 Pages
 Operation manual OL500
2 Pages
 Operation manual MSP
2 Pages
 Operation manusal S
1 Page
 Operation manual EX
2 Pages
 Operation manual E
2 Pages
 Operation manual V
2 Pages
 Pulsarlube EX
2 Pages
 Pulsarlube S
2 Pages
 Pulsarlube MSP
2 Pages
 Pulsarlube M
2 Pages
 Pulsarlube V
2 Pages
 Leaflet Pulsarlube C
2 Pages


Archived catalogs
 Pulsarlube E
2 Pages