RW-7
1 /16Pages

RW-7
1 /16Pages
Catalog excerpts

User’s Guide © 2016 All rights reserved For the most recent version of this manual please visit http://wwwprimeralabel.com
Open the catalog to page 1
Notices: The information in this document is subject to change without notice. NO WARRANTY OF ANY KIND IS MADE WITH REGARD TO THIS MATERIAL, INCLUDING, BUT NOT LIMITED TO, THE IMPLIED WARRANTIES OF MERCHANTABILITY AND FITNESS FOR A PARTICULAR PURPOSE. No liability is assumed for errors contained herein or for incidental or consequential damages in connection with the furnishing, performance, or use of this material. This document contains proprietary information that is protected by copyright. All rights are reserved. No part of this document may be photocopied, reproduced, or translated into...
Open the catalog to page 2
Section 1: Box Contents. . . . . . . . . . . . . . . . . . . . . . . . . . . . . . . . . . . . . . . . . . . . . . . . . . . 1 Section 2: Setup Your RW-7 Label Rewinder/UW-7 Label Unwinder . . . . . . . . . . . . 2 2.2 Install Core Adaptor . . . . . . . . . . . . . . . . . . . . . . . . . . . . . . . . . . . . . . . . . . 3 2.3 Install and Remove the Label Guide. . . . . . . . . . . . . . . . . . . . . . . . . . . . . 4 Section 3: RW-7 Label Rewinder Setup . . . . . . . . . . . . . . . . . . . . . . . . . . . . . . . . . . . . . . 5 3.2 Loading the Label Stock. . . . . . . . . . . . . . . . ....
Open the catalog to page 3
iv RW-7 Label Rewinder / UW-7 Label Unwinder
Open the catalog to page 4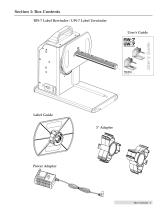
Section 1: Box Contents RW-7 Label Rewinder / UW-7 Label Unwinder User's Guide Label Guide 3" Adapter Power Adapter
Open the catalog to page 5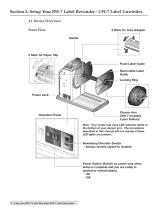
Section 2: Setup Your RW-7 Label Rewinder / UW-7 Label Unwinder 2.1 Device Overview Front View 3 Slots for Core Adapter Handle 2 Slots for Paper Clip Fixed Label Guide Removable Label Guide Locking Ring Power Jack Operation Panel Dancer Arm (UW-7 Includes Foam Rollers) Note: Your model may have LED indicator lights at the bottom of your dancer arm. The procedures described in this manual will not change if these LED lights are present. Rewinding Direction Switch - Always set this switch to Outside Power Switch (Switch on power only when setup is complete and you are ready to unwind or rewind...
Open the catalog to page 6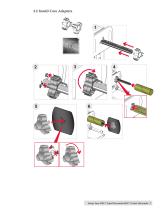
2.2 Install Core Adapters Setup Your RW-7 Label Rewinder/UW-7 Label Unwinder 3
Open the catalog to page 7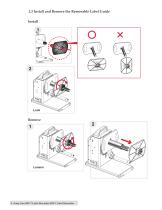
2.3 Install and Remove the Removable Label Guide Install 4 Setup Your RW-7 Label Rewinder/UW-7 Label Unwinder
Open the catalog to page 8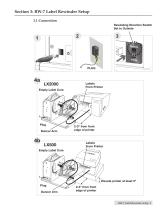
Section 3: RW-7 Label Rewinder Setup 3.1 Connection Rewinding Direction Switch Set to Outside Empty Label Core Labels From Printer 2-3" from front edge of printer Labels From Printer Empty Label Core Elevate printer at least 5" Plug Dancer Arm 2-3" from front edge of printer RW-7 Label Rewinder Setup 5
Open the catalog to page 9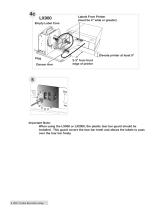
Empty Label Core Labels From Printer (must be 4" wide or greater) Elevate printer at least 5" 2-3" from front edge of printer Important Note: When using the LX900 or LX2000, the plastic tear bar guard should be installed. This guard covers the tear bar teeth and allows the labels to pass over the tear bar freely. 6 RW-7 Label Rewinder Setup
Open the catalog to page 10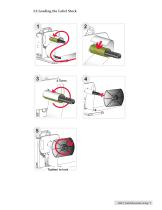
3.2 Loading the Label Stock RW-7 Label Rewinder Setup 7
Open the catalog to page 11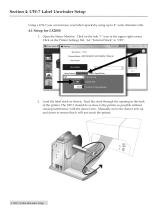
Using a UW-7 you can increase your label capacityby using up to 8" outer diameter rolls. 4.1 Setup for LX2000 1. Open the Status Monitor. Click on the info "i" icon in the upper right corner. Click on the Printer Settings Tab. Set "External Stock" to "ON". 1 L-n-Jl Update Settings Externa Stock No Activity Timeout (seconds) 2. Load the label stock as shown. Feed the stock through the opening in the back of the printer. The UW-7 should be as close to the printer as possible without causing interference with the dancer arm. Manually move the dancer arm up and down to ensure that it will not touch...
Open the catalog to page 12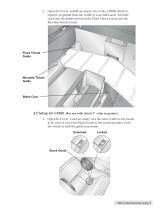
3. Open the Cover. Install an empty core in the LX2000 which is equal to or greater than the width of your label stock. Feed the stock into the printer between the Fixed Throat Guide and the Movable Throat Guide. Fixed Throat Guide Movable Throat Guide Blank Core 4.2 Setup for LX500 (For use with labels 3” wide or greater) 1. Open the Cover. Load an empty core the same width as the media to be used or move the Stock Guide to the widest position. Push the switch to lock the guide in position. Unlocked Stock Guide UW-7 Label Unwinder Setup 9
Open the catalog to page 13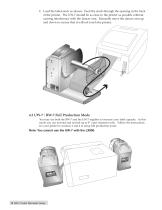
2. Load the label stock as shown. Feed the stock through the opening in the back of the printer. The UW-7 should be as close to the printer as possible without causing interference with the dancer arm. Manually move the dancer arm up and down to ensure that it will not touch the printer. 4.3 UW-7 / RW-7 Full Production Mode You may use both the RW-7 and the UW-7 together to increase your label capacity. In this mode you can unwind and rewind up to 8” outer diameter rolls. Follow the instructions for your printer in sections 3 and 4 to setup full production mode. Note: You cannot use the UW-7...
Open the catalog to page 14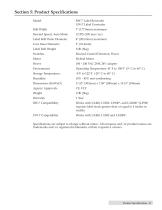
Model Roll Width Rewind Speed, Auto Mode Label Roll Outer Diameter Core Inner Diameter Label Roll Weight Switches Motor Power Environment Storage Temperature: Humidity Dimensions (HxWxD) Agency Approvals Weight Warranty RW-7 Compatibility Specifications are subject to change without notice. All company and/or product names are trademarks and/or registered trademarks of their respective owners.
Open the catalog to page 15All Primera Technology catalogs and technical brochures
 Impression IP60
2 Pages
 EddieBrochure
4 Pages
 Bravo 4200 Series
56 Pages
 Bravo SE-3
56 Pages
 AP550
AP55032 Pages
 AP360/362
20 Pages
 LX1000/LX2000
90 Pages
 LX500/LX500c
52 Pages
 Bravo series
1 Page
 CX1000
4 Pages
 LP130 Laser Marking System
2 Pages
 RX900F
2 Pages
 RX900
RX9002 Pages
 CX-FX series
8 Pages


Archived catalogs
 LX series
1 Page
 LX series_2013
8 Pages
- LIMING automatic labeler
- Label printer
- Bottle labelling machine
- Polymer tag
- Ink
- Color printer
- Desktop printer
- Labelling machine for the food industry
- Thermal transfer printer
- Desktop label printer
- White label
- USB interface printer
- Roll label
- Rewinder-winder
- Compact labeling machine
- Printable label
- High-speed labeling machine
- High-resolution printer
- Semi-automatic label applicator
- Packaging label applicator