- Catalogs
- Primera Technology
- Bravo SE-3
Bravo SE-3
1 /56Pages

Bravo SE-3
1 /56Pages
Catalog excerpts
Bravo se'3 User's Manual PKMERA. TECHNOLOGY, INC. © 2016 All rights reserved For the most recent version of this manual please visit http://www.primera.com/manuals.html
Open the catalog to page 1
Notices: The information in this document is subject to change without notice. NO WARRANTY OF ANY KIND IS MADE WITH REGARD TO THIS MATERIAL, INCLUDING, BUT NOT LIMITED TO, THE IMPLIED WARRANTIES OF MERCHANTABILITY AND FITNESS FOR A PARTICULAR PURPOSE. No liability is assumed for errors contained herein or for incidental or consequential damages in connection with the furnishing, performance, or use of this material. This document contains proprietary information that is protected by copyright. All rights are reserved. No part of this document may be photocopied, reproduced, or translated into...
Open the catalog to page 2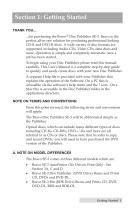
THANK YOU... ...for purchasing the Bravo® Disc Publisher SE-3. Bravo is the perfect all-in-one solution for producing professional looking CD-R and DVD-R discs. A wide variety of disc formats are supported, including Audio CDs, Video CDs, data discs and more. Operation is simple and completely automatic once a job has been started. To begin using your Disc Publisher, please read this manual carefully. This User's Manual is a complete step-by-step guide to quickly and easily create discs with your new Disc Publisher. A separate Help file is provided with your Publisher that explains the operation...
Open the catalog to page 5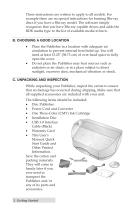
These instructions are written to apply to all models. For example there are no special instructions for burning Blu-ray discs if you have a Blu-ray model. The software simply recognizes that you have Blu-ray capable drives and adds the BDR media type to the list of available media to burn. B. CHOOSING A GOOD LOCATION • Place the Publisher in a location with adequate air circulation to prevent internal heat build up. You will need at least 15.25" (38.73 cm) of over-head space to fully open the cover. • Do not place the Publisher near heat sources such as radiators or air ducts, or in a place...
Open the catalog to page 6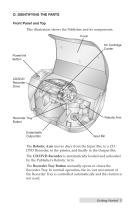
D. IDENTIFYING THE PARTS Front Panel and Top This illustration shows the Publisher and its components. Cover Ink Cartridge Carrier Power/Ink Button CD/DVD Recorder Drive Recorder Tray Button Extendable Output Bin The Robotic Arm moves discs from the Input Bin, to a CD/ DVD Recorder, to the printer, and finally to the Output Bin. The CD/DVD Recorder is automatically loaded and unloaded by the Publisher's Robotic Arm. The Recorder Tray Button manually opens or closes the Recorder Tray. In normal operation, the in/out movement of the Recorder Tray is controlled automatically and this button is not...
Open the catalog to page 7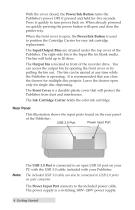
With the cover closed, the Power/Ink Button turns the Publisher's power OFF if pressed and held for five seconds. Press it quickly to turn power back on. When already powered on quickly pressing the power button will open and close the printer tray. When the front cover is open, the Power/Ink Button is used to position the Cartridge Carrier for easy ink cartridge replacement. The Input/Output Bins are situated under the top cover of the Publisher. The right-side bin is the Input Bin for blank media. The bin will hold up to 20 discs. The Output bin is located in front of the recorder drive. You can...
Open the catalog to page 8
E. OVERVIEW OF OPERATION Your new Publisher is an automated, precision device intended for continuous-duty publishing of discs. The following is a description of the complete process of duplicating and printing a CD/DVD job on your Publisher: 1. Up to 20 blank discs may be loaded at one time into the Input Bin. 2. The Publisher's integrated Robotic Arm will first check your recorder drive for a disc by attempting to"pick" from the recorder. Then, the Robotic Arm will pick a disc from the Input Bin. 3. The Recorder Tray opens automatically and the Robotic Arm places a disc into the recorder. After...
Open the catalog to page 9
9. Print time varies according to which print mode has been selected (Section 3-A). In most cases, print time takes no more than 2 minutes. After printing the first disc, the Publisher's Printer Disc Tray opens automatically. The Robotic Arm moves the finished disc to the Output Bin. 10. The Robotic Arm will now load the second recorded disc into the Printer Tray for printing. 11. The process starts over and repeats until all blank discs are gone or the number you have specified via software are copied and printed.
Open the catalog to page 10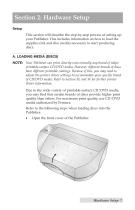
Section 2: Hardware Setup Setup This section will describe the step-by-step process of setting up your Publisher. This includes information on how to load the supplies (ink and disc media) necessary to start producing discs. A. LOADING MEDIA (DISCS) NOTE: Your Publisher can print directly onto virtually any brand of inkjet printable-surface CD/DVD media. However, different brands of discs have different printable coatings. Because of this, you may need to adjust the printer driver settings to accommodate your specific brand of CD/DVD media. Refer to Section 3E and 3F for further printer driver...
Open the catalog to page 11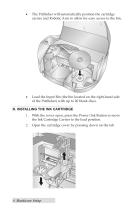
The Publisher will automatically position the cartridge carrier and Robotic Arm to allow for easy access to the bin. Load the Input Bin (the bin located on the right-hand side of the Publisher) with up to 20 blank discs. B. INSTALLING THE INK CARTRIDGE 1. With the cover open, press the Power/Ink Button to move the Ink Cartridge Carrier to the load position. 2. Open the cartridge cover by pressing down on the tab.
Open the catalog to page 12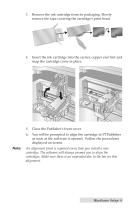
3. Remove the ink cartridge from its packaging. Slowly remove the tape covering the cartridge's print head. 4. Insert the ink cartridge into the carrier, copper end first and snap the cartridge cover in place. 5. Close the Publisher's front cover. 6. You will be prompted to align the cartridge in PTPublisher as soon as the software is opened. Follow the procedures displayed on screen. Note: An alignment print is required every time you install a new cartridge. The software will always prompt you to align the cartridges. Make sure there is an unprinted disc in the bin for this alignment.
Open the catalog to page 13
There are two main components to creating discs, printing and burning. For PC, SureThing CD Labeler is used to design the image to print on the disc. For Mac, Disc Cover is used to design the image to print on the disc. For Mac and PC, PTPublisher controls the recording and allows you to select the image to be printed to your discs. Every effort was made to make them look and function the same. However, due the unique benefits and limitations of both operating systems there are subtle differences. Where important, those differences will be highlighted. In general, these instructions will apply...
Open the catalog to page 14All Primera Technology catalogs and technical brochures
 Impression IP60
2 Pages
 EddieBrochure
4 Pages
 Bravo 4200 Series
56 Pages
 RW-7
RW-716 Pages
 AP550
AP55032 Pages
 AP360/362
20 Pages
 LX1000/LX2000
90 Pages
 LX500/LX500c
52 Pages
 Bravo series
1 Page
 CX1000
4 Pages
 LP130 Laser Marking System
2 Pages
 RX900F
2 Pages
 RX900
RX9002 Pages
 CX-FX series
8 Pages


Archived catalogs
 LX series
1 Page
 LX series_2013
8 Pages
- Automatic labeling machine
- Label printer
- Bottle labelling machine
- Polymer tag
- Color printer
- Desktop printer
- Labelling machine for the food industry
- Thermal transfer printer
- Desktop label printer
- White label
- Roll label
- USB interface printer
- Rewinder-winder
- Compact labeling machine
- Printable label
- High-speed labeling machine
- High-resolution printer
- Semi-automatic label applicator
- Packaging label applicator