
- Catalogs
- Primera Technology
- Bravo 4200 Series

Bravo 4200 Series

Bravo 4200 Series
The user manual for the Bravo 4200 Series Disc Publisher offers detailed guidance on using this all-in-one disc production solution. It supports various disc formats, including audio CDs, DVD Video, and data discs, and emphasizes the importance of thoroughly reading the instructions for effective use.
The Bravo 4200-Series comprises seven models with varying capabilities such as disc capacity, drive types, and kiosk features. Blu-ray models specifically require a USB 3.0 port for optimal performance.
Users should place the Publisher in a well-ventilated area, away from heat and direct sunlight. A checklist of included items, such as input/output bins, power cord, and ink cartridges, is provided.
The manual describes the components of the Publisher, including the control panel, robotic disc transporter, and input/output bins, detailing the function of each part.
Instructions for loading discs emphasize using inkjet printable-surface media for best results, recommending Primera-authorized media for maximum print quality.
Steps for installing ink cartridges include positioning the cartridge carrier and aligning the cartridge using the PTPublisher software.
Kiosk Mode allows both bins to be used as input, increasing disc capacity to 100 discs, though this feature is unavailable for the 4052 models.
Safety warnings include avoiding exposure to rain or moisture and not removing exterior panels. FCC compliance information and a California Proposition 65 warning are also provided.
The document concludes with technical specifications and an index for easy navigation.
The document details using PTPublisher software for disc creation and printing, covering kiosk mode setup, disc creation processes, and project types.
- Attach the Output Bin Holder to the Publisher, align the Locating Tabs with the Slots, and place the Output Bin on the Holder.
- Enable Kiosk Mode via PTPublisher's Options menu.
- Involves printing and burning using SureThing CD Labeler for PC and Disc Cover for Mac.
- PTPublisher controls recording and image selection for printing.
- Steps include adding data, adding a print file, setting the number of copies, and adjusting options.
- Copy Project reads the master disc to the computer's hard drive, storing it in Global Image format (*.gi).
- Allows recording and printing of CDs, DVDs, and BDRs with various project types like Copy, Data, Audio, Video, and Image Projects.
Multiple drive units can be managed for flexibility, and PTProtect is available for video protection on PC with a USB dongle. Projects can be saved and scheduled for regular execution.
Options include setting recording speed, type, and file system. Test Record and Verify options ensure disc quality.
The status window provides real-time updates on drive, printer, and project status, with error indications and detailed logs.
Involves setting up data projects and scheduling them, with data spanning across multiple discs if necessary.
Audio CDs can be ripped to MP3 or other formats using iTunes or Windows Media Player.
Allows for DVD video protection using a USB dongle, supporting ISO images and VIDEO_TS/AUDIO_TS folders.
SureThing software for PC and Disc Cover for Mac are used to design disc labels, integrated with PTPublisher for seamless operation.
- Includes custom backgrounds, clipart, text options, and an Inspector Tool for advanced editing.
- Settings affect print quality, speed, saturation, margins, and color mode.
- Includes cost estimation, calibration, and maintenance instructions.
- Includes cleaning procedures, technical support options, and explanations of LED indicators.
- Details on model configurations, printing methods, media types, system requirements, disc capacity, interface, power, dimensions, weight, certifications, and warranty.
Catalog excerpts
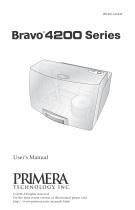
Bravo®4SOO Series User's Manual PRIMERA TECHNOLOGY, INC © 2016 All rights reserved For the most recent version of this manual please visit http://www.primera.com/manuals.html
Open the catalog to page 1
Notices: The information in this document is subject to change without notice. NO WARRANTY OF ANY KIND IS MADE WITH REGARD TO THIS MATERIAL, INCLUDING, BUT NOT LIMITED TO, THE IMPLIED WARRANTIES OF MERCHANTABILITY AND FITNESS FOR A PARTICULAR PURPOSE. No liability is assumed for errors contained herein or for incidental or consequential damages in connection with the furnishing, performance, or use of this material. This document contains proprietary information that is protected by copyright. All rights are reserved. No part of this document may be photocopied, reproduced, or translated into...
Open the catalog to page 2
...for purchasing a Bravo 4200 Series Disc Publisher. Bravo is the perfect all-in-one solution for producing professional looking discs. A wide variety of disc formats are supported, including audio CDs, DVD Video, data discs and more. Operation is simple and completely automatic once a project has been started. To begin using your Disc Publisher, please read this manual carefully. This Operator's Manual is a complete step-by-step guide to quickly and easily create discs with your new Optical Disc Publisher. A separate Help file is provided with your Publisher that explains the operation of the...
Open the catalog to page 5
The Bravo 4200-Series comes in seven different models including: • Bravo 4052 (1 DVD Drive) Burns and Prints CD, DVDs and DVD-DL, 50 disc capacity, No Kiosk, No Network Software. • Bravo 4052 BLU (1 BDR Drive) Burns and Prints CD, DVD, DVD-DL, BDR and BDR-DL, 50 disc capacity, No Kiosk. • Bravo 4200 AutoPrinter (No Drives) Print Only, 100 Disc Capacity with Kiosk - See Section 3A, C and D. • Bravo 4201 (1 DVD Drive) Burns and Prints CD, DVDs and DVD-DL, 100 Disc Capacity with Kiosk. • Bravo 4202 (2 DVD Drives) Burns and Prints CD, DVDs and DVD-DL, 100 Disc Capacity with Kiosk. • Bravo 4201 Blu...
Open the catalog to page 6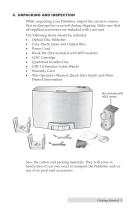
C. UNPACKING AND INSPECTION While unpacking your Publisher, inspect the carton to ensure that no damage has occurred during shipping. Make sure that all supplied accessories are included with your unit. The following items should be included: • Optical Disc Publisher • Gray Plastic Input and Output Bins • Power Cord • Kiosk Bin (Not included with 4052 models) • CMY Cartridge • QuickStart Installer Disc • USB 3.0 Interface Cable (Black) • Warranty Card • This Operator's Manual, Quick Start Guide and Other Printed Information Not included with 4052 model. Save the carton and packing materials....
Open the catalog to page 7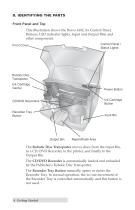
D. IDENTIFYING THE PARTS Front Panel and Top This illustration shows the Bravo 4102, its Control Panel, Buttons, LED indicator lights, Input and Output Bins and other components. Control Panel / Status Lights Front Cover Robotic Disc Transporter Ink Cartridge Carrier Power Button CD/DVD Recorders Recorder Tray Button Reject/Kiosk Area The Robotic Disc Transporter moves discs from the Input Bin, to a CD/DVD Recorder, to the printer, and finally to the Output Bin. The CD/DVD Recorder is automatically loaded and unloaded by the Publisher's Robotic Disc Transporter. The Recorder Tray Button manually...
Open the catalog to page 8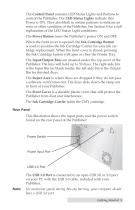
The Control Panel contains LED Status Lights and Buttons to control the Publisher. The LED Status Lights indicate that Power is ON. They also blink in certain patterns to indicate an error or other condition of the Publisher. See Section 4 for a full explanation of the LED Status Light conditions. The Power Button turns the Publisher's power ON and OFF. When the front cover is opened, the Ink Cartridge Button is used to position the Ink Cartridge Carrier for easy ink cartridge replacement. When the front cover is closed, pressing the Ink Cartridge button will open or close the Printer Tray. The...
Open the catalog to page 9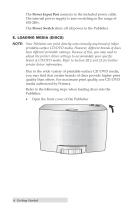
The Power Input Port connects to the included power cable. The internal power supply is auto-switching in the range of 100-240v. The Power Switch shuts off all power to the Publisher. E. LOADING MEDIA (DISCS) NOTE: Your Publisher can print directly onto virtually any brand of inkjet printable-surface CD/DVD media. However, different brands of discs have different printable coatings. Because of this, you may need to adjust the printer driver settings to accommodate your specific brand of CD/DVD media. Refer to Section 2B.2 and 2E for further printer driver information. Due to the wide variety...
Open the catalog to page 10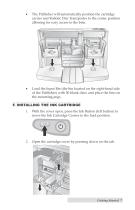
The Publisher will automatically position the cartridge carrier and Robotic Disc Transporter to the center position allowing for easy access to the bins. Load the Input Bin (the bin located on the right-hand side of the Publisher) with 50 blank discs and place the bins on the mounting pegs. F. INSTALLING THE INK CARTRIDGE 1. With the cover open, press the Ink Button (left button) to move the Ink Cartridge Carrier to the load position. 2. Open the cartridge cover by pressing down on the tab. Getting Started
Open the catalog to page 11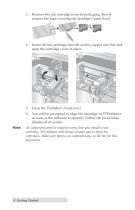
3. Remove the ink cartridge from its packaging. Slowly remove the tape covering the cartridge's print head. 4. Insert the ink cartridge into the carrier, copper end first and snap the cartridge cover in place. 5. Close the Publisher's front cover. 6. You will be prompted to align the cartridge in PTPublisher as soon as the software is opened. Follow the procedures displayed on screen. Note: An alignment print is required every time you install a new cartridge. The software will always prompt you to align the cartridges. Make sure there is an unprinted disc in the bin for this alignment.
Open the catalog to page 12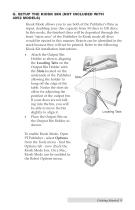
G. SETUP THE KIOSK BIN (NOT INCLUDED WITH 4052 MODELS) Kiosk Mode allows you to use both of the Publisher's Bins as input, doubling your disc capacity from 50 discs to 100 discs. In this mode, the finished discs will be deposited through the front "reject area" of the Publisher. In Kiosk mode all discs would be ejected in this manner. Rejects can be identified in the stack because they will not be printed. Refer to the following Kiosk Kit installation instructions. • Attach the Output Bin Holder as shown, aligning the Locating Tabs on the Output Bin Holder with the Slots located on the underside...
Open the catalog to page 13All Primera Technology catalogs and technical brochures
 Impression IP60
2 Pages
 EddieBrochure
4 Pages
 Bravo SE-3
56 Pages
 RW-7
RW-716 Pages
 AP550
AP55032 Pages
 AP360/362
20 Pages
 LX1000/LX2000
90 Pages
 LX500/LX500c
52 Pages
 Bravo series
1 Page
 CX1000
4 Pages
 LP130 Laser Marking System
2 Pages
 RX900F
2 Pages
 RX900
RX9002 Pages
 CX-FX series
8 Pages


Archived catalogs
 LX series
1 Page
 LX series_2013
8 Pages
- Automatic labeling machine
- Label printer
- Bottle labelling machine
- Polymer tag
- Color printer
- Desktop printer
- Labelling machine for the food industry
- Desktop label printer
- Thermal transfer printer
- White label
- Roll label
- USB interface printer
- Rewinder-winder
- Printable label
- Compact labeling machine
- High-speed labeling machine
- High-resolution printer
- Semi-automatic label applicator
- Packaging label applicator