

AmfiTrack Development Kit - Getting started

AmfiTrack Development Kit - Getting started
To begin using the AmfiTrack Development Kit, download the necessary software, including the AmfiTrack Viewer, USB protocol description, data logging script, and drivers from the provided link. The AmfiTrack Viewer is essential for visualizing tracking system outputs. Key drivers include hidapi.dll, Amfitrack_CPP_Driver.dll, and optionally AmfitrackCPPDriver_CSharpWrapper.dll for .NET applications.
The system comprises several components: the EMF Source, EMF Source driver, EMF sensors, USB RF Hub, and power supplies. The EMF Source emits an electromagnetic field, while the EMF sensors detect this field and calculate their position. Communication occurs via a 2.4GHz RF link. The USB RF Hub relays positioning data to a PC, and power is supplied through a 5V USB PSU.
The EMF Source can be powered via a 5V USB connection. Sensors are turned on/off with a button and charged using a 5V USB power source. Charging indicators include a flashing white LED for charging in progress and a constant white LED when charging is complete. A full charge takes approximately one hour.
Calibration is necessary after powering up the sensors. This process involves positioning the sensor approximately 30-40 cm from the EMF Source. The sensor's LED will turn yellow when correctly positioned, and it will become visible in the AmfiTrack Viewer software upon pressing the sensor button.
A Unity demo is available for download. After connecting and calibrating the AmfiTrack system, unzip the demo file and run Amfitrack_Unity.exe. For the Unity demo project, install Unity software, build the demo project, and ensure driver DLLs are correctly placed for both the build and Unity editor environments.
Catalog excerpts

Project: AmfiTrack Doc Title: Development Kit - Getting started Originator (Init): PR / LKK / MLF Rev. no.: 1.2 AmfiTrack Development Kit - Getting started 1. Downloading Software, USB protocol, Data Logging script Please follow this link in order to download the latest version of the AmfiTrack demo software "AmfiTrack Viewer", a USB protocol description, the data logging python script and the drivers: http://www.amfitrack.com/SW/AmfiTrackSoftware.ziD The AmfiTrack Viewer software is used when a visual representation of the tracking system output is necessary. 1.1. Drivers A C++ driver exists for AmfiTrack alongside a .NET wrapper. These are distributed as a set of x86-64 DLLs ready to be imported into your project. The DLLs you will need are: • hidapi.dll • Amfitrack_CPP_Driver.dll • (optional, used for .NET) AmfitrackCPPDriver_CSharpWrapper.dll
Open the catalog to page 1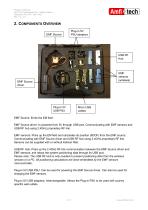
Project: AmfiTrack Doc Title: Development Kit - Getting started Originator (Init): PR / LKK / MLF Rev. no.: 1.2 2. COMPONENTS OVERVIEW Plug-in 5V PSU adaptors EMF Source: Emits the EM field. EMF Source driver: Is powered from 5V through USB port. Communicating with EMF sensors and USB RF hub using 2.4GHz proprietary RF link. EMF sensors: Picks up the EM field and calculates its position (6DOF) from the EMF source. Communicating with EMF Source driver and USB RF hub using 2.4GHz proprietary RF link. Sensors can be supplied with or without Kalman filter. USB RF Hub: Picks up the 2.4GHz RF link...
Open the catalog to page 2
Project: AmfiTrack Doc Title: Development Kit - Getting started Originator (Init): PR / LKK / MLF Rev. no.: 1.2 3. Powering and charging 3.1. Powering the source The source can be powered by 5V USB from either the supplied external plug-in Micro USB supply or a PC USB port. Press the button until the LED turns on/off. 3.3. charging the sensor The sensor contains a rechargeable Lithium battery. The charging starts when the sensor is connected to a 5V USB power source (external 5V USB power supply or PC USB port). Charging indication: LED flashing white: Charging in progress LED constantly white:...
Open the catalog to page 3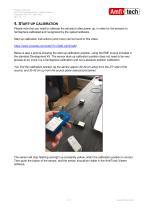
Project: AmfiTrack Doc Title: Development Kit - Getting started Originator (Init): PR / LKK / MLF Rev. no.: 1.2 4. START-UP CALIBRATION Please note that you need to calibrate the sensor(s) after power up, in order for the sensors to hemisphere calibrated and recognized by the system/software. Start-up calibration instructions (and more) can be found in this video: https://www.youtube.com/watch?v=X9ALvqmkmaM Below is also a picture showing the start-up calibration position, using the EMF source included in the standard Development Kit. The sensor start-up calibration position does not need to...
Open the catalog to page 4
Project: AmfiTrack Doc Title: Development Kit - Getting started Originator (Init): PR / LKK / MLF Rev. no.: 1.2 5. Unity Demo You can download the demo by going to: http://www.amfitrack.com/SW/AmfiTrackIslandDemo.zip To run it, connect and calibrate Amfitrack as previously described. Unzip AmfiTrackisiandDemo.zip, and run Amfitrack_Unity.exe 6. Unity demo project You can download the demo project by going to: http://www.amfitrack.com/SW/UnityDemoProject.zip To get started with the unity project demo, first you need to download and install unity from https://unity3d.com. After installing, you...
Open the catalog to page 5All PREMO catalogs and technical brochures
 SMD Telecoil TC0502
1 Page
 MICU 300A-S/LF
1 Page
 KGEA-BFCR
1 Page
 general catalogue
20 Pages
 premo innovation
137 Pages
 Vr emmotion tracking sensors
73 Pages
 Tracking Sensors & Applications
226 Pages
 BLOCKING FILTER SOLUTIONS
2 Pages
 NFC ANTENNA SOLUTIONS
2 Pages
 Company Presentation 2017
36 Pages
 TR1102CAP
1 Page
 TP0702UCAP
1 Page
 TP0702U
1 Page
 TP0602
1 Page
 TP0502
1 Page
 RCA-ROD
2 Pages
 KGEA-HB
1 Page
 KGEA-TH
1 Page
 KGEA-BFCWX
1 Page
 SEA
SEA1 Page
 4DC15NF
3 Pages
 2D1D15
2 Pages
 SDTR1103-HF2
1 Page
 3DC11CAP
1 Page
 ZAC1203
1 Page
 SDTR1103
1 Page
 TR1102
1 Page
 TP0702CAP
1 Page
 TP0702
1 Page
 EMC FILTERS
110 Pages
 RFID TRANSPONDERS
72 Pages
 INDUCTORS/ CHOKES
173 Pages
 SMD Power Inductors
11 Pages
 FVDT
FVDT87 Pages
 PLC Components and accessories
56 Pages
 Transformers
89 Pages
 Ferrite Cores
42 Pages
 TAGS
TAGS41 Pages
 Transponder
32 Pages
 SMD Inductors
57 Pages


Archived catalogs
 emitter antennas
2 Pages
 PREMO PLC CATALOGUE
29 Pages
 PREMO EMC FILTERS CATALOGUE
131 Pages
 PREMO IC CATALOGUE 2009
165 Pages
 PREMO RFID CATALOGUE 2009
77 Pages
- Transformer
- Dry transformer
- Current transformer
- Encapsulated transformer
- Power transformer
- Electronic filter
- Radio antenna
- Industrial transformer
- Passive electronic filter
- AC electronic filter
- Low-pass electronic filter
- Cast resin transformer
- Outdoor antenna
- Magnetic sensor
- Coupler
- Compact transformer
- External antenna
- Choke coil
- AC transformer
- Passive antenna