- Catalogs
- Pneumat Systems
- BinWhip
BinWhip
1 /53Pages

BinWhip
1 /53Pages
Catalog excerpts
TECHNICAL MANUAL 110 Mohr Drive Mankato, MN 56001 1-800-458-9446 www.pneumat.com FIND HELPFUL VIDEOS AT: www.pne
Open the catalog to page 1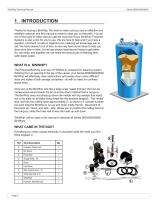
BinWhip Technical Manual Thanks for buying a BinWhip. We want to make sure you are an effective and satisfied customer and this manual is meant to start you on that path. It is just one of the tools to make sure you get the most out of your BinWhip. Pneumat Systems is also a tool for you to use. We are here to help and if you have a question, comment, or idea in regards to bin cleaning we encourage you to call. We have cleaned a lot of bins, so we may have some ideas to help you clean your bins or silos, but we are always learning and trying to get better. So, call away, and together we can make...
Open the catalog to page 2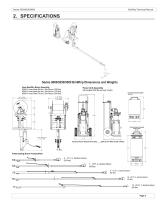
BinWhip Technical Manual Series 9000/9250/9500 BinWhip Dimensions and Weights 5 Hose Reel/Bin Mount Assembly 9000-H Hose Reel (85 lbs) / Bin Mount (128 lbs) 9250-H Hose Reel (84 lbs) / Bin Mount (125 lbs) 9500-H Hose Reel (79 lbs) / Bin Mount (100 lbs) D Power Unit Assembly All models (350 lbs w/ Hyd. Fluid) Cleaning Head Assembly (60 lbs) Cleaning 1Head Assembly Dual Impact (90 lbs) 1 UNLESS OTHERWISE SPECIFIED: Telescoping Boom Assemblies 7 110 Mohr Drive Mankato, MN 56001 USA 507-345-4553 www.pneumat.com Pneumat Systems Power Unit Assy, 10 STOCK SIZE UNLESS OTHERWISE SPECIFIED: DIMENSIONS...
Open the catalog to page 3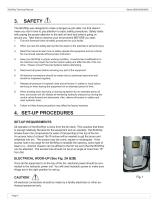
BinWhip Technical Manual The BinWhip was designed to make a dangerous job safer, but that doesn’t mean you don’t have to pay attention to basic safety procedures. Safety starts with paying the proper attention to the task at hand and what is going on around you. Take time to observe your environment BEFORE you start. 1. First and foremost follow all safety procedures for your facility. When you see this safety-alert symbol be aware to the potential of personal injury Read this manual to learn how to safely operate this equipment and its controls. No one should operate without proper instruction....
Open the catalog to page 4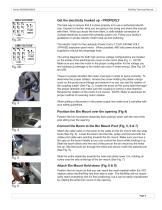
Series 9500/9250/9000 BinWhip Technical Manual Get the electricity hooked up - PROPERLY The best way to ensure that it is done properly is to use a authorized electrician. Explain to him/her what you are going to be doing and share this manual with them. What you would like from them, is safe reliable connection of 3-phase electricity to power the hydraulic power unit. Follow your facility’s guidelines on proper electric motor hook-up and switching. The electric motor for the Hydraulic Power Unit is 7.5 HP 230/460 VOLT 3-PHASE explosion-proof motor. When possible, 460 Volt power should be supplied...
Open the catalog to page 5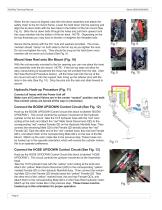
BinWhip Technical Manual When the bin mount is aligned, take the hold down assembly and attach the safety chain to the bin mount frame. Lower the hold down into the opening and align the tie down bolts with the two holes in the bottom of the bin mount (See Fig. 8). Slide the tie down bolts through the holes and pull them upward until the cross member hits the bottom of the bin deck. NOTE: Depending on the bin top thickness you may have to shorten or lengthen the threaded rods. Secure the tie-downs with the 3/4” nuts and washers provided. The crossmember should “clamp” on both sides to the bin...
Open the catalog to page 6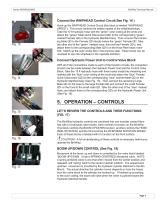
BinWhip Technical Manual Connect the WHIPHEAD Control Circuit See Fig. 14 ) Hook-up the WHIPHEAD Control Circuit (this block is labeled “WHIPHEAD SPEED”). This circuit controls the rotation speed of the whiphead/whips. Take the 10 ft hydraulic hose with the “green” color coding at the ends and attach the “green” Male Quick Disconnect (QD) to the corresponding “green” marked Female QD on the Hydraulic Manifold Assy. Then connect the remaining Male QD to the Female QD directly below the “green” Female QD. Take the other end of the “green” marked hose, this end has Female QD’s, and attach them to...
Open the catalog to page 7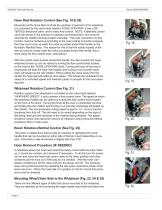
BinWhip Technical Manual Hose Reel Rotation Control (See Fig. 19 & 20) Movement of the Hose Reel controls the up/down movement of the whiphead. It is controlled by the valve block labeled “HOSE UP/DOWN”, it has a DÉTENTED directional valve, and a rotary flow control. NOTE: A détented control valve will remain in the position it is placed (up/neutral/down), and must be returned the middle (neutral) position manually. The hose connection for this function must be hooked-up according to the color coding to function properly, the hose must come up when the valve is pushed toward the handle on the...
Open the catalog to page 8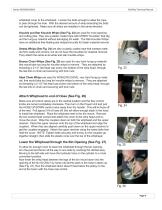
BinWhip Technical Manual whiphead cover to the whiphead. Loosen the bolts enough to allow the rope to pass through the hole. With the desired amount of whip extending the bolts can be tightened. Make sure all whips are installed in the same direction. Knuckle and Star Knuckle Whips (See Fig. 24) are used for most cleaning and cutting jobs. They are a plastic coated rope with UHMW “knuckles” that dig out the hung-up material without damaging bin walls. The Star Knuckle Whips have an additional free-floating star shaped knuckle for faster material removal. Sweep Whips (See Fig. 24) are also a plastic...
Open the catalog to page 9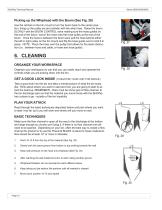
BinWhip Technical Manual Picking up the Whiphead with the Boom (See Fig. 28) Use the ratchet on the bin mount to turn the boom back to the center position, lining up the pulley set and cylinder with the whip hose. Raise the boom SLOWLY with the BOOM CONTROL valve making sure the hose guides on the end of the boom “corral” the hose onto the hose pulley at the end of the boom. Once the hose is between the boom ears pull the hose behind either the left or right pulley on the bin mount and flip the hose guide over to hold it in place. NOTE: Place the hose over the pulley that allows for the least...
Open the catalog to page 10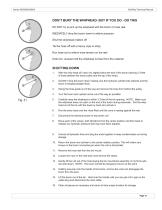
BinWhip Technical Manual DO NOT try to pick up the whiphead with the boom or hose reel. IMEDIATELY drop the boom down to relieve pressure Shut the whiphead rotation off Tie the hose off with a heavy rope or strap Run hose out to relieve hose tension on the reel Drain bin, at-least until the whiphead is freed from the material 1. With the whip head off, raise it to slightly below the end of the boom (leaving 2-3 feet of hose between the boom pulley and the top of the whip). 2. SLOWLY drop the boom down making sure the hydraulic cylinder fully extends and the boom is hanging straight down. 3. Swing...
Open the catalog to page 11All Pneumat Systems catalogs and technical brochures
 Safety Data Sheet
9 Pages
 BinDrill
40 Pages
 Cardox
32 Pages
 AIRBLASTTRUCKUNLOADER
2 Pages
 blast.
4 Pages
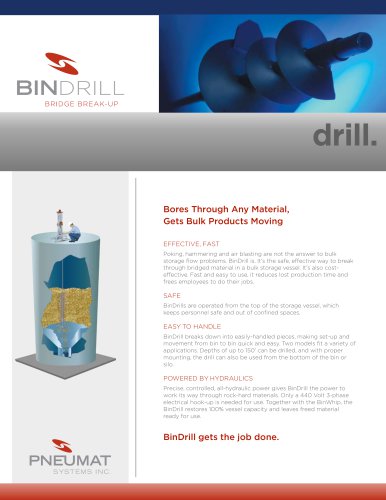 drill.
2 Pages
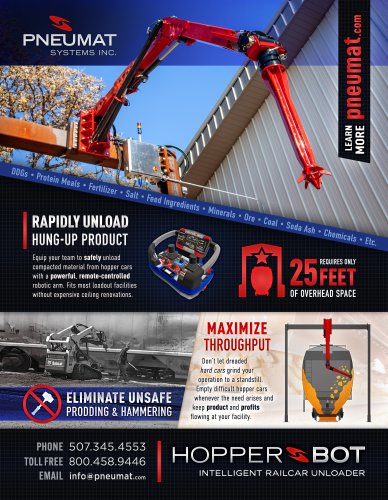 RAPIDLYUNLOAD HUNG-UPPRODUCT
2 Pages