Catalog excerpts

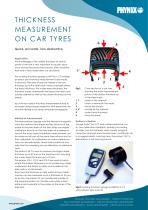
THIC K N ES S ME A S U REM EN T ON C A R T Y RE S Quick, accurate, non-destructive Application The knowledge of the rubber thickness at various points of the tyre is very important for quality assurance during the production process, after durability tests and in tests made after car accidents. The coating thickness gauge Surfix ® Pro S-CT enables an exact tyre thickness measurement to be made in seconds. The area of special interest is the tyre thickness up to the steel mesh inside, amongst others: the tread thickness, the under-tread thickness, the thickness inside underneath the tread, the inside and outside sidewall as well as the rubber thickness on the beads. Up until now rubber thickness measurements had to be made using sample inspection with expensive, destructive testing or by using computer tomography. Cross-section of a car tyre showing the main measurement points of the rubber thickness up to the steel mesh: inside at the sidewall inside underneath the tread above the beads outside at the sidewall under-tread thickness tread thickness Method of measurement The measurement gauge uses the standard magnetic inductive method and measures the distance of the probe to the steel mesh of the tyre. After one simple calibration directly on the steel mesh of a reference tyre (of the same type) immediate measurement can be made on all tyres of the same type without any further calibration. All calibrations on various reference tyres can be individually stored and recalled at any later time thus avoiding any recalibration on reference tyres. The probe F 30-T is used to measure the large rubber thickness up to 30 mm on the tread and for checking the under-tread thickness up to 10 mm. The probes F10-1, F10-2 and F10-3 are used at points where the rubber thickness is much smaller e.g. inside underneath the tread, or inside and outside on the side walls or on the beads. Even the total thickness on side walls having a fabric carcass can be measured up to a thickness of 10 mm. To do this, the probe F10-cp is positioned outside at the required position on the side wall, while a steel plate is held opposite to the probe on the inner of the side wall. Delivery schedule Gauge Surfix ® Pro S-CT with rubber protective cover, two calibration standards, probe(s) according to order, two AA batteries, data transfer program, instruction manuals and manufacturer’s certificate, all in a rugged plastic carrying case, the probe F 30-T is delivered in a soft carrying pouch. Fig.2: Coating thickness gauge Surfix® Pro S-CT with probes F 30-T and F10 C OATING THIC KNESS MEASU REMENT · POROSITY DETECT I O N www.phynix.com WAL L THIC KNESS MEASU REMENT · SU RFAC E ROU GHNESS MEASU RE M E N T HAR DNESS MEASU REMENT · GL OSS MEASU REMENT · C ROSS HATC H C U
Open the catalog to page 1
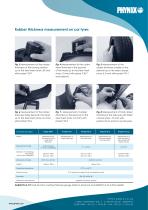
Rubber thickness measurement on car tyres Fig. 3: Measurement of the rubber thickness on the running surface up to the steel mesh (max. 30 mm) with probe F 30-T. Fig. 4: Measurement of the undertread thickness in the grooves of the tread up to the steel mesh (max. 10 mm) with probe F 30-T and steel pin. Fig. 5: Measurement of the rubber thickness outside on the sidewall up to the steel carcass (max. 6.5 mm) with probe F10-1. Fig. 6: Measurement of the rubber thickness inside beneath the tread up to the steel mesh (max. 6.5 mm) with probe F10-2. Fig. 7: Measurement of rubber thickness on the...
Open the catalog to page 2All PHYNIX catalogs and technical brochures
-
SURFIX ® EASY series
2 Pages
-
PHYNIX Surfix EX/SX
2 Pages
-
PHYNIX Surfix Pro X_en
2 Pages
-
PHYNIX Pro X
2 Pages
-
Roughness tester KR-110
1 Pages
-
Cross Hatch Cutting
2 Pages
-
Pocket-Surfix®
2 Pages
-
Tube Probe FN1.5/90°
1 Pages
-
Cross hatch cutter
2 Pages
-
Surfix®
2 Pages
-
PaintCheck
2 Pages
-
Probes
4 Pages
-
PHYNIX Overview
6 Pages


