NHL15
1 /24Pages

NHL15
1 /24Pages
Catalog excerpts
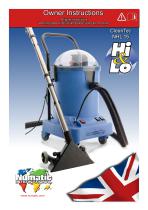
Owner Instructions Original Instructions Warning! Read instructions before using the machine
Open the catalog to page 1
Good carpet cleaning is very much a team effort between operative and machine and a few well established rules to be followed to get the best results. 1. Product Features * TriJet carpet extraction head. * Lo pressure for lightly soiled areas. * Hi pressure for heavy soiled areas. * Quality upholstery tool supplied. * Dump hose emptying option. * 4 wheel mobility. * 15 litres capacity. * Full Aluminium tool head. The Hi - Lo system puts you in complete control, when you need more, you get more and when you need less, you are but a switch away.
Open the catalog to page 2
Before continuing, please refer to Quick Set Up Guide on Page 8
Open the catalog to page 3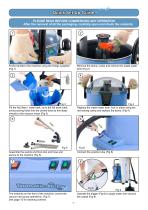
PLEASE READ BEFORE COMMENCING ANY OPERATION After the removal of all the packaging, carefully open and check the contents. Fit the handle to the machine using the fixings supplied. (Fig 1) Remove the dome, unclip and remove the waste water tank (Fig 2) Fig 3 Fill the NuChem / water tank, up to the full level mark, avoid pouring fluids into the central tube as this leads directly to the vacuum motor (Fig 3). Fig 4 Replace the waste water tank, lock in place using the red locking clamp and replace the dome. (Fig 4) Assemble the wands and floor-tool and hose and secure to the machine (Fig 5) Connect...
Open the catalog to page 4
1. Plugged Cable cover 2. 6.3 amp time lag fuse x 2. 3. Plugged cable 4. Cable grommet 5. Vacuum filter cover 6. Vacuum filter 7. Castor wheels x 4 8. Quick release 9. Hi Lo Pump Switch 10. Vacuum Switch 11. Pump Switch 12.Dome 13. Waste tank locking toggle 14. Waste tank vacuum filter 15. Waste tank emptying hose 16. Handle 17. Cable strain relief 18. Solution tube quick release For full easy to follow Instructions on the NHL 15 set up and use, See quick set up guide page 4 5
Open the catalog to page 5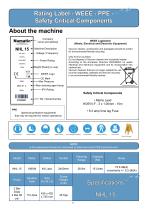
About the machine Machine Description ■ Voltage / Frequency -Power Rating Weight (Ready to use) WEEE Logo CE Mark — Max Pressure ■Max cleaning agent temp IPX Rating -Yr / Wk / Serial Number WEEE Legislation (Waste, Electrical and Electronic Equipment) Vacuum cleaner, accessories and packaging should be sorted for environmental-friendly recycling. Only for EU countries: Do not dispose of Vacuum cleaner into household waste! According to the European Directive 2002/96/EC on waste electrical and electronic equipment and its incorporation into national law. Vacuum cleaners that are no longer suitable...
Open the catalog to page 6
c Information for Spray Extraction Vacuum Cleaners WARNING Read the instruction manual before using the machine. Operators shall be adequately instructed on the use of these machines. As with all electrical equipment, care and attention must be exercised at all times during use, in addition to ensuring that routine and preventative maintenance is carried out periodically to ensure safe operation. Failure to carry out maintenance as necessary, including the replacement of parts to the correct standard could render this equipment unsafe and the manufacturer can accept no responsibility in this...
Open the catalog to page 7
Fart FMtogj - Maft - ©pay Irtaatooi] Spray extraction machines only • Use only approved cleaning preparations. Use of detergents When using any detergent with this machine, please ensure you have read the safety data on the container and you are familiar with the procedures to clear up spills, inhalation, skin and eye contact. This product complies with the requirements IEC/EN 60335 -2-68. When moving from one place to another, consider the weight of the machine. Spray extraction maintenance/fault finding If the vacuum cleaner stops working switch off and remove the plug from the wall, before...
Open the catalog to page 8
Machine Set-Up Fitting the handle Fig 10 Slide the handle over the two tubes already fitted to the side of the machine. (Fig 10). Fig 11 Secure the handle using the nut and bolt supplied (Fig 11). Fig 12 The handle makes an ideal way to store the cable (Fig 12). Fig 13 The handle can be used to enable the machine to be easily moved around the area to be cleaned (Fig 13). 9
Open the catalog to page 9
Removing the dome and waste-water tank. To remove the dome, unclip the locking toggles and lift the dome off the machine (Fig 14). The waste water tank is held into place with a red locking clamp. Undo the clamp (Fig 15) and lift the waste water tank from the machine (Fig 16). Filling the Nuchem / water tank. The NHL 15 is equipped with a large 15 litre NuChem / water tank allowing large areas to be cleaned in a single fill. To fill the clean water tank remove the waste water tank and fill using hose, bucket or a suitable container (Fig 17). Fill to the MAX level mark (Fig 18) located on the...
Open the catalog to page 10
Chemical usage. Control of substances hazardous to health (COSHH) For best results use a non-foaming type of chemical, dilute to the manufacturers specification. For further guidance on hazardous substances refer to HSE website. Visit http://www.hse.gov.uk/ for UK information. When handling and mixing chemicals. Always ensure that chemical manufacturer’s safety guidelines are followed. Only use non foaming chemicals when using this machine. NuChem information NuChem 4 available for this product. INSTRUCTIONS FOR USE TEST FOR COLOUR FASTNESS Find a small area on the material which is not normally...
Open the catalog to page 11
Replacing the waste-water tank and dome. To replace the waste-water tank fit into the drum and lock in place with the red locking clip (Fig 20). If the waste tank is not locked, the machine will lose performance. Locate the handle into the front of the drum (Fig 21). Refit the dome and lock in place with the toggles. (Fig 22) Fitting the vacuum hose. Fit the Vacuum hose to the front of the machine (Fig 23). Lock into place by twisting the hose securing onto the lugs moulded into the neck of the machine. Connecting the solution tube. Fit the solution tube to the front of the machine (Fig 24)....
Open the catalog to page 12
Assembling the wands and floor-tool The NHL 15 comes with a complete set of high quality stainless steel wands. To make the machine comfortable to use we have included a small spacer wand allowing the height of the wand set to be adjustable for different height operatives. Assemble the wands, as shown. Adjust the height using the small spacer wand to suit. (Fig 25). 900mm Simply slide the wands together (Fig 26). Ensure that the wands and floor tool are firmly located before use. Connecting the solution tube Fig 29 The solution tube has been designed so the trigger can be fitted either way on...
Open the catalog to page 13All Numatic catalogs and technical brochures
 NHL15_Extraction Cleaner
2 Pages
 PBT230NX
2 Pages
 Full Product Catalogue
49 Pages
 RSB140
2 Pages
 RSV130
12 Pages
 PPH320
12 Pages
 Accessories Catalogue
17 Pages
 Pro Care PRODUCT RANGE CATALOGUE
11 Pages
 New Graphite Range Summer 2017
23 Pages
 TT1840 Mini Brochure
2 Pages
 Floorcare Catalogue
40 Pages
 Homecare
16 Pages
 VersaCare Accessories Catalogue
24 Pages
 HML
HML2 Pages
 TT4045 Mini Brochure
2 Pages
 Floorcare Accessories Catalogue
12 Pages


Archived catalogs
 New Twintec and LoLine 2006
2 Pages
 Cleancare Catalogue
44 Pages
 Servocare Catalogue
36 Pages
 Versaclean Catalogue
48 Pages
 Homecare Catalogue
16 Pages


- SARRALLE electric vacuum cleaner
- SARRALLE industrial vacuum cleaner
- SARRALLE dry vacuum cleaner
- SARRALLE mobile vacuum cleaner
- Metal cart
- SARRALLE compact vacuum cleaner
- Cart with swivel casters
- Battery charger
- Handling cart
- Shelf trolley
- SARRALLE wet vacuum cleaner
- SARRALLE stainless steel vacuum cleaner
- Wheel-mounted vacuum cleaner
- SARRALLE single-phase vacuum cleaner
- SARRALLE scrubber-dryer
- SARRALLE electric scrubber-dryer
- Steel cart
- SARRALLE battery-powered scrubber-dryer
- SARRALLE hazardous dust vacuum cleaner
- Anti-static vacuum cleaner