
Catalog excerpts
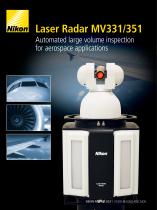
Laser Radar MV331/351 Automated large volume inspection for aerospace applications NIKON METROLOGY I VISION BEYOND PRECISION
Open the catalog to page 1
RICH FEATURES, ABSOLUTE BENEFITS Automated, non-contact inspection saves on process and labor overhead The Laser Radar offers non-contact inspection, true single-person operation, and supports off-line programming for completely automated and unattended operation, reducing operating costs. The Laser Radar’s patented technology enables direct surface and feature measurements at high data rates. As a result, the Laser Radar eliminates the need for photogrammetry targets, spherically mounted retro reflectors (SMRs) and handheld probes. Flexibility in measuring surfaces and finishes Recapturing...
Open the catalog to page 2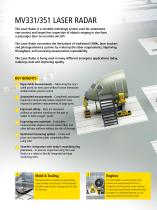
MV331/351 LASER RADAR The Laser Radar is a versatile metrology system used for automated, non-contact and target-less inspection of objects ranging in size from a passenger door to an entire aircraft. The Laser Radar overcomes the limitations of traditional CMMs, laser trackers and photogrammetry systems by reducing the labor requirements, improving throughput, and increasing measurement repeatability. The Laser Radar is being used in many different aerospace applications today, reducing costs and improving quality. Repeatable measurements - Measuring the exact same points on every part...
Open the catalog to page 3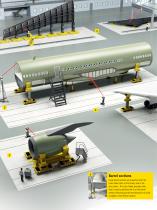
Barrel sections Large barrel sections are inspected with the Laser Radar both at the factory and in the join station. The Laser Radar provides data that is used to optimize the fit of the barrel sections allowing aircraft manufacturers to build straighter, more efficient planes.
Open the catalog to page 4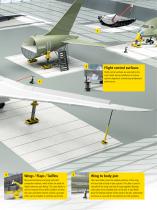
Flight control surfaces are scanned by the Laser Radar during installation to ensure optimal alignment, maximizing aerodynamic performance. Wings / Flaps / Tailfins More aerostructures are being built with composite materials, which drives the need for higher tolerance part fitting. The Laser Radar is used to measure the as-built condition of wing ribs, skins and other control surfaces so proper shims can be installed to optimize each build. Flight control surfaces Wing to body join The Laser Radar scans the relative positions of the wing root and side of body in join position. This data is...
Open the catalog to page 5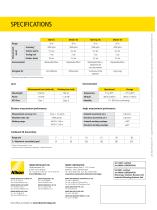
* Measurement speed depends on hole size and settings Laser Environmental Distance measurement performance Angle measurement performance Measurement accuracy (2o) * Tooling ball target grade 25 or less * Laser Radar must be calibrated and operating in a stable environment NIKON METROLOGY, INC. Tel: +1 810 2204360 Sales.US.NM@nikon.com NIKON METROLOGY UK LTD. Tel: +44 1332 811349 Sales.UK.NM@nikon.com NIKON CORPORATION Shinagawa Intercity Tower C, 2-15-3, Konan, Minato-ku, Tokyo 108-6290 Japan Tel: +81-3-6433-3701 Fax: +81-3-6433-3784 www.nikon.com/products/industrial-metrology/ NIKON...
Open the catalog to page 6All Nikon Metrology catalogs and technical brochures
-
XT V SERIES
7 Pages
-
XT H 225 ST 2x
7 Pages
-
VOXLS 30 SERIES
15 Pages
-
XT H Series
7 Pages
-
APDIS Automotive
7 Pages
-
MCT225 Metrology CT
4 Pages
-
Industrial X-ray and CT
7 Pages
-
NEXIV VMZ-S
5 Pages
-
bw series
8 Pages
-
Autocollimator
4 Pages
-
X-ray CT inspection services
1 Pages
-
Overview brochure
40 Pages
-
NEXIV VMZ-K Series
5 Pages
-
NEXIV VMZ-H3030
3 Pages
-
NEXIV VMZ R-Series
7 Pages
-
Microscope components
17 Pages
-
CMM-Manager for iNEXIV
4 Pages
-
CAMIO8
16 Pages
-
ALTERA CMM
8 Pages
-
CMM-Manager
8 Pages
-
Newsmagazine Vol.13
28 Pages
-
MCAx-MM
8 Pages
-
LC60Dx
4 Pages
-
LC15Dx
8 Pages
-
NWL200
5 Pages
-
Eclipse MA200-MA100N
12 Pages
-
Eclipse LV-N Microscopes
9 Pages
-
XT V Series
12 Pages
-
VMZ-R Series
7 Pages
-
MM-Series
15 Pages
-
Stereo microscopes
32 Pages
-
AZ100M-AZ100
20 Pages
-
NIS-Elements
20 Pages
-
Laser Radar General
6 Pages
-
XC65Dx(-LS)
2 Pages
-
Digital sight series
9 Pages
-
L100 Laser scanner
8 Pages
-
Nikon Metrology Solutions
40 Pages
-
Profile Projectors
12 Pages
-
XT H Series
12 Pages
-
Automated CT
8 Pages
-
Configurable X-ray CT systems
12 Pages
-
Focus
6 Pages
-
iNEXIV VMA series
5 Pages
-
K-Scan MMDx - K-CMM
4 Pages
-
JEOL Smart Coater
2 Pages
-
JCM 6000 Plus Neoscope
16 Pages
-
iSpace Assembly Fabrication
4 Pages
-
iSpace
6 Pages
-
H14L
4 Pages
-
eclipse E200pol
3 Pages
-
Auto MeasureEyes
2 Pages
-
gehl-kseries
2 Pages
-
BW-Series
8 Pages
-
X.Tract
2 Pages
-
Nikon Metrology News Vol.10
28 Pages
-
Nikon Metrology News Vol.9
28 Pages
-
LV100N POL Ci POL
5 Pages
-
LV-DAF Brochure
2 Pages
Archived catalogs
-
NEXIV VMR Brochure
5 Pages
-
Intensilight Brochure
3 Pages
-
Eclipse L200 Series
5 Pages
-
Eclipse LV Series Brochure
10 Pages
-
Eclipse LV100-UDM-POL
3 Pages
-
Neoscope JCM-6000 Brochure
6 Pages
-
K-Robot
2 Pages
-
LC15 Optical Probe
2 Pages
-
XC50-LS Cross Scanner
2 Pages
-
stereomicroscope SMZ1000
7 Pages
-
Neoscope Brochure
4 Pages
-
Optistation-3100
2 Pages
-
AMI-3000
2 Pages
-
COOLSCOPE
8 Pages
-
BioStation IM
5 Pages
-
BioStation CT
8 Pages
-
Neoscope Brochure
4 Pages
-
DXM-1200C
6 Pages
-
Optistation-3100
2 Pages
-
AMI-3000
2 Pages
-
Eclipse FN1
7 Pages
-
Eclipse E100 Brochure
5 Pages
-
Fluorescence Filter Blocks
6 Pages
-
Eclipse 50i/55i Accessories
5 Pages
-
Laser TIRF System
7 Pages
-
Eclipse TS100/TS100F
8 Pages
-
Eclipse Ti Brochure
15 Pages
-
Eclipse TE2000 Brochure
28 Pages
-
COOLSCOPE
8 Pages
-
BioStation IM brochure
5 Pages
-
BioStation CT brochure
8 Pages


