Catalog excerpts

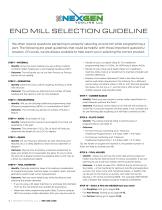
END MILL SELECTION GUIDELINE We often receive questions pertaining to properly selecting an end mill while programming a part. The following are great guidelines that could be helpful with those important questions/ answers. Of course, we are always available to help assist you in selecting the correct product. STEP 1 – MATERIAL > Identify: Know the exact material you are cutting, material condition (billet, forging etc.), and material hardness (HRC). > Outcome: This will guide you to our Non-Ferrous or Ferrous section of our catalog. STEP 2 – OPERATION > Identify: Determine if you will be roughing, finishing, or both with this tool. > Outcome: This will help you determine the number of flutes needed and the need (or not) for chip breakers. STEP 3 – PROGRAMMING > Identify: Will you be utilizing traditional programming, high efficiency programming (HEM), or a combination of both? > Outcome: This will help you decide on number of flutes in Step 8. STEP 4 – ADOC (Axial Depth of Cut) > Identify: Determine the maximum axial depth of cut tool will experience in the part. > Outcome: This dimension (+1/2 x Dia. of tool) will help you determine the length of cut (LOC) to deploy. STEP 5 – REACH > Identify: Do you have any obstacles to clear (fixturing, part features, etc.) or deep depths to reach (6x tool diameter or deeper)? > Outcome: May be time to employ a reduced necked tool to keep your length of cut reasonable but allow for you to drop the tool into a deeper position by stepping down (LOC max at a time) to a desired part depth. STEP 6 – TOOL DIAMETER > Identify: Diameter selection takes a formulative consideration of programming type, machine taper, cut depth, reach, and part geometry (wall-to-wall corner requirements). > Outcome: Here are some helpful tips while deciding on and selecting the proper diameter. • Decide on your cut depth (Step 4). For traditional programming keep it <2xDia., for HEM keep it below 4xDia. • Decide on your total reach depth (Step 5). If needing to machine 4xDia. look at a necked tool to maintain strength and minimize deflection. • Employ a tool radius (diameter/2) that is less than the part wall-to-wall radius requirement. For instance, for a .250-part corner radius constraint utilize a .375 or .437 Tool and generate the radius. Do not run a ½" end mill into a .250 corner it will chatter, squawk, and possibly break. STEP 7 – CORNER RADIUS > Identify: Does your part require a corner radius specification to meet between wall and the floor? > Outcome: Running a corner radius on an end mill will increase its corner life. If your part requires one then great, if not, consider one for pre-finishing (aka roughing) as it will help to extend tool life! STEP 8 – FLUTE COUNT > Identify: The cutting material (Step 1) and the type of programming in use (Step 3) > Outcome: • For Non-Ferrous machining (excl. Titanium) Traditional Programming = 2-3 flutes, HEM = 3-5 Flutes • For Ferrous machining (incl. Titanium) Traditional Programming = 4-5 flutes, HEM = 5-7 Flutes Tip: the harder or tougher the material is, the greater number of flutes will help to increase tool life. STEP 9 – TOOL HOLDER > Identify: Always try and use the most rigid and accurate tool holder proving the least amount of runout as possible. If you are planning to use a side lock holder, see the outcome below. > Outcome: It is best to keep TIR <.0005 at the tip of the tool (in the holder – in the machine) for optimum tool life and application success. Our tools come with cylindrical shanks. A Weldon Flat can be put on the tool by us quickly. Just order the tool by placing a “W” at the end of the EDP#. For example, EDP 60000 with a Weldon flat needed would be ordered as 60000W. • If you’re using a 40-taper machine, try and keep tool diameter <3/4" as this will extend your spindle life expectancy. STEP 10 – Select & Pick the NEXGEN tool you need! • Determine what programming style (Step 3) you’re using as HEM can employ smaller diameters than you may be used to. > For Non-ferrous Tooling go to pages 11-15. > For Roughing tools go to pages 5-9. > For Ferrous tooling go to pages 17-2
Open the catalog to page 1All Nexgen Tooling LLC catalogs and technical brochures
-
WELDON FLAT SPECIFICATIONS
1 Pages
-
DEPTH OF CUT GUIDELINES
1 Pages
-
SPEED & FEED
1 Pages
-
PRODUCT CATALOG
64 Pages


