 Website:
NETZSCH Analyzing & Testing
Group: NETZSCH
Catalog excerpts

Dilatometer Series DIL 402 Expedis Classic Method, Instrument, Applications Analyzing & Testing
Open the catalog to page 1
Dilatometry NETZSCH dilatometers yield precise information on the expansion or shrinkage during thermal treatment providing insights into the behavior of ceramics, glasses and building materials. Specifically the knowledge of binder burnout during the firing process, sintering behavior, and influence of additives in the sintering process is required when producing ceramic materials. Even the development of glazes, e.g., for porcelain products, demands precise knowledge of the dimensional changes of the products in contact during firing. Changes in the composition of glasses can be simply...
Open the catalog to page 2
The Method for Determination of Dimensional Changes Displacement System Pushrod dilatometry is a method for determining dimensional changes versus temperature or time while the sample undergoes a controlled temperature program. The degree of expansion divided by the change in temperature is called the material’s coefficient of expansion (α). Sample Holder Furnace Pushrod coefficient of expansion initial sample length change in temperature change in length 1 Δl α = –– ( ––– ) L0 ΔT For preparing a dilatometer measurement, a rod-shaped sample, typically several cm long, is inserted into a...
Open the catalog to page 3
User-Optimized Environment Major simplification begins with preparation of the measurement by using method-based test routines predefined by the operator. The MultiTouch feature places the sample into the optimum position using a unique, tail-like motion. The initial sample length is then automatically determined at a predefined contact force. Exchanging the furnace is simple and requires no detailed experience. Only a few clicks are needed to start the measurement. ALL-IN-ONE DESIGN DIL Expedis Classic is available as a single or dual/differential system. In both versions, the all-inone...
Open the catalog to page 4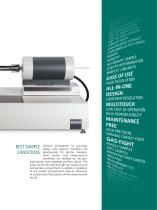
BEST SAMPLE CONDITIONS Defined atmosphere by gas-tight design and superior insulation are prerequisites for precise measurement results. Such measurement conditions are realized by the gastight design and integrated gas flow device. The gases can be directed through the measuring cell and sample compartment. In addition, insulation of the sample compartment reduces influences of temperature fluctuations on the measurement results.
Open the catalog to page 5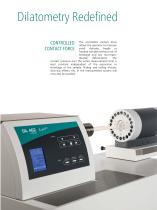
Dilatometry Redefined CONTROLLED CONTACT FORCE The controlled contact force allows the operator to measure small, delicate, fragile or foamed samples without risk of breakage and any non-reproducible deformation. The contact pressure over the entire measurement time is kept constant independent of the expansion or shrinkage of the sample. Sliding and rolling friction, stick-slip effects, etc. in the measurement system will now also be avoided.
Open the catalog to page 6
TEMPERATURE MEASUREMENT AT THE RIGHT SPOT In order to conveniently measure various sample lengths , the thermocouple is adjustable. A guiding rod accommodates the thermocouple to place it in the desired position without bending. NanoEye OBSERVES YOUR SAMPLE The new, pioneering NanoEye displacement system features perfect linearity and maximum resolution over the entire measuring range. The heart of the NanoEye is an optoelectronic sensor able to encode a position and convert it into a digital signal. Using a linear encoder has the advantage that resolution, accuracy and linearity remain...
Open the catalog to page 7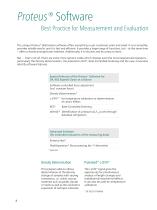
Proteus® Software Best Practice for Measurement and Evaluation The unique Proteus® dilatometer software offers everything a user could ever want and need: It runs smoothly, provides reliable results, and it is fast and efficient. It provides a large range of functions, but – at the same time – offers a clearly-arranged user interface. Additionally, it is intuitive and thus easy to learn. But … that’s not all. There are some more options inside which impress even the most experienced operators – particularly the Density Determination, the patented c-DTA®, Rate-Controlled-Sintering and the...
Open the catalog to page 8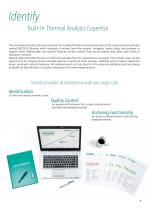
Built-In Thermal Analysis Expertise The innovative Identify software extension for the identification and interpretation of DIL measurements includes several NETZSCH libraries with hundreds of entries from the ceramic, inorganic, metal, alloy, and polymer or organic fields. Additionally, user-specific libraries can be created. They can be shared with other users within a computer network. Identify allows the identification of unknown samples from the measured curve shape. This will also open up the opportunity to compare known samples against a variety of other samples, enabling one to make...
Open the catalog to page 9
Performance and Applications High Accuracy Platinum measurement in comparison to literature values. Measurement conditions: heating rate 5 K/min, dynamic nitrogen atmosphere (20 ml/min). This plot exhibits the measurement (red curve) on a reference material made of platinum between room temperature and 990°C. The black curve corresponds to literature values. The deviation of the determined mean CTE value between 100°C and 950°C is less than 4E-08 1/K in comparison to literature data [1]. The software includes expansion data of common reference materials. For convenient comparison, these...
Open the catalog to page 10
Thermal Expansion Mismatch Poor glaze/body fit is the main cause of crazing (spider web pattern of cracks penetrating the glaze). This effect is caused by, e.g., thermal expansion mismatch which can be avoided by adjusting the thermal expansion behavior of the body and the glaze. This plot shows the expansion behavior of the glaze (red curve) compared to that of the body to which it should be applied. At 700°C – shortly before the glass transition temperature of the glaze at 718°C – the difference in expansion amounts to 0.02%. Softening of the glaze occurs at 822°C. The higher expansion of...
Open the catalog to page 11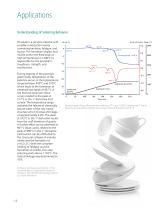
Applications Understanding of Sintering Behavior Porcelain is a ceramic material with variable composition mainly containing kaolinite, feldspar, and quartz. The formation of glass and mullite within the fired body at high temperatures (>1200°C) is responsible for the porcelain’s toughness, strength, and translucence. During heating of the porcelain green body, dehydration of the kaolinite occurs in the temperature range between 450°C and 570°C which leads to the formation of metakaolinite (peak at 467°C in the thermal expansion (blue curve), related to the peak at 517°C in the 1st...
Open the catalog to page 12All NETZSCH Analyzing & Testing catalogs and technical brochures
-
DMA 303 Eplexor
24 Pages
-
LFA 717 HyperFlash® Series
28 Pages
-
DSC 300 Caliris Series
28 Pages
-
STA 509 Jupiter Series
28 Pages
-
TG 309 Libra Series
24 Pages
-
DEA 288 Ionic
20 Pages
-
STA 2500 Regulus
12 Pages
-
NTA Guarded Hot Plate Series
16 Pages
-
TMA 402 F1/F3 Hyperion®
16 Pages
-
Rosand Series
20 Pages
-
Accelerating Rate Calorimetry
20 Pages
-
NTA HotBoxes
16 Pages
-
DIL 402 Expedis Select/Supreme
28 Pages
-
Product Overview
12 Pages
-
NETZSCH Energy Solutions
40 Pages
-
Advanced Materials Testing
32 Pages
-
NTA Fire Testing Systems
20 Pages
-
Kinetics NEO
20 Pages
-
TG-FTIR - product brochure
24 Pages
-
TA-QMS Coupling
28 Pages
-
Kinexus Prime DSR Series
20 Pages
-
Kinexus Prime Series
20 Pages
-
HMOR 422
1 Pages
-
RUL/CIC 421
1 Pages
-
Cone Calorimeter TCC 918
12 Pages
-
Thermal Insulation Materials
24 Pages
-
SBA 458 Nemesis®
24 Pages
-
NETZSCH NEVIO Instrument Series
24 Pages
-
LFA 427 - product brochure
24 Pages
-
DMA GABO EPLEXOR up to 1500°C
12 Pages
-
GABOMETER®
8 Pages


