

LT150/LT85
LT150/LT85
- Precautions: Users should read the manual before using the NEC MultiSync LT150/LT85 Projector. The serial number is on the bottom of the projector.
- Safety Warnings: Avoid opening the cabinet to prevent shock. Servicing should be done by qualified NEC personnel. Keep the projector away from rain or moisture.
- Compliance: The projector complies with Canadian and FCC regulations for Class B digital devices.
- Guidelines: Use in a dark room on a flat surface, away from dust and moisture. Avoid direct sunlight and heat.
- Power Supply: Operates on 100-120 or 200-240 V 50/60 Hz AC. Handle the power cable carefully.
- Cleaning: Unplug before cleaning. Use a damp cloth for the cabinet and a blower or lens paper for the lens.
- Lamp Replacement: Replace the lamp after 1000 hours of use. Allow the projector to cool for 60 minutes before replacing the lamp.
- Ensure ventilation and avoid placing liquids on the projector. Do not look directly into the lens while on.
The document describes the MultiSync LT150/LT85 Projector, its features, setup, and operational instructions. It supports various configurations, including tabletop, rear projection, and ceiling mounting.
- Projects images up to 200 inches diagonally from multiple sources.
- Equipped with a 130-watt NSH lamp and supports wireless remote control.
- Offers keystone correction and multiple video modes.
- Includes NEC's Advanced AccuBlend technology for image compression.
- Compatible with various video standards and signal types.
- Features a built-in PC Card Viewer for presentations without a PC.
- Professional installation is recommended for ceiling mounting.
- Includes controls for easy operation and various input options.
- Operates via infrared with a range of up to 22 feet.
- Includes features like auto-adjust, picture mute, and magnify functions.
Details the functions of remote control buttons, including power, video source selection, and auto-adjust.
The PJ button toggles between modes, affecting button functionality. Includes a laser pointer and menu access.
Includes pointer display, keystone correction, image magnification, and volume control.
Involves determining image size and selecting a projection surface. Provides a distance chart for optimal placement.
Illustrates connections for video, S-video, and audio inputs, with recommendations for cable lengths.
- PC: Use the supplied RGB signal cable and power on both devices.
- Macintosh: Similar steps as PCs, with possible need for a pin adapter.
- DVD Player: Use appropriate cables for component or composite video outputs.
- VCR or Laser Disc Player: Use RCA cables and ensure correct stereo sound connections.
- Select menu language upon startup.
- Use the Source button to select inputs and adjust image settings.
- Auto Adjust optimizes image settings for RGB inputs.
Offers on-screen instructions in seven languages.
Includes pointer icon selection and magnify function.
Volume and keystone bars can be displayed or hidden during adjustments.
Includes image orientation, background display, and USB mouse settings.
Allows manual or automatic source selection and image optimization.
Automatically turns off after five minutes without input. Keystone settings can be saved.
Supports image capture to a CompactFlash card and includes a ChalkBoard feature.
Allows presentations from a CompactFlash card without a computer.
Instructions for inserting and ejecting a CompactFlash card.
Used to create slides from documents for projector presentations.
Replace the lamp after 1000 hours of use and reset the lamp hour meter.
- Projector Shutdown: Check lamp cover and cooling fan issues.
- Power Issues: Verify power cable connection and check for overheating.
- No Picture: Confirm source selection and cable connections.
- Image Issues: Adjust position and focus, use Keystone feature.
- Remote Control Problems: Ensure range and battery status.
- Model Numbers: LT150 / LT85
- Optical: DMD™ Single Chip, 1024x768 (LT150) / 800x600 (LT85)
- Lens: Manual focus, F3.0, f = 20.3 mm
- Lamp: 130 W NSH, warranted for 1000 hours within 6 months
- Image Size: 36 - 200 inches diagonal
- Projection Distance: LT150: 3.9-21.8 ft, LT85: 3.9 - 22.6 ft
- Electrical: Supports various video inputs and frequencies
- Mechanical: Dimensions: 9.4" x 2.1" x 7.7", Weight: 3.3 lbs
- Environmental: Operational temperatures: 41˚ to 95˚F
- Regulations: UL Approved
Includes codes for power, input selection, and mute functions.
Catalog excerpts
MultiSync LT150/LT85 Micro-Portable Projector User’s Manual
Open the catalog to page 1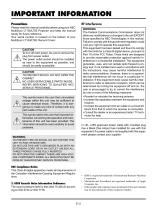
IMPORTANT INFORMATION RF Interference Precautions Please read this manual carefully before using your NEC MultiSync LT150/LT85 Projector and keep the manual handy for future reference. Your serial number is located on the bottom of your MultiSync LT150/LT85. Record it here: WARNING The Federal Communications Commission does not allow any modifications or changes to the unit EXCEPT those specified by NEC Technologies in this manual. Failure to comply with this government regulation could void your right to operate this equipment. This equipment has been tested and found to comply with the limits...
Open the catalog to page 2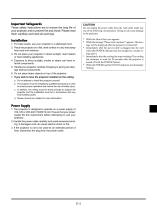
These safety instructions are to ensure the long life of your projector and to prevent fire and shock. Please read them carefully and heed all warnings. 1. For best results, use your projector in a darkened room. 2. Place the projector on a flat, level surface in a dry area away from dust and moisture. 3. Do not place your projector in direct sunlight, near heaters or heat radiating appliances. 4. Exposure to direct sunlight, smoke or steam can harm internal components. 5. Handle your projector carefully. Dropping or jarring can damage internal components. 6. Do not place heavy objects on top...
Open the catalog to page 3
1. Unplug the projector before cleaning. 2. Clean the cabinet periodically with a damp cloth. If heavily soiled, use a mild detergent. Never use strong detergents or solvents such as alcohol or thinner. 3. Use a blower or lens paper to clean the lens, and be careful not to scratch or mar the lens. • To replace the lamp, follow all instructions provided on page E-52. • Be sure to replace the lamp when the message "Lamp Running Time is Over 1000 Hours!!" appears. If you continue to use the lamp after the lamp has reached the end of its usable life, the lamp bulb may shatter, and pieces of glass...
Open the catalog to page 4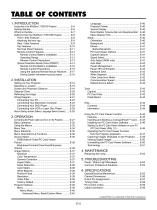
TABLE OF CONTENTS 1. INTRODUCTION CompactFlash is a trademark of San Disk Corporation.
Open the catalog to page 5
Congratulations on Your Purchase of The MultiSync LT150/LT85 Projector The MultiSync LT150/LT85 is one of the very best projectors available today. The MultiSync LT150/LT85 enables you to project precise images up to 200 inches across (measured diagonally) from your PC or Macintosh computer (desktop or notebook), VCR, DVD player, document camera, a laser disc player or PC Card Viewer. You can use the projector on a tabletop or cart, you can use the projector to project images from behind the screen, and the projector can be permanently mounted on a ceiling*1. The remote control can be used wirelessly....
Open the catalog to page 6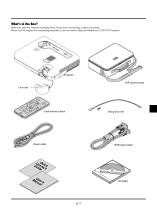
What's in the Box? Make sure your box contains everything listed. If any pieces are missing, contact your dealer. Please save the original box and packing materials if you ever need to ship your MultiSync LT150/LT85 Projector. Projector Soft carrying case Lens cap Card remote control Power cable
Open the catalog to page 7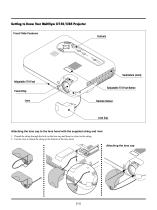
Getting to Know Your MultiSync LT150/LT85 Projector Front/ Side Features Controls Ventilation (inlet) Adjustable Tilt Foot Adjustable Tilt Foot Button Focus Ring Remote Sensor Attaching the lens cap to the lens hood with the supplied string and rivet 1. Thread the string through the hole on the lens cap and then tie a knot in the string. 2
Open the catalog to page 8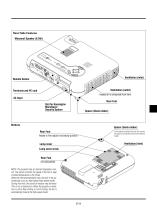
Rear/ Side Features Monaural Speaker (0.5W) Ventilation (inlet) Ventilation (outlet) Heated air is exhausted from here AC Input Rear Foot Slot for Kensington MicroSaver Security System Spacer (black rubber) Spacer (black rubber) Rear Foot Rotate to fine-adjust horizontally position To fine-adjust the height of the rear foot, remove the spacer and rotate the rear foot to the desired height. Ventilation (inlet) Lamp cover Lamp cover screw Rear Foot (not adjustable) NOTE: The projector has an internal temperature sensor. The sensor controls the speed of the fan to keep constant temperature in the...
Open the catalog to page 9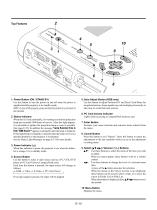
1. Power Button (ON / STAND BY) Use this button to turn the power on and off when the power is supplied and the projector is in standby mode. NOTE: To turn off the projector, press and hold this button for a minimum of two seconds. 2. Status Indicator When this is lit red continually, it's warning you that the projection lamp has exceeded 1000 hours of service. After this light appears, it is advisable to replace the projection lamp as soon as possible. (See page E-52). In addition the message "Lamp Running Time is Over 1000 Hours!!" appears continually until the lamp is replaced. If this light...
Open the catalog to page 10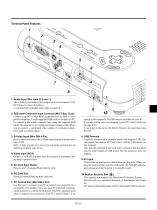
Terminal Panel Features S U 8 1. Audio Input Mini Jack (3.5 mm ∅) This is where you connect audio output from your computer, VCR, DVD player or laser disc player. A commercially available audio cable is required. 2. RGB Input/ Component Input Connector (Mini D-Sub 15 pin) Connect your PC or other RGB equipment such as IBM or compatible computers. Use the supplied RGB cable to connect to a PC. Or connect a Macintosh computer here using the supplied RGB cable. This also serves as a component input connector that allows you to connect a component video output of component equipment such as a DVD...
Open the catalog to page 11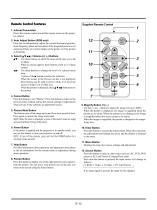
Remote Control Features Supplied Remote Control 1. Infrared Transmitter Direct the remote control toward the remote sensor on the projector cabinet. 3. Select (▲▼䊴 䊳) / Volume (+) (–) Buttons ▲▼: Use these buttons to select the menu of the item you wish to adjust. When no menus appear, these buttons work as a volume control. 䊴 䊳: Use these buttons to change the level of a selected menu item. A press of the 䊳 button executes the selection. When the menus or the Viewer tool bar is not displayed, these buttons can be used to select a slide, or to move the cursor in Folder List or Slide List. When...
Open the catalog to page 12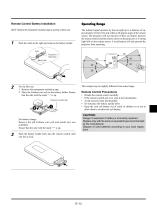
Remote Control Battery Installation Operating Range NOTE: Remove the transparent insulation tape by pulling it before use. The infrared signal operates by line-of-sight up to a distance of approximately 22 feet (7m) and within a 60-degree angle of the remote sensor. The projector will not function if there are objects between the remote control and the remote sensor on the projector or if strong light falls on the remote sensor. A weak battery will also prevent the projector from operating Push the catch to the right and remove the battery holder. Transparent insulation tape Battery holder For...
Open the catalog to page 13All NEC catalogs and technical brochures
 L51W
L51W67 Pages
 HT510/HT410
74 Pages
 GT6000/GT5000
115 Pages