HT510/HT410
1 /74Pages

HT510/HT410
1 /74Pages
Catalog excerpts

Entertainment Projector English Deutsch Français Italiano Español Svensk
Open the catalog to page 1
IMPORTANT INFORMATION IMPORTANT INFORMATION Safety Cautions Precautions Please read this manual carefully before using your NEC HT510/HT410 Projector and keep the manual handy for future reference. Your serial number is located on the bottom of your projector. Record it here: CAUTION To turn off main power, be sure to remove the plug from power outlet. The power outlet socket should be installed as near to the equipment as possible, and should be easily accessible. CAUTION TO PREVENT SHOCK, DO NOT OPEN THE CABINET. NO USER-SERVICEABLE PARTS INSIDE. REFER SERVICING TO QUALIFIED SERVICE PERSONNEL....
Open the catalog to page 2
IMPORTANT INFORMATION The Federal Communications Commission does not allow any modifications or changes to the unit EXCEPT those specified by NEC Solutions (America), Inc. in this manual. Failure to comply with this government regulation could void your right to operate this equipment. This equipment has been tested and found to comply with the limits for a Class B digital device, pursuant to Part 15 of the FCC Rules. These limits are designed to provide reasonable protection against harmful interference in a residential installation. This equipment generates, uses, and can radiate radio frequency...
Open the catalog to page 3
Fire and Shock Precautions 1. Ensure that there is sufficient ventilation and that vents are unobstructed to prevent the build-up of heat inside your projector. Allow at least 4 inches (10 cm) of space between your projector and a wall. 2. Prevent foreign objects such as paper clips and bits of paper from falling into your projector. Do not attempt to retrieve any objects that might fall into your projector. Do not insert any metal objects such as a wire or screwdriver into your projector. If something should fall into your projector, disconnect it immediately and have the object removed by a...
Open the catalog to page 4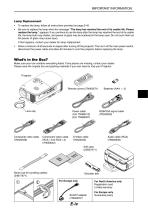
IMPORTANT INFORMATION Lamp Replacement • To replace the lamp, follow all instructions provided on page E-45. Be sure to replace the lamp when the message "The lamp has reached the end of its usable life. Please replace the lamp." appears. If you continue to use the lamp after the lamp has reached the end of its usable life, the lamp bulb may shatter, and pieces of glass may be scattered in the lamp case. Do not touch them as the pieces of glass may cause injury. If this happens, contact your dealer for lamp replacement. Allow a minimum of 60 seconds to elapse after turning off the projector....
Open the catalog to page 5
Congratulations on Your Purchase of The HT510/HT410 Entertainment Projector The HT510/HT410 is a sophisticated single chip DLP™ projector designed with the enhanced video requirements for the home entertainment user. With the HT510/HT410 you will enjoy projecting images up to 200” (measured diagonally) from your DVD player, VCR, satellite hookup, HDTV source, PC or Macintosh computer (desktop or notebook) and images from your digital camera. The HT510/HT410 can be setup on a coffee table, tabletop, cart, bookshelf or permanently installed*1. With an extensive input panel, quick connect guide...
Open the catalog to page 8
• Digital Light Processing and DLP are trademarks of Texas Instruments. • IBM is a trademark or registered trademark of International Business Machines Corporation. • Mac and PowerBook are trademarks of Apple Computer, Inc., registered in the U.S. and other countries. • Other product and company names mentioned in this user's manual may be the trademarks or registered trademarks of their respective holders.
Open the catalog to page 9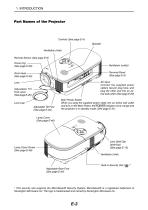
Part Names of the Projector Controls (See page E-4) Speaker Ventilation (inlet) Remote Sensor (See page E-9) SELE CT Focus ring (See page E-26) Ventilation (outlet) Zoom lever (See page E-25) Terminal Panel (See page E-5) AC Input Connect the supplied power cable's two-pin plug here, and plug the other end into an active wall outlet. (See page E-20) Adjustable Tilt Foot Lever (See page E-25) Lens Cap Adjustable Tilt Foot (See page E-25) Main Power Switch When you plug the supplied power cable into an active wall outlet and turn on the Main Power, the POWER indicator turns orange and the projector...
Open the catalog to page 10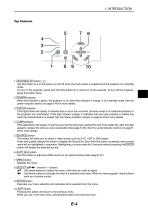
STATUS POWER 1. ON/STAND BY button ( ) Use this button to turn the power on and off when the main power is supplied and the projector is in standby mode. To turn on the projector, press and hold this button for a minimum of two seconds. To turn off the projector, press this button twice. 2. POWER indicator When this indicator is green, the projector is on; when this indicator is orange, it is in standby mode. See the power Indicator section on page E-49 for more details. 3. STATUS indicator If this light blinks red rapidly, it indicates that an error has occurred, the lamp cover is not attached...
Open the catalog to page 11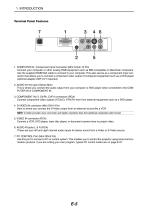
Terminal Panel Features 1. COMPUTER IN / Component Input Connector (Mini D-Sub 15 Pin) Connect your computer or other analog RGB equipment such as IBM compatible or Macintosh computers. Use the supplied RGB/VGA cable to connect to your computer. This also serves as a component input connector that allows you to connect a component video output of component equipment such as a DVD player (optional adapter ADP-CV1 required). 2. AUDIO IN mini jack (Stereo Mini) This is where you connect the audio output from your computer or DVD player when connected to the COMPUTER IN or COMPONENT IN. 3. COMPONENT...
Open the catalog to page 12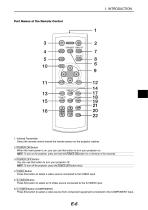
Part Names of the Remote Control COMPONENT COMPUTER 1. Infrared Transmitter Direct the remote control toward the remote sensor on the projector cabinet. 2. POWER ON Button When the main power is on, you can use this button to turn your projector on. NOTE: To turn on the projector, press and hold the POWER ON button for a minimum of two seconds. 3. POWER OFF Button You can use this button to turn your projector off. NOTE: To turn off the projector, press the POWER OFF button twice. 4. VIDEO Button Press this button to select a video source connected to the VIDEO input. 5. S-VIDEO Button Press...
Open the catalog to page 13
7. I COMP. I Button (COMPUTER) Press this button to select a video source from computer or component equipment connected to your COMPUTER IN port. 8. I AUTO I Button (AUTO ADJ.) Use this button to adjust an RGB source for an optimal picture. See page E-27. 9. I SELECT I ATTT Button AT : Use these buttons to select the menu of the item you wish to adjust. : Use these buttons to change the level of a selected menu item. Displays the menu for various settings and adjustments. Use this button to enter your menu selection. It works the same as the I ENTER I button on the cabinet. See page E-4. It...
Open the catalog to page 14All NEC catalogs and technical brochures
 L51W
L51W67 Pages
 LT150/LT85
59 Pages
 GT6000/GT5000
115 Pages