GT6000/GT5000
1 /115Pages
GT6000/GT5000
1 /115Pages
Catalog excerpts
GT6000/GT5000 LCD Projector User’s Manual
Open the catalog to page 1
To turn off main power, be sure to remove the plug from power outlet. The power outlet socket should be installed as near to the equipment as possible, and should be easily accessible. Precautions Please read this manual carefully before using your NEC GT6000/ GT5000 Projector and keep the manual handy for future reference. Your serial number is located on the bottom of your GT6000/ GT5000. Record it here: If you are a user of the GT6000R, read the supplied document which describes the differences from the GT6000. A This symbol warns the user that uninsulated voltage within the unit may be sufficient...
Open the catalog to page 2
Important Information 1. The projector is designed to operate on a power supply of 100120 or 200-240 V 50/60 Hz AC. Ensure that your power supply fits this requirement before attempting to use your projector. 2. Handle the power cable carefully and avoid excessive bending. A damaged cord can cause electric shock or fire. 3. If the projector is not to be used for an extended period of time, disconnect the plug from the power outlet. 4. Do not touch the power plug with wet hand. Doing so can cause electrical shock or fire. 5. Do not touch the power plug during a thunder storm. Doing so can cause...
Open the catalog to page 3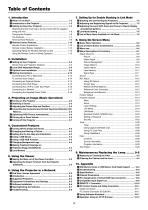
Table of Contents 1. Introduction 7. Setting Up for Double Stacking in Link Mode
Open the catalog to page 4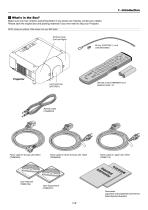
1. Introduction z What's in the Box? Make sure your box contains everything listed. If any pieces are missing, contact your dealer. Please save the original box and packing materials if you ever need to ship your Projector. NOTE: Lenses are optional. Order lenses from your NEC dealer. Terminal cover (Left and Right) FO C U S Projector Remote control (79646634) and batteries (AAA⳯2) Power cable for Europe (AC 230V) (7N080003) Power cable for North America (AC 120V) (7N080208) Power cable for Japan (AC 100V) (7N080113) User Supportware (7N950431) Documents (Japanese and English/German/French/ Italian/Spanish/Swedish)...
Open the catalog to page 6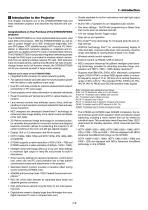
Congratulations on Your Purchase of the GT6000/GT5000 projector The GT6000/GT5000 is our most sophisticated three panel, dual lamp XGA LCD projector. With the GT6000/GT5000 you will be able to project images up to 500" (measured diagonally) from your DVD player, VCR, satellite hookup, HDTV source, PC, Workstation or Macintosh computer (desktop or notebook) and images from you digital camera PC Card or compact flash memory. The GT6000/GT5000 incorporates integrated networking access through the RJ45 input or provides for wireless network connectivity from an optional wireless network PC card....
Open the catalog to page 7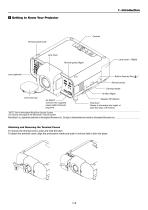
1. Introduction c Getting to Know Your Projector Terminal panel (Left) Lens hood Lamp cover 1 (Right) Terminal panel (Right) Lens (optional) Built-in Security Slot ( Remote sensor Carrying handle Air filter (Right) Lens hood cap AC INPUT Connect the supplied power cable’s three-pin plug here. Foot (four) Rotate to fine-adjust the height of each foot (max. 0.6”/15mm). *NOTE: Slot for Kensington MicroSaver Security System This security slot supports the MicroSaver® Security System. MicroSaver® is a registered trademark of Kensington Microware Inc. The logo is trademarked and owned by Kensington...
Open the catalog to page 8
Depression for foot (4 locations) Remote sensor Remote sensor Ventilation (outlet) Air filter (Left) Lamp cover 2 (Left) Ventilation (outlet) Remote sensor Ventilation (inlet) Remote sensor
Open the catalog to page 9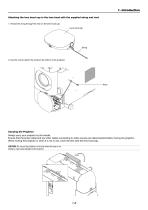
1. Introduction Attaching the lens hood cap to the lens hood with the supplied string and rivet 1. Thread the string through the hole on the lens hood cap. Lens hood cap S-VIDEO VIDEO 2. Use the rivet to attach the string to the bottom of the projector. Carrying the Projector Always carry your projector by the handle. Ensure that the power cable and any other cables connecting to video sources are disconnected before moving the projector. When moving the projector or when it is not in use, cover the lens with the lens hood cap. CAUTION: Do not put the projector on its side when the lamp is on....
Open the catalog to page 10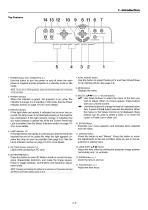
3D REFORM AUTO ADJUST 1. POWER Button (ON / STAND BY)( LENS SHIFT 7. AUTO ADJUST Button Use this button to adjust Position-H/V and Pixel Clock/Phase for an optimal picture. See page 3-6. Use this button to turn the power on and off when the main power is supplied and the projector is in standby mode or idle mode. NOTE: To turn on or off the projector, press and hold this button for a minimum of two seconds. Displays the menu. 9. SELECT 왖왔왗왘 (+) (–) / Volume Buttons 왖왔 : Use these buttons to select the menu of the item you wish to adjust. When no menus appear, these buttons work as a volume control....
Open the catalog to page 11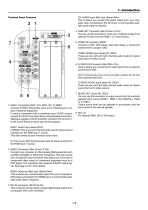
1. Introduction DVI AUDIO Input Mini Jack (Stereo Mini) This is where you connect the audio output from your computer when connected to the DVI input. A commercially available audio cable is required. Terminal Panel Features 4. RGB OUT Connector (Mini D-Sub 15 Pin) You can use this connector to loop your computer image to an external monitor from the RGB 1 or 2 input source. 5. VIDEO IN Connector (BNC) Connect a VCR, DVD player, laser disc player, or document camera here to project video. VIDEO AUDIO Input Jacks R/L (RCA) These are your left and right channel audio inputs for stereo sound from...
Open the catalog to page 12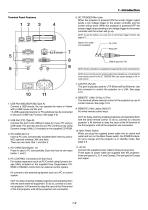
1. Introduction 6. SC. TRIGGER Mini Jack When the projector is powered ON the screen trigger output sends a low voltage trigger to the screen controller and the screen will go down. When the projector is powered OFF the screen trigger stops sending a low voltage trigger to the screen controller and the screen will go up. Terminal Panel Features Stereo mini cable (not supplied) NOTE: To use this feature, you must turn on the Screen Trigger function. See page 8-17. NOTE: Screen controllers are supplied and supported by screen manufacturers. NOTE: Do not use this jack for anything other than intended...
Open the catalog to page 13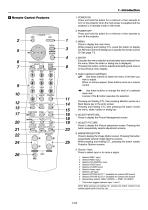
1. Introduction v Remote Control Features 1. POWER ON Press and hold this button for a minimum of two seconds to turn on the projector when the main power is supplied and the projector is in standby mode or idle mode. 2. POWER OFF Press and hold this button for a minimum of two seconds to turn off the projector. PICTURE WHITE BAL. PROJECTOR POSITION PIXEL PICTURE SOUND OSD KEYSTONE AMPLITUDE ENTRYLIST R ZOOM LENS 4. ENTER Executes the menu selection and activates items selected from the menu. When the slider or dialog box is displayed: Pressing this button confirms adjustments/setting and returns...
Open the catalog to page 14All NEC catalogs and technical brochures
 L51W
L51W67 Pages
 LT150/LT85
59 Pages
 HT510/HT410
74 Pages