Mott Quick Change Sparger Instructions
1 /2Pages
Mott Quick Change Sparger Instructions
1 /2Pages
Catalog excerpts
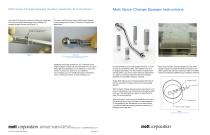
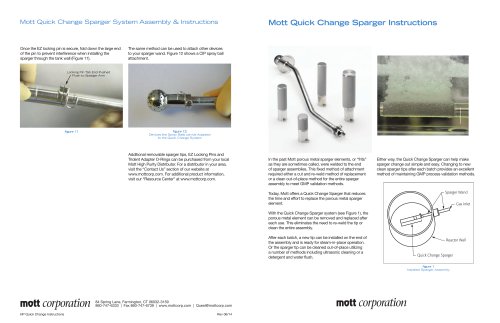
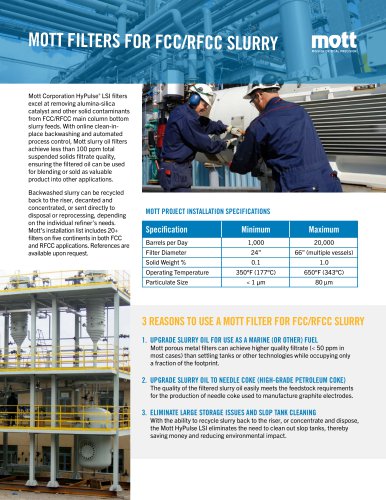
Mott Quick Change Sparger System Assembly & Instructions Once the EZ locking pin is secure, fold down the large end of the pin to prevent interference when installing the sparger through the tank wall (Figure 11). Mott Quick Change Sparger Instructions The same method can be used to attach other devices to your sparger wand. Figure 12 shows a CIP spray ball attachment. Locking Pin Tab End Pushed Flush to Sparger Arm figure 12 Devices like Spray Balls can be Adapted to the Quick Change System Additional removable sparger tips, EZ Locking Pins and Trident Adapter O-Rings can be purchased from your local Mott High Purity Distributor. For a distributor in your area, visit the “Contact Us” section of our website at www.mottcorp.com. For additional product information, visit our “Resource Center” at www.mottcorp.com. In the past Mott porous metal sparger elements, or “frits” as they are sometimes called, were welded to the end of sparger assemblies. This fixed method of attachment required either a cut and re-weld method of replacement or a clean out-of-place method for the entire sparger assembly to meet GMP validation methods. Either way, the Quick Change Sparger can help make sparger change out simple and easy. Changing to new clean sparger tips after each batch provides an excellent method of maintaining GMP process validation methods. Today, Mott offers a Quick Change Sparger that reduces the time and effort to replace the porous metal sparger element. With the Quick Change Sparger system (see Figure 1), the porous metal element can be removed and replaced after each use. This eliminates the need to re-weld the tip or clean the entire assembly. After each batch, a new tip can be installed on the end of the assembly and is ready for steam-in-place operation. Or the sparger tip can be cleaned out-of-place utilizing a number of methods including ultrasonic cleaning or a detergent and water flush. figure 1 Installed Sparger Assembly mott corporation HP Quick Change Instructions 84 Spring Lane, Farmington, CT 06032-3159 860-747-6333 | Fax 860-747-6739 | www.mottcorp.com | [email protected] Rev 06/14
Open the catalog to page 1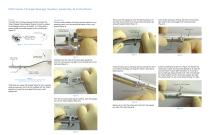
Mott Quick Change Sparger System Assembly & Instructions The Mott Quick Change Sparger System includes the Trident Sparger Wand Adapter (Figure 2) which is welded to the Sparger wand (not included*), an O-Ring seal, a porous metal removable sparger tip and a locking pin (Figure 3). Once the trident adapter has been properly welded to your sparging wand, the o-ring should be placed in the o-ring groove (Figure 4). Firmly push the sparger tip onto the trident adapter until the collar has covered the o-ring and the locking tabs are pressed together tightly (Figure 7). Twist the EZ locking pin through...
Open the catalog to page 2All Mott catalogs and technical brochures
 IGS Filter Systems
2 Pages
 Additive Manufacturing Overview
12 Pages
Archived catalogs
 Series 850
1 Page
 Biotech Filter Housings
4 Pages
 Biotech Steam Filters
2 Pages
 Defender Fiber Gas Filters
2 Pages
 Static flow controller sfc
2 Pages
 Diffusers
4 Pages
 Flow Restrictors
4 Pages
 GasketFilters
2 Pages
 IGS Filters & Restrictors
8 Pages
 PENTA® Nickel Gas Filters
8 Pages
 POU Filters
4 Pages
 Sentry Nickel Gas Filters
2 Pages
 Utility & Bulk Filters
4 Pages
 Catalyst Recovery Filters
8 Pages
 Lab Testing Filters
8 Pages
 Process Systems Overview
12 Pages
 Inertial Gas Sampling Filters
12 Pages
 Air Film Rolls
8 Pages
 Flame Arrestors
2 Pages
 Polymer PolyPak Filters
1 Page
 Biotech Applications
1 Page
 Porous Metal Solutions
8 Pages
 GasShield® Diffuser
4 Pages
 High Purity Products
2 Pages
 Mott HyPulse® LSI Filters
2 Pages
 Filter Elements Brochure
12 Pages
 Steam Filters
2 Pages
 Corporate Overview
8 Pages
 Series 6610
1 Page
 Fiber metal gas filtration
8 Pages
 Porous metal solutions
16 Pages
 Porous metal filter elements
12 Pages
 Mott Corporation Spargers
8 Pages


- Liebherr piping
- Liebherr liquid filter
- Liebherr pipe
- Liebherr filter cartridge
- Heat exchanger unit
- Industrial use filter
- Liebherr stainless steel filter
- Industrial filter cartridge
- Liebherr fine filter cartridge
- Filtration unit
- Additive manufacturing machine
- Water filter cartridge
- Plastic filter cartridge
- General purpose filter cartridge
- Industrial 3D printer
- VOC-free liquid filtration unit
- Liebherr gas filter
- Stainless steel heat exchanger
- Process filter
- Industrial heat exchanger