SELF-LEVELING ROTATING LASER
1 /20Pages

SELF-LEVELING ROTATING LASER
1 /20Pages
Catalog excerpts

LASER AUTOLIVELLANTE ROTANTE SELF-LEVELING ROTATING LASER LASER ROTATIF AUTO-NIVELANT SELBSTNIVELLIERENDER ROTATIONSLASER LÁSER AUTO-NIVELANTE
Open the catalog to page 1
MODULO LASER LASER MODULE MODULE LASER LASERMODUL MODULO LÁSER TASTIERA COMANDI KEYBOARD CONTROLS COMMANDES DE CLAVIER TASTATURSTEUERUNG TECLADO COMANDOS FINESTRA DEL LASER LASER WINDOW FENÊTRE LASER LASERFENSTER VENTANA DEL LÁSER IMPUGNATURE HANDLES POIGNEES GRIFFE EMPUÑADUR
Open the catalog to page 2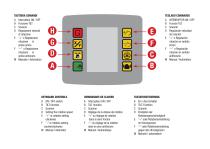
TASTIERA COMANDI A Interruttore ON / OFF B Funzione TILT C Scanner D Regolazione velocità di rotazione E “+” o Regolazione rotazione in senso orario F “–” o Regolazione rotazione in senso antiorario M Manuale / Automatico KEYBOARD CONTROLS A ON / OFF switch B TILT function C Scanner D Setting the rotation speed E “+” or rotation setting clockwise F “-” or rotation setting counterclockwise M Manual / Automatic COMMANDES DE CLAVIER A Interrupteur ON / OFF B TILT fonction C Scanner D Réglage de la vitesse de rotation E “+” ou réglage de rotation dans le sens horaire F “-” ou réglage de la rotation...
Open the catalog to page 3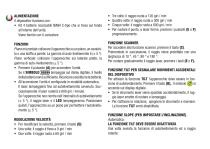
ALIMENTAZIONE Il dispositivo funziona con: • Kit 4 batterie ricaricabili NiMH C-tipo che si trova sul fondo all’interno dell’unità. Viene fornito con il caricatore. FUNZIONI Piano orizzontale: collocare il apparecchio su un piano, un cavaletto o una staffa a parete. La gamma di auto-livellamento è (± 5 °). Piano verticale: collocare l’apparecchio sul laterale piatto, la gamma di auto-livellamento (± 5 °). • Premere il pulsante (A) per accendere l’unità. Se il SIMBOLO lampeggia sul dislay digitale, il livello della batteria non è sufficiente. Ricaricare o sostituire le batterie. • All’accensione...
Open the catalog to page 4
• Premere il tasto CAL (H) • Sul display appaiono X e Y ed “X” lampeggia sul display • premere i tasti “+” e “–” per impostare il valore in percentuale dell’inclinazione lungo l’asse X (indicata sul coperchio dell’apparecchio) • premere il tasto “X/Y” (G): lampeggia “Y” sul display • premere i tasti “+” e “–” per impostare il valore in percentuale dell’inclinazione lungo l’asse Y (indicata sul coperchio dell’apparecchio) • premere nuovamente il tasto “X/Y” (G) per confermare i dati La rotazione si arresta e lo strumento si posiziona ai valori impostati. Riparte la rotazione utilizzando le impostazioni...
Open the catalog to page 5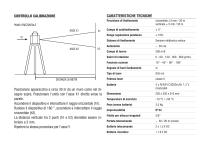
CONTROLLO CALIBRAZIONE CARATTERISTICHE TECNICHE PIANO ORIZZONTALE Range regolazione pendenza Sensore elettronico veloce Funzione scanner Segnale di fuori livellamento Posizionare apparecchio a circa 30 m da un muro come nel disegno sopra. Posizionare l’unità con l’asse X1 diretto verso la parete. Accendere il dispositivo e intercettare il raggio orizzontale (h1). Ruotare il dispositivo di 180 °, accendere e intercettare il raggio orizzontale (h2). La distanza verticale tra 2 punti (h1 e h2) dovrebbe essere inferiore a 3 mm. Ripetere la stessa procedura per l’asse Y. Potenza laser Peso (senza...
Open the catalog to page 6
POWER SUPPLY The device works with: • 4 rechargeable NiMH C-cell batteries located on the bottom of the unit. Comes with the charger. FEATURES Horizontal plane: Place the instrument on a floor, tripod, or wall mount. The self-leveling range is ± 5 °. Vertical plane: Place the device on the flat side, the self-leveling range is ± 5 °. • Press the (A) button to turn on the unit. If the SYMBOL flashes on the digital display, the battery level is not sufficient. Recharge or replace the batteries. • When turned on, the device is set to automatic mode. The laser will flash until self-leveling. Thereafter,...
Open the catalog to page 7
inclination on the X axis (indicated on the cover of the unit) • Press the “X / Y” (G) key: “Y” flashes on the display • Press the “+” and “-” buttons to adjust the percentage of the incline on the Y axis (indicated on the cover of the unit) • Press the “X / Y” (G) key again to confirm the data The rotation stops and the instrument is set to the defined values. The rotation starts again using the date settings To change the setting data, press the CAL (H) key twice and repeat the procedure. • To return to the auto-leveling position at 0 rpm, turn the instrument off and on again SLOPE FUNCTION...
Open the catalog to page 8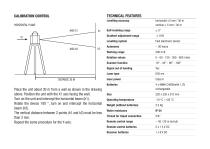
CALIBRATION CONTROL TECHNICAL FEATURES HORIZONTAL PLANE Levelling accuracy Self-levelling range Gradient adjustment range Laser type Place the unit about 30 m from a wall as shown in the drawing above. Position the unit with the X1 axis facing the wall. Turn on the unit and intercept the horizontal beam (h1). Rotate the device 180 °, turn on and intercept the horizontal beam (h2). The vertical distance between 2 points (h1 and h2) must be less than 3 mm. Repeat the same procedure for the Y-axis. Working range Scanner function Fast electronic sensor Rotation values Levelling system laser power...
Open the catalog to page 9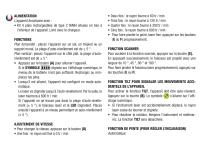
ALIMENTATION L’appareil fonctionne avec : • Kit 4 piles rechargeables de type C NiMH situées en bas à l’intérieur de l’appareil. Livré avec le chargeur. FONCTIONS Plan horizontal : placez l’appareil sur un sol, un trépied ou un support mural. La plage d’auto-nivellement est de ± 5 °. Plan vertical : placez l’appareil sur le côté plat, la plage d’autonivellement est de ± 5 °. • Appuyez sur le bouton (A) pour allumer l’appareil. Si le SYMBOLE clignote sur l’affichage numérique, le niveau de la batterie n’est pas suffisant. Rechargez ou remplacez les piles. • Lorsqu’il est allumé, l’appareil est...
Open the catalog to page 10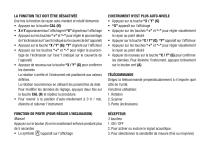
LA FONCTION TILT DOIT ÊTRE DÉSACTIVÉE Une fois la fonction de rayon auto-nivelant et rotatif démarrée: • Appuyez sur la touche CAL (H) • X et Y apparaissent sur l’affichage et “X” clignote sur l’affichage • Appuyez sur les touches “+” et “-” pour régler le pourcentage de l’inclinaison sur l’axe X (indiqué sur le couvercle de l’appareil) • Appuyez sur la touche “X / Y” (G): “Y” clignote sur l’afficheur • Appuyez sur les touches “+” et “-” pour régler le pourcentage de l’inclinaison sur l’axe Y (indiqué sur le couvercle de l’appareil) • Appuyez de nouveau sur la touche “X / Y” (G) pour confirmer...
Open the catalog to page 11All Metrica catalogs and technical brochures
 10008
100082 Pages
 10009
100092 Pages
 10002 SP
2 Pages
 volantino laser rotativi
8 Pages
 61190
6119080 Pages
 GENERAL CATALOGUE
274 Pages
 CALIBRO DIGITALE
2 Pages
- Digital imager
- Industrial camera module
- Infrared imager
- Indentation hardness tester
- Digital pyrometer
- Thermographic camera
- Tilt sensor
- °C thermometer
- IR pyrometer
- Thickness gauge
- Portable thickness gauge
- Digital inclination sensor
- Micrometer
- 2-axis tilt sensor
- Digital counter
- Analog indicator
- Portable hardness tester
- Moisture meter
- Caliper
- Lightweight imager