DIY Sensor Profiles
1 /13Pages

DIY Sensor Profiles
1 /13Pages
Catalog excerpts

Polymer Electric Product information DIY Sensor Profiles GmbH & Co. KG Polymer Electric Örlinger Straße 1–3 89073 Ulm GERMANY Tel.: +49 731 2061-0 Fax: +49 731 2061-222 e-mail: [email protected] Internet: www.mayser.com
Open the catalog to page 1
Important information Read through the product information carefully. It contains important information on operation, safety and maintenance of the product. Retain the product information for later reference. Always observe the safety instructions on the following pages under ATTENTION. Only use the product for the purpose described in the product information. © Mayser Ulm 2013 Subject to technical modifications.
Open the catalog to page 2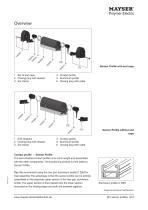
Sensor Profile with end caps 1 Set of end caps 2 Closing plug with resistor 3 Ear clamp 4 Contact profile 5 Aluminium profile 6 Closing plug with cable Sensor Profile without end caps 1 End stoppers 2 Closing plug with resistor 3 Ear clamp 4 Contact profile 5 Aluminium profile 6 Closing plug with cable Contact profile – Sensor Profile The semi-finished contact profile (4) is cut to length and assembled with the other components. The functioning product is then called a Sensor Profile. Tip: We recommend using the two-part aluminium profile C 25M for final assembly. The advantage is that the sensor...
Open the catalog to page 3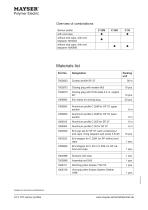
Overview of combinations Sensor profile with end caps without end caps, with end stoppers 1001223 without end caps, with end stoppers 1000606 Materials list Part No. Closing plug with resistor 8k2 Closing plug with PUR cable 2.5 m, angled 90° Ear clamp for closing plug Aluminium profile C 25M for SP 37, upper section Aluminium profile C 25M for SP 37, lower section End cap set for SP 37: each containing 2 end caps, fixing stoppers and screw 3.5×25 End stopper for C 25M, for SP without end caps End stopper for C 25 or C 25S, for SP without end caps Scissors with stop Notching pliers Knipex 7742115...
Open the catalog to page 4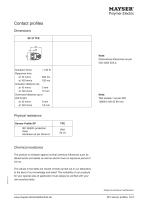
Contact profiles Dimensions SP 37 TPE Note: Dimensional tolerances as per ISO 3302 E2/L2. Actuation force: < 150 N Response time at 10 mm/s 500 ms at 100 mm/s 120 ms Actuation distance (A) at 10 mm/s 5 mm at 100 mm/s 12 mm Overtravel distance up to 250 N (B1) at 10 mm/s 9 mm at 100 mm/s 1.8 mm Actuation force: < 150 N Response time at 10 mm/s xx ms at 100 mm/s xx ms Actuation distance (A) at 10 mm/s X mm at 100 mm/s X mm Overtravel distance up to 250 N (B1) at 10 mm/s X mm at 100 mm/s X mm Note: Test sample 1 as per ISO 13856-2 with Ø 80 mm. Physical resistance Sensor Profile SP IEC 60529: protection...
Open the catalog to page 5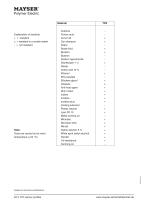
Explanation of symbols: + = resistant ± = resistant to a certain extent - = not resistant Note: Tests are carried out at room temperature (+23 °C). Acetone Formic acid Armor All Car shampoo Petrol Brake fluid Buraton Butanol Sodium hypochlorite Disinfectant 1 % Diesel Acetic acid 10 % Ethanol Ethyl acetate Ethylene glycol Greases Anti-frost agent Skin cream Icidine Incidine Incidine plus Cooling lubricant Plastic cleaner Lyso FD 10 Metal working oil Microbac Microbac forte Minutil Saline solution 5 % White spirit (ethyl alcohol) Terralin UV-resistance Centring oil Subject to technical modifications....
Open the catalog to page 6
Effective actuation area The parameters X, Y, Z, LNE and the angle α describe the effective actuation area. For the effective actuation area, the following applies: LWB = LSP - 2× LNE Parameters: LWB = effective actuation length LSP = total length of sensor profile LNE = non-sensitive length at end of sensor profile α = effective actuation angle Subject to technical modifications.
Open the catalog to page 7
DIY in 5 steps These instructions describe how to cut the contact profile to length, insert and clamp the closing plug, fit the end caps and subsequently check and test the assembly. The final product is a sensor profile SP 37 with degree of protection IP67. 1. Cutting to length • Measure and mark required length of contact profile (CP). The following applies: LCP = LSP - 16 mm (without end caps) Or: LCP = LSP - 20 mm (with 2 end caps) where: LCP = length of contact profile LSP = length of sensor profile • Cut off contact profile at marking with scissors (1004988) 2. Insertion • Cut into the...
Open the catalog to page 8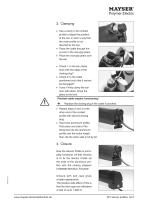
3. Clamping • Use a cavity in the contact profile to adjust the position of the ear, in such a way that the outer profile is not disorted by the ear. • Place the cable through the cut-out in the vice-grip pliers. • Place the vice-grip pliers over the ear. • Check 1: Is the ear clamp flush with the edge of the closing plug? • Check 2: Is the cable positioned such that it cannot be damaged? • If yes: Firmly clamp the ear shut with pliers. Close the pliers to the limit. Pinched cable impairs functioning! ÄÄ Replace the closing plug if the cable is pinched. • Repeat steps 2 and 3 at the other end...
Open the catalog to page 9
• Press the fixing stoppers as far as they will go into the aluminium profile. Tip: Squeeze the Sensor Profile together so that the foot makes room for the fixing stoppers. Case A: lateral exit cable. • Pull cable through the desired cut-out. Case B: 90° cable exit. • First loosely position end cap.. • Place cable into channel provided. • Slide end cap on completely, press against aluminium profile and screw in place with self-tapping screw in fixing stopper. • Close the other end of the sensor profile in the same way with the second end cap. 5. Check • Check visually that the end caps or closing...
Open the catalog to page 10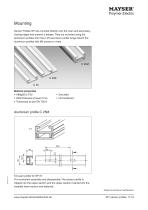
Mounting Sensor Profiles SP are mounted directly onto the main and secondary closing edges that present a danger. They are mounted using the aluminium profiles from the C 25 aluminium profile range. Mount the aluminium profiles with M5 screws or rivets. Material properties • AlMgSi0.5 F22 • Wall thickness at least 2 mm • Tolerances as per EN 755-9 Two-part profile for SP 37: For convenient assembly and disassembly. The sensor profile is clipped into the upper section and the upper section inserted into the installed lower section and fastened. Subject to technical modifications.
Open the catalog to page 11All Mayser catalogs and technical brochures
 Public transport
9 Pages
 Commercial Vehicles
7 Pages
 Industry Brochure
16 Pages
 Product catalog
268 Pages
 Seat occupancy Sensor SBS
4 Pages
 DIY SE 1 TPE spring contact
4 Pages
 Safety shoe
4 Pages
 Consensus with ISO 13849-1
6 Pages
 RailFR: Sensor, cable
11 Pages
 Automotive Brochure
11 Pages


Archived catalogs
 Aviation brochure
9 Pages
 Ultrasonic sensors brochure
5 Pages
 Signal Transmission System
3 Pages
 Safety Mats SM
20 Pages
 Safety Mat SM11
13 Pages
 Control Units
3 Pages
 Miniature Safety Edges
31 Pages
 Safety Bumper
10 Pages
 Safety Edges
34 Pages
 Ultrasonic Industrial Sensor
12 Pages
 Safety Bumpers
10 Pages
 Transmission Systems WLS
3 Pages
