- Catalogs
- Matrox Video
- Matrox® LUMA Series™
Matrox® LUMA Series™
1 /37Pages

Matrox® LUMA Series™
1 /37Pages
Catalog excerpts
Matrox LUMA Series – User Guide
Open the catalog to page 2
Matrox LUMA Series – User Gui
Open the catalog to page 3
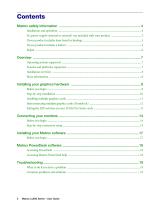
Matrox safety information To ensure safe and reliable operation of your Matrox product, to avoid personal injury, and to prevent damage to your computer or Matrox hardware, read the following guidelines. Read and retain all instructions. Only use your Matrox product according to the instructions, operating ranges, and guidelines provided in the Matrox user guide and other related Matrox documentation. Failure to follow these instructions could result in damage to your product or injury to the user or installer. Don’t expose your Matrox product to rain, water, condensation, or moisture. Caution:...
Open the catalog to page 4
If a power supply (internal or external) was included with your product Don’t place the external power supply directly on top of the device. Only use power supplies originally supplied with the product or use a replacement that’s approved by Matrox. Don’t use the power supply if it appears to be defective or has a damaged chassis. Any AC-powered product must be connected to a grounded outlet installed by a licensed electrician. Don’t defeat the safety purpose of the polarized or grounding-type plug. A polarized plug has two blades with one wider than the other. A grounding-type plug has two...
Open the catalog to page 5
Don’t attempt to open or repair a power supply unit (if one was supplied). Don’t attempt to open or repair your Matrox product. If there’s a fault with your Matrox product, review your Matrox warranty for more information. Matrox LUMA Series –
Open the catalog to page 6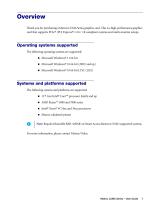
Overview Thank you for purchasing a Matrox LUMA Series graphics card. This is a high-performance graphics card that supports PCIe® (PCI Express®) ×16 / ×8 compliant systems and multi-monitor setups. Operating systems supported The following operating systems are supported: Microsoft Windows® 10 64-bit LTSC (2021) Systems and platforms supported The following systems and platforms are supported: 11th Gen Intel® Core™ processor family and up Intel® Xeon® W 24xx and 34xx processors Matrox validated systems Note: Requires Resizable BAR (reBAR) or Smart Access Memory (SAM) supported systems. For...
Open the catalog to page 7
Installation overview Note: If your Matrox Video product is already partially or fully installed on your computer, some or all the installation information in this guide may not apply to you. However, this information may be useful if you need to reinstall your Matrox Video product. To install your Matrox Video product: 1 Install your Matrox Video graphics hardware – see page 9. Connect your monitors – see page 14. Install your Matrox Video software – see page 17. More information Your Matrox Video user guide provides information on installing and using your Matrox Video hardware. For information...
Open the catalog to page 8
Installing your graphics hardware This section describes how to install your Matrox card. For information specific to your computer, like how to remove its cover, see your system manual. Before you begin To avoid personal injury and to prevent damage to your computer or Matrox hardware, read the following guidelines before installing your Matrox graphics hardware. Preventing damage to your graphics hardware Always turn off your computer, unplug it, then wait for it to cool before touching any of the internal parts of your computer or installing your Matrox product. While your computer is turned...
Open the catalog to page 9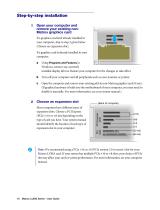
Open your computer and remove your existing nonMatrox graphics card If a graphics card isn’t already installed in your computer, skip to step 2 given below (Choose an expansion slot). If a graphics card is already installed in your computer: Using Programs and Features in Windows, remove any currently installed display drivers. Restart your computer for the changes to take effect. Turn off your computer and all peripherals such as your monitor or printer. Open the computer and remove your existing add-in non-Matrox graphics card (if any). (If graphics hardware is built into the motherboard of...
Open the catalog to page 10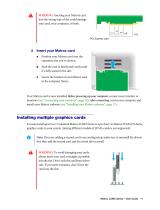
WARNING: Inserting your Matrox card into the wrong type of slot could damage your card, your computer, or both. ×1 ×4 ×8 Insert your Matrox card a Position your Matrox card over the expansion slot you’ve chosen. Push the card in firmly and evenly until it’s fully seated in the slot. Secure the bracket of your Matrox card to the computer frame. Your Matrox card is now installed. Before powering up your computer, connect your monitor or monitors (see “Connecting your monitors”, page 14). After connecting, restart your computer and install your Matrox software (see “Installing your Matrox software”,...
Open the catalog to page 11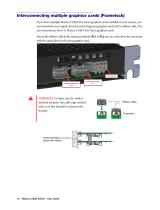
Interconnecting multiple graphics cards (Framelock) If you have multiple Matrox LUMA Pro Series graphics cards installed in your system, you can framelock your outputs by interconnecting your graphics cards with a ribbon cable. You can interconnect four (4) Matrox LUMA Pro Series graphics cards. Attach the ribbon cable to the connector labeled FL1 or FL2 on one card and to the connector with the same label on the next graphics card. WARNING: To make sure the cable is inserted properly, the cable edge marked with a red line should be closest to the bracket. Ribbon cable Interconnected cards with...
Open the catalog to page 12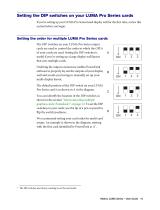
Setting the DIP switches on your LUMA Pro Series cards If you’re setting up your LUMA Pro Series based display wall for the first time, review this section before you begin. Setting the order for multiple LUMA Pro Series cards The DIP switches on your LUMA Pro Series output cards are used to control the order in which the GPUs of your cards are used. Setting the DIP switches is useful if you’re setting up a large display wall layout that uses multiple cards. Ordering the output connectors enables PowerDesk software to properly lay out the outputs of your display wall and avoids you having to...
Open the catalog to page 13
Connecting your monitors This section describes how to connect your monitors to your Matrox graphics hardware. Depending on your Matrox product, your connection setup changes (see “Step-by-step connection setup”, page 15). Before you begin To avoid possible problems that could damage your monitors or prevent you from using your Matrox product, read the following guidelines before connecting your Matrox graphics hardware. Your Matrox product supports the following adapters: Matrox A310 Series – Mini DisplayPort to DisplayPort Mini DisplayPort to VGA (active) Mini DisplayPort to HDMI* To get...
Open the catalog to page 14All Matrox Video catalogs and technical brochures
 Matrox M-Series™
2 Pages
 Matrox QuadHead2Go Q155
4 Pages
 Matrox ExtioTM Series
2 Pages
 Matrox® Extio™ 3 Series
8 Pages
 Matrox MaevexTM 5100 Series
4 Pages
 Matrox Maevex 6100 Series
8 Pages
 Superior AV OVER IP
4 Pages
 Matrox Monarch EDGE Series
7 Pages
 Matrox® Display Wall
33 Pages
 MATROX® DAISY CHAIN
4 Pages


- Management software solution
- Automation software solution
- Windows software
- Computer-aided design software
- Cloud-based software
- Control software
- Design software solution
- Industrial software
- Interface software
- Visualization software solution
- Development software
- Network software
- Test software
- Digital recorder
- Compact receiver
- Graphic software
- Serial receiver
- I/O card
- PCI Express graphics card